I’ve shared a few bathroom renovation snippets here and there since the beginning of January. However, now that we’re in the homestretch, I thought I put everything into one post for easy reference. I’ll be sharing some progress photos, as well as some of the snags we encountered along the way, along with some things to consider if you’re considering a bathroom renovation of your own!
This post contains affiliate links for your shopping convenience. Click here to read my full disclosure policy.
I continue to share daily updates on my Instagram Stories, as progress permits. I’ve saved all the videos and images since we started this journey the first week of January if you want to re-watch any of them. They are saved as a highlight bubble called “Bath Renos”. But today I thought I’d share some still images and explain a bit of the process so far!
Jack & Jill Bathroom Remodel Progress
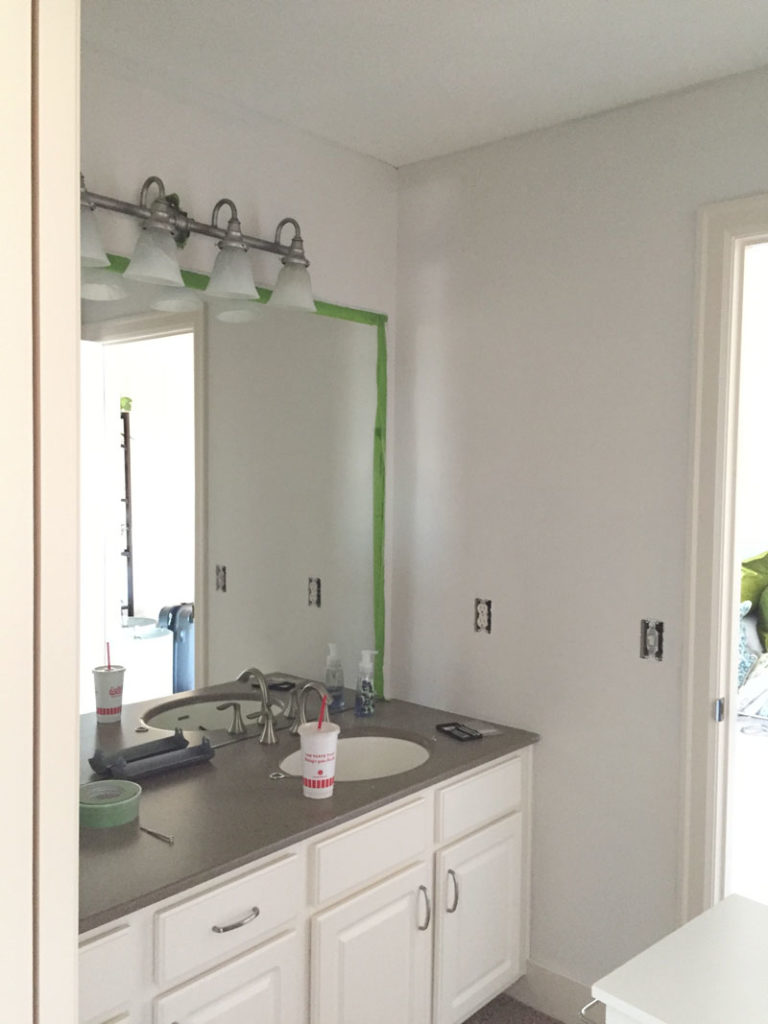
As reminder, here’s where we started on this journey in early January. Our Jack & Jill bathroom essentially looked like this shortly after we moved in and sat that way for the past eight years. I did one coat of paint, got bored and moved on thinking we’d tackle a full remodel much sooner!
And here was the view into the area with the shower and toilet.
And this is my design plan for the space. You can read more of the details about it here.
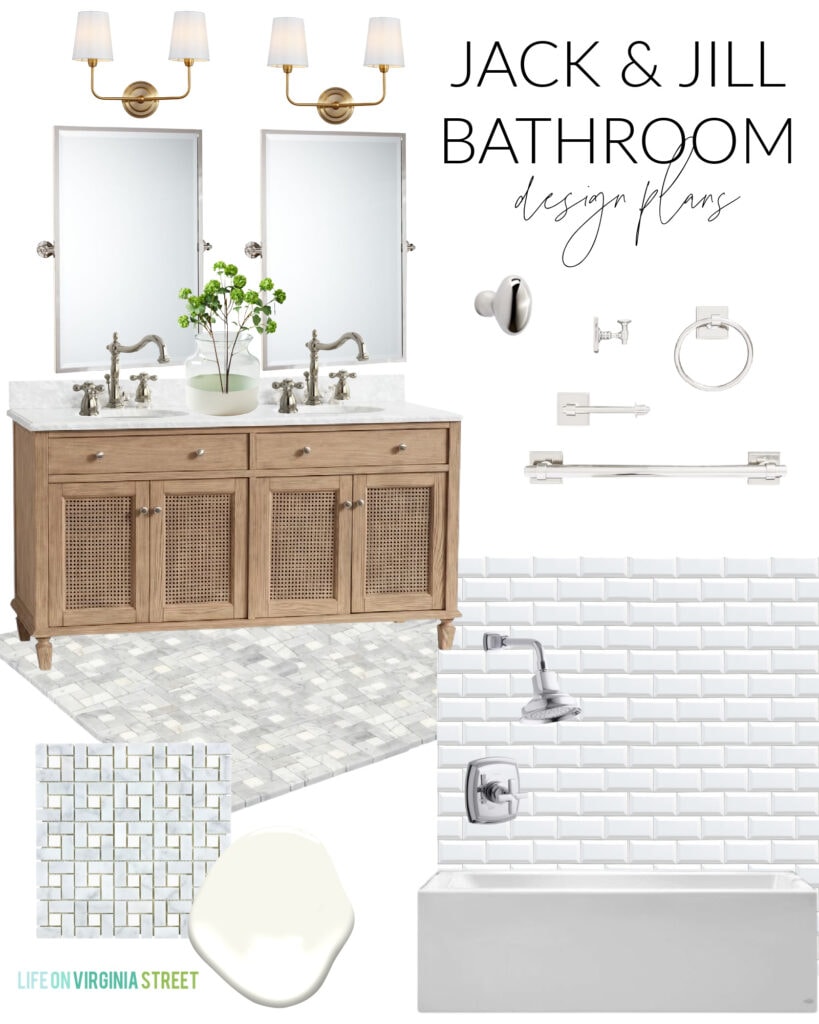
JACK & JILL BATHROOM DESIGN BOARD SOURCES: Vanity | Pivot Mirrors | Light Fixtures | Sink Faucets | Bath Accessories Set | Pinwheel Carrara Marble Floor Tile | Beveled Subway Tiles | Shower/Tub Fixtures | Bathtub | Paint Dipped Vase | Faux Viburnum Stems | Paint Color: Benjamin Moore Simply White
One of the biggest changes in this particular bathroom, was re-routed the off-centered sink line to make room for two sinks. The old plumbing was coming up from the floor rather than the wall. But since our new vanity was furniture style, a second line was added and they both had to come out of the wall. I’m just glad it was professionals doing it, and not us 😉 We also are going from one light fixture centered over the vanity to two fixtures centered over each mirror/sink.
And although you can’t necessarily tell in the photo above a small issue came up with the outlets. Previously, there was only an outlet on the right side of the vanity (the one shown above). However, since we were moving to two sinks, we wanted to add a second outlet to the left side. However, that’s where the pocket door is to the bedroom. So, we thought we’d move the one on the right to match the new outlet. Turns out, that’s where our cold air return is, and it’s against code to have an outlet in a cold air return. So… I basically made a game day decision and figured this wasn’t anything worth freaking out about. We’re just going to have outlets where they can go, rather than placed symmetrically. I honestly don’t think it will be that noticeable once the towel bars go up. And I’d rather have the extra power options for our guests. So, we’re going with it!
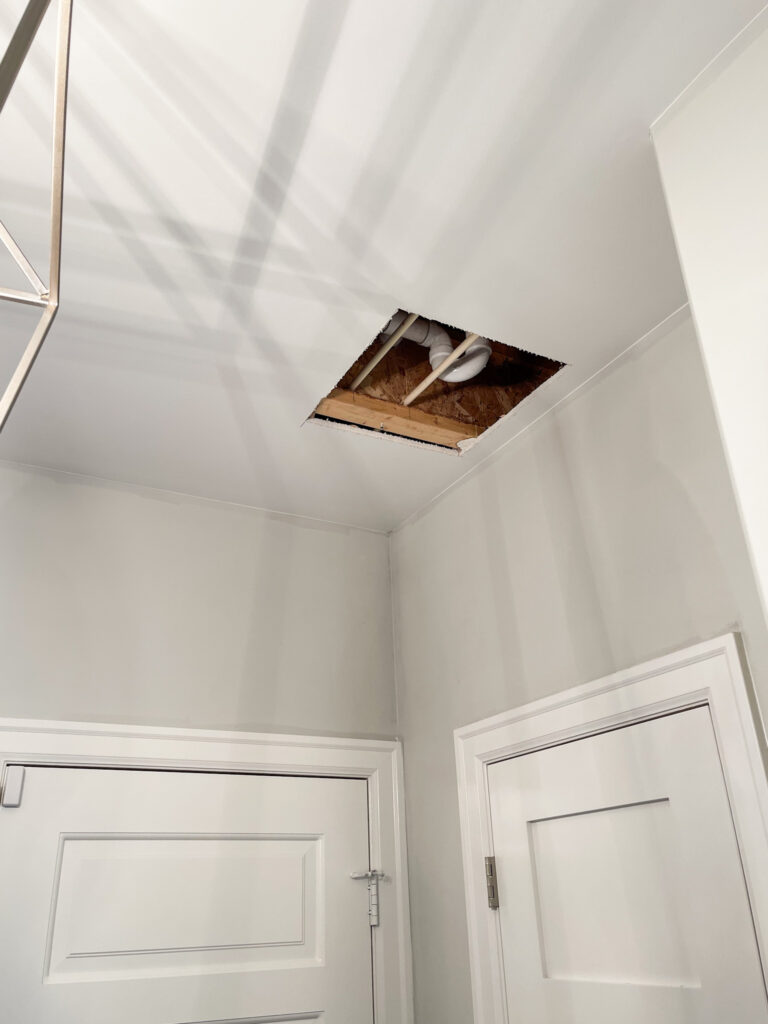
One thing I should mention that was a surprise to us. When you replace a bathtub in your home, they will have to cut a hole in the ceiling underneath it in order to attach the drain. It’s not a huge deal, but definitely something to be aware of! Thankfully ours was in the back corner of our mud room, so it really didn’t cause much disruption at all. And after the drywall guy repaired and mudded it, you can’t even see where the hole was!
It’s always fun to see all your finishes arrive and come together!
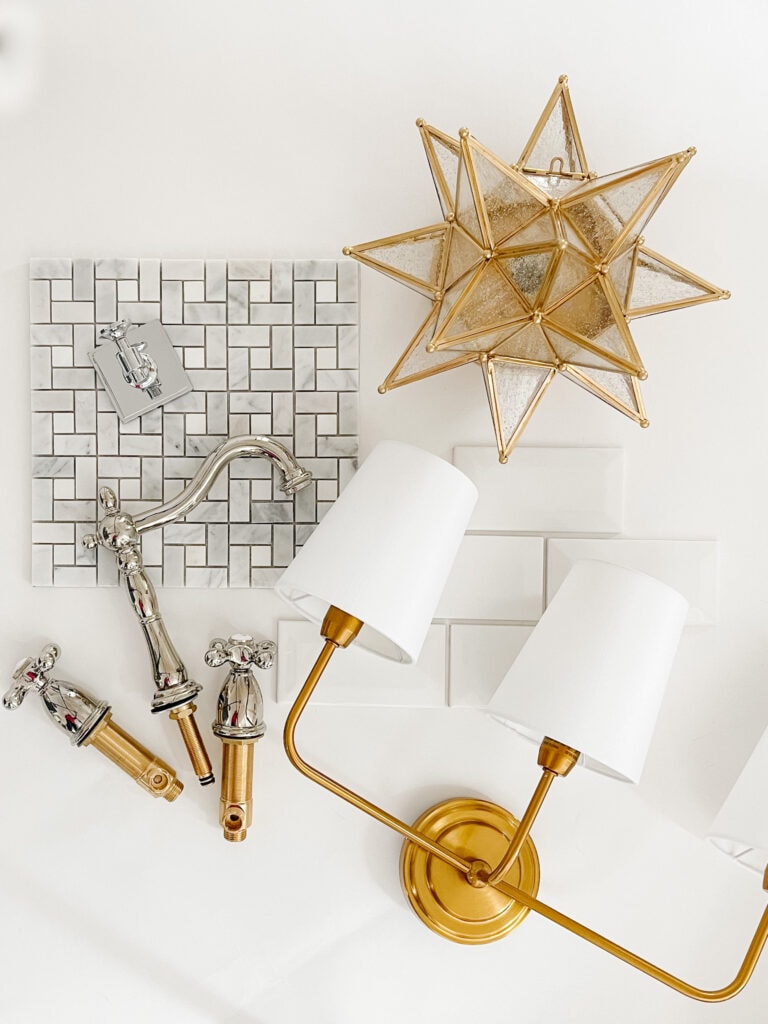
JACK & JILL BATHROOM DESIGN BOARD SOURCES: Vanity Light Fixtures | Star Light Fixture | Sink Faucets | Bath Accessories Set | Pinwheel Carrara Marble Floor Tile | Beveled Subway Tiles
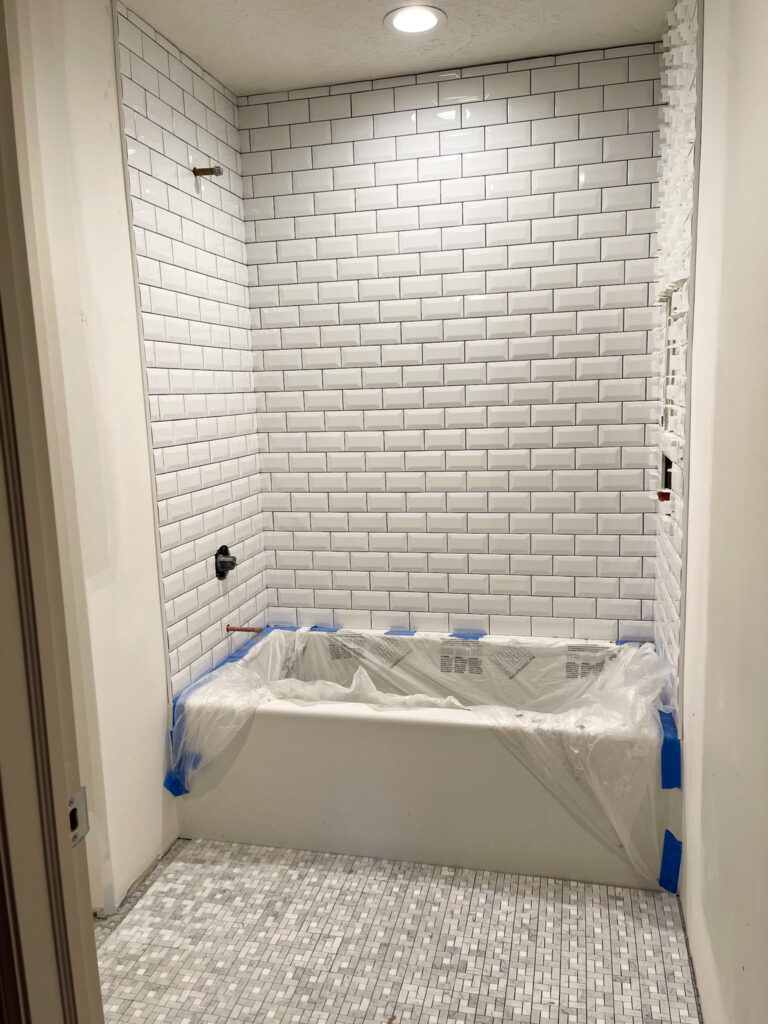
Keep in mind that until your grout is in, your tile is going to look very different than the final look so don’t panic if it’s not what you expected! Since I actually chose white grout for the subway tiles, I knew the final focus would be on the beveled tile and not the grout lines when all was said and done. We also had a can light added over the shower in case I opt to do a floor to ceiling curtain. It’s amazing how much brighter it already feels in here. And it’s crazy how much taller the room seems (we only have 8′ ceilings here) now that the tile is running to the ceiling!
I personally prefer low-contrast grout. So essentially, I try to match the tile as much as possible so it doesn’t look too light or too dark. For the tile walls, I chose Bright White.
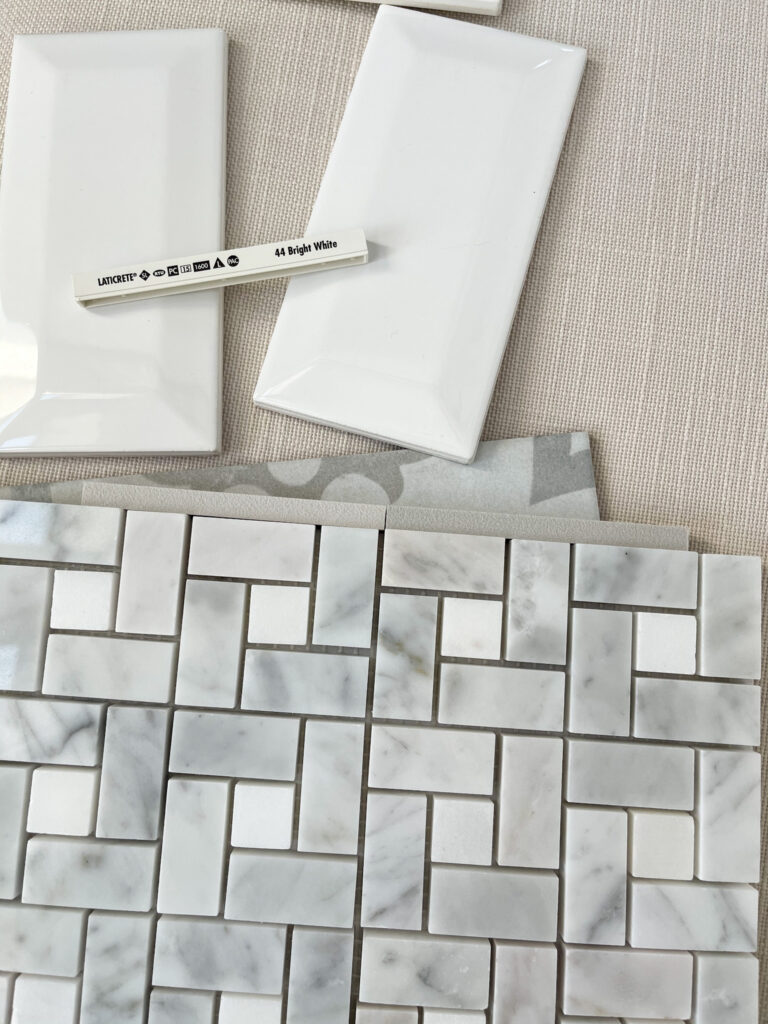
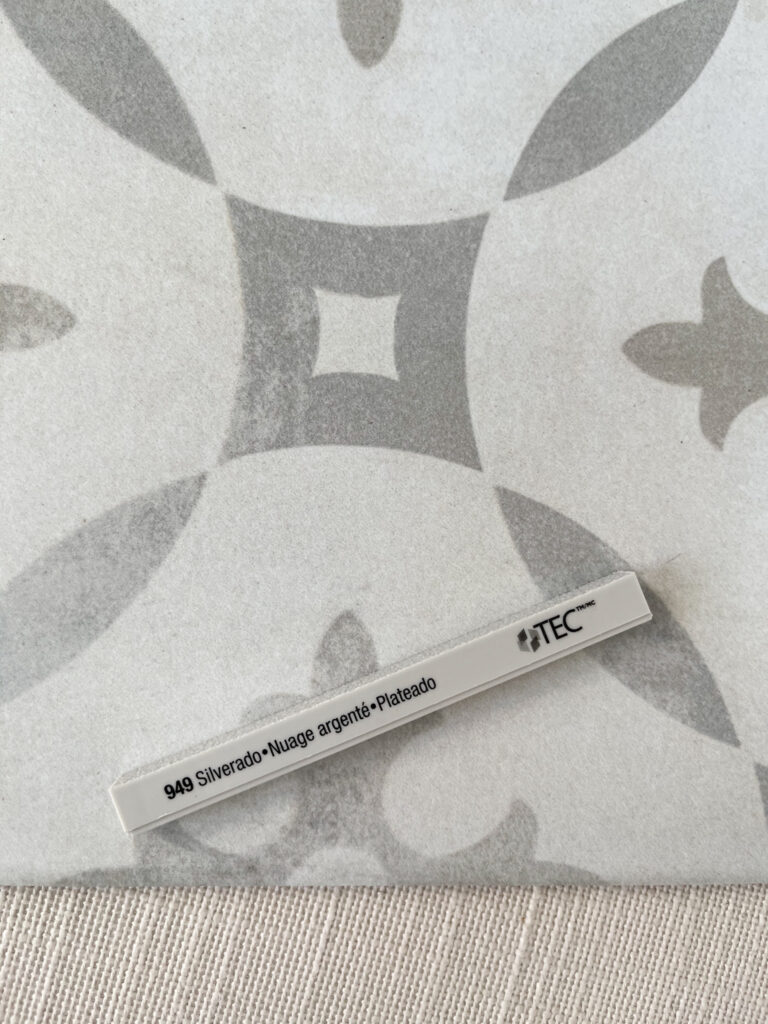
For the marble flooring, I considered two options, but ultimately chose Silverado. Since this tile could feel busy in a hurry if the contrast was too much (so many grout lines!), I wanted to pick the best mid-tone option to make the grout lines kind of fade away. I loved Sterling, but felt like it might be too warm, which is why we ultimately chose Silverado! I would recommend looking at your samples in good natural light but then also in the space where the tile and grout will ultimately reside. That will help you identify any undertones you may be trying to avoid.

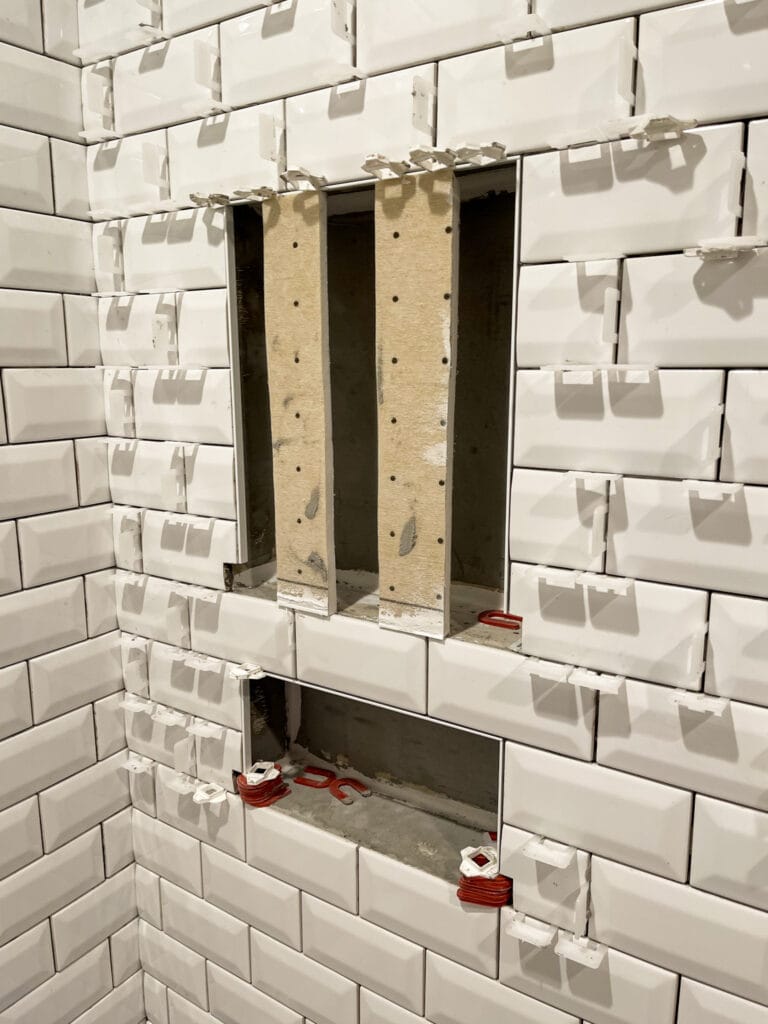
Here’s a little peek at the build-out of our niches. We had only planned on one, but our contractor recommended a second one below for smaller items such as razors and bar soap. We loved that idea! And they were so meticulous with the tile work that it was measured to allow for full rows of tile centered around the box.
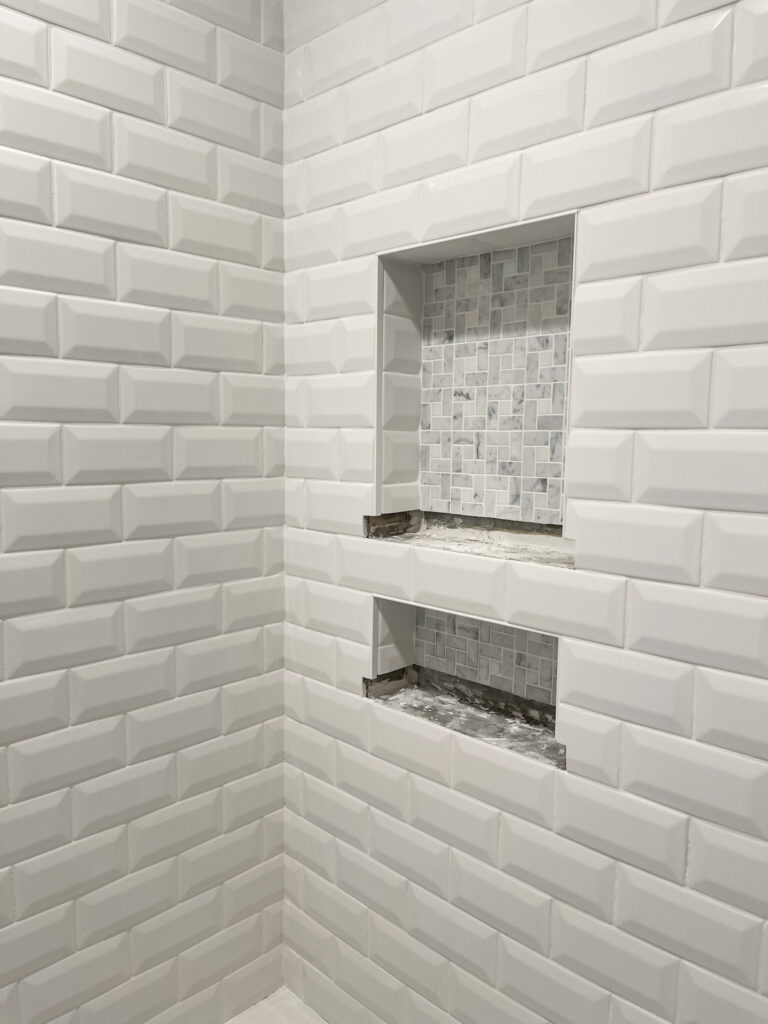
And here’s how the niche looks now! We’re just waiting on the solid surface ledges for each of the niches and then the shower will be 100% done! I don’t want to give too much away on the shower before the big reveal, so here’s a little sneak peek! See what I mean about the bevels really being the star now instead of the dark grout lines?! Love it!
The new baseboards were added to the room yesterday, so painting should start today or tomorrow!
Small Guest Bathroom Remodel Progress
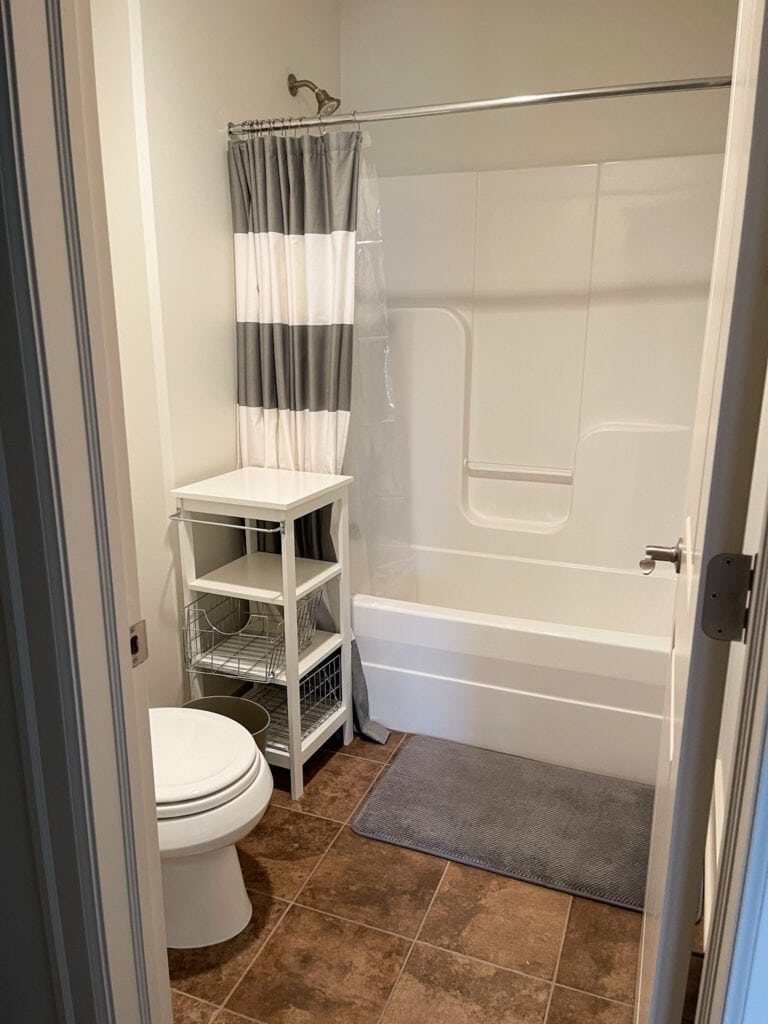
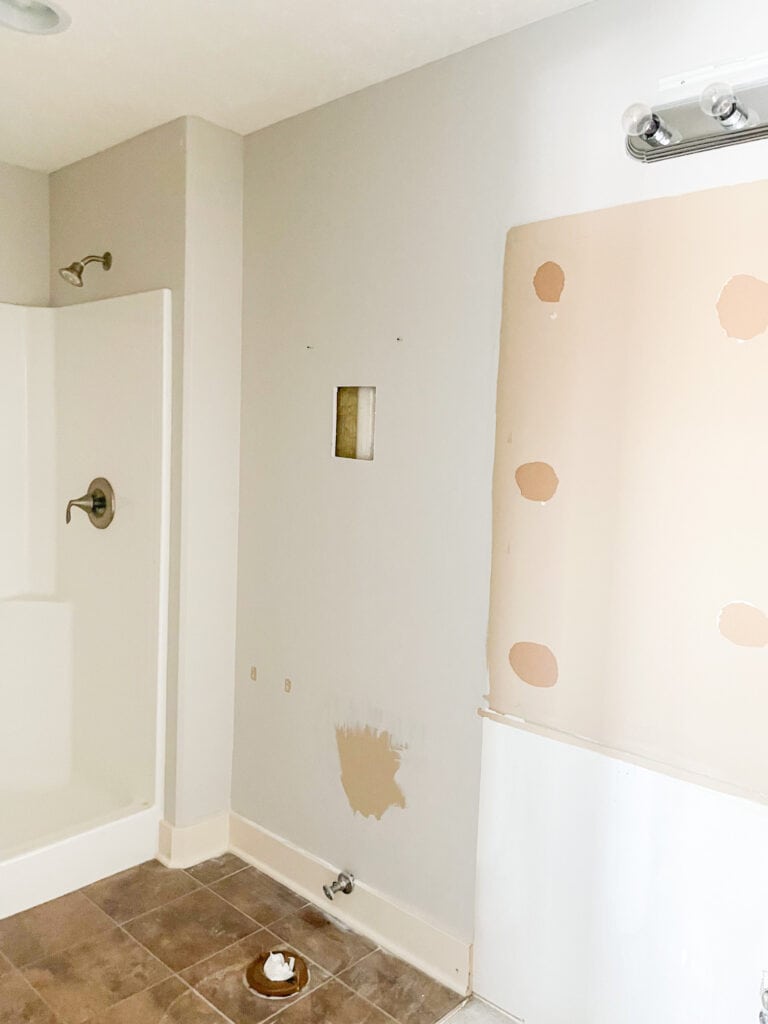
Our small guest bathroom was a semi last minute addition. Over the past year or so, Kurtis now uses this bathroom daily since it’s attached to his temporary home office. But, what we initially thought was super temporary will ultimately stretch into well over a year and possibly longer. So, we figured while we were in the midst of the other renovation, we’d rather just tackle both at once at be done with them forever. Here’s how the space looked shortly after we moved in.
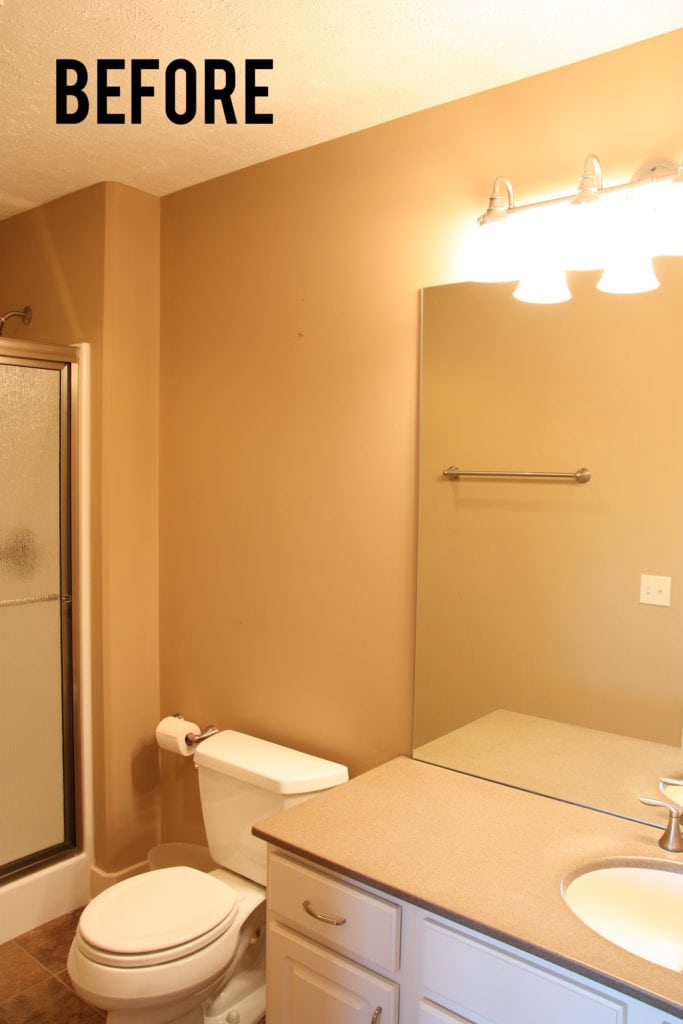
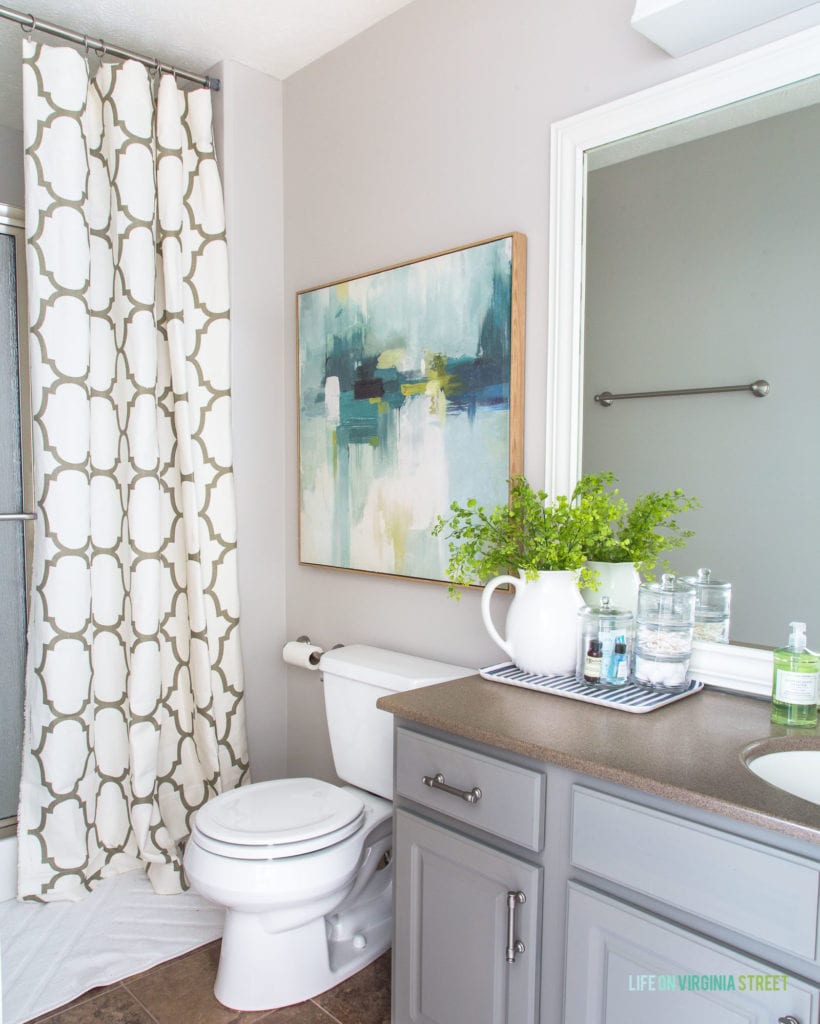
And here’s how it had looked for the past several years after several budget friendly makeovers that mostly included paint and us framing out the mirror.
And this is my design plan for the space. You can read more of the details about it here. Since this space technically looks out over our courtyard, I immediately wanted to add a window to bring in some natural light, and ultimately make this tight bathroom feel a bit bigger and more special!
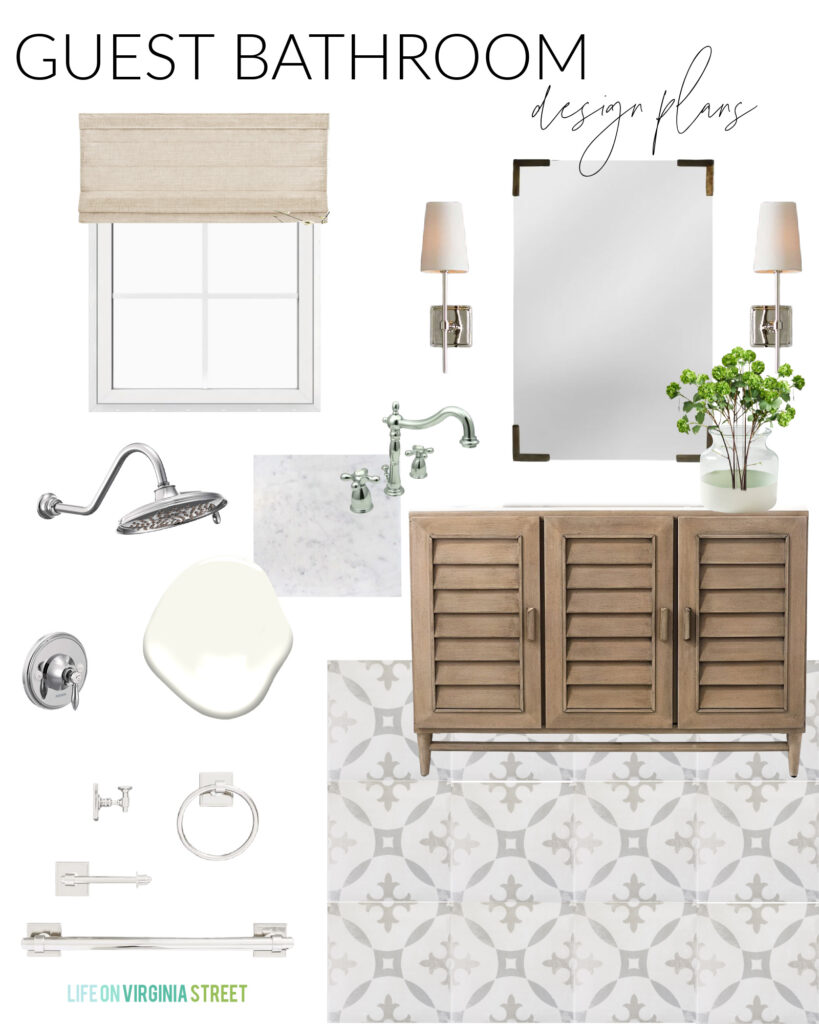
GUEST BEDROOM DESIGN PLAN SOURCES: Louvered Vanity | Mirror | Sconces | Sink Faucet | Shower Fixtures | Bath Accessories Set | Paint Dipped Vase | Faux Viburnum Stems | Cordless Roman Shade | Patterned Tile | Paint Color: Benjamin Moore Simply White
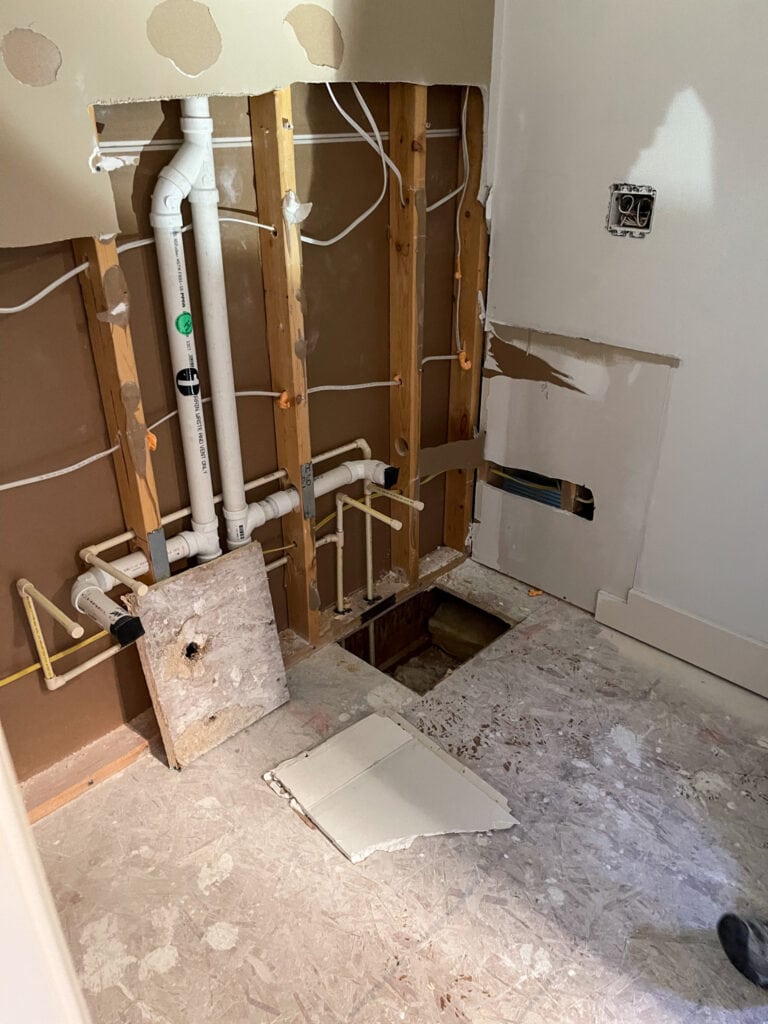
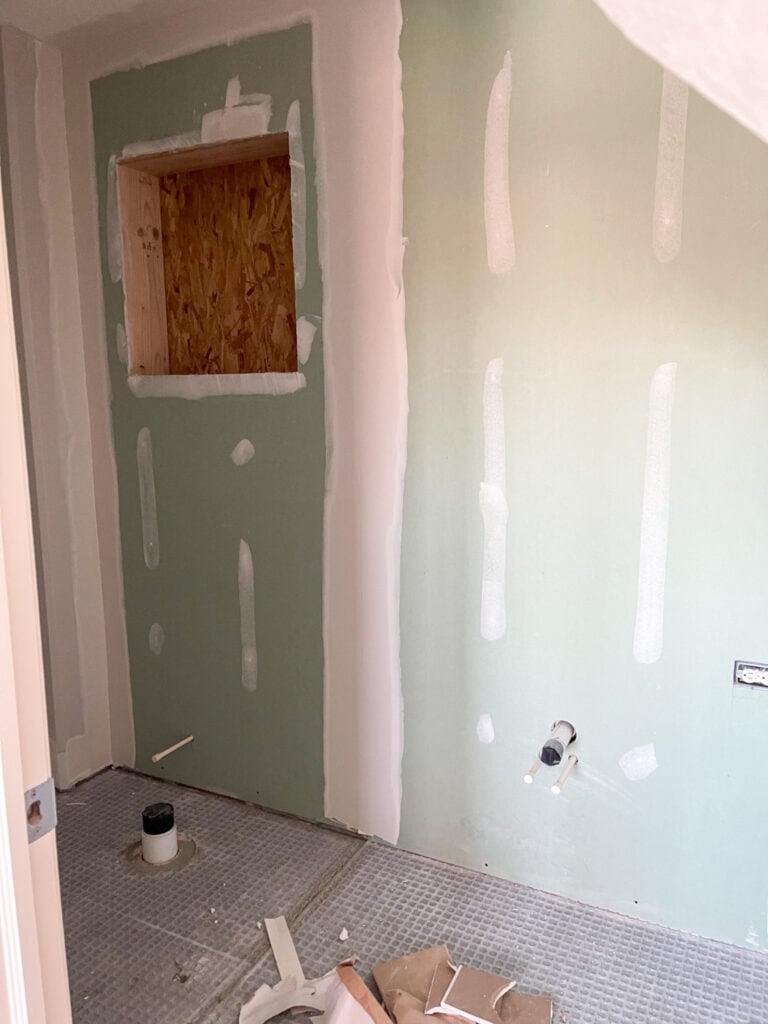
The biggest obstacle we initially encountered was finding the sewer gas vent going right through the area where we were hoping to place the window. We were basically told it was a no-go without a huge expense. I was super bummed out, since the window was half the reason we even moved forward with this bathroom. For a day or so, we just planned on no window. But Kurtis pushed me to ask more questions since he knew how much I was wanting the window (and I think he secretly did at that point, too). So I asked them to have the plumber provide a formal bid, and it turned out it wasn’t nearly as expensive as initially projected. We knew we’d never add it again down the road, so we decided to move forward with it.
You can see here just how much was involved to move it. Essentially the plumbers needed enough access to reroute that pipe (in lieu of it coming straight down from the top like it did before) and allow for the framing of the window. So, it required a little reframing and and cutting out the floor to move things a bit. It wasn’t anything difficult for them, but rather time consuming which is where the expense comes in. But needless to say, I’m so glad we did!

Since the pipe had to get moved, it also allowed us to better center the toilet under the window. For some reason, on the old floor plan, the toilet was squished up super close to the vanity which then required the toilet paper to be hung on the wall by the shower. You can see below we also had an outlet added behind the vanity at the perfect height to accommodate the drawer in our vanity that has outlets and USB plugs. Lots of precise measuring to take into account the floor height that doesn’t exist yet! Since our prior sink was off-centered, the plumbing had to be moved about a foot here, as well. We will also be going from one light fixture over the mirror to two sconces on each side of the mirror so wires had to be run accordingly for that.
Here are all the fixtures for this bathroom once they arrived. Although, we’re using the exact faucet below, I actually have it in a chrome finish for this bathroom (I used the polish nickel in this image). Since we opted not to replace the shower insert to save on costs, we had to stick with the same brand of shower fixtures we already had (Moen) so the valves wouldn’t have to be replaced. Turns out, Moen doesn’t make a polished nickel finish, so that kind of dictated chrome for the other finishes.
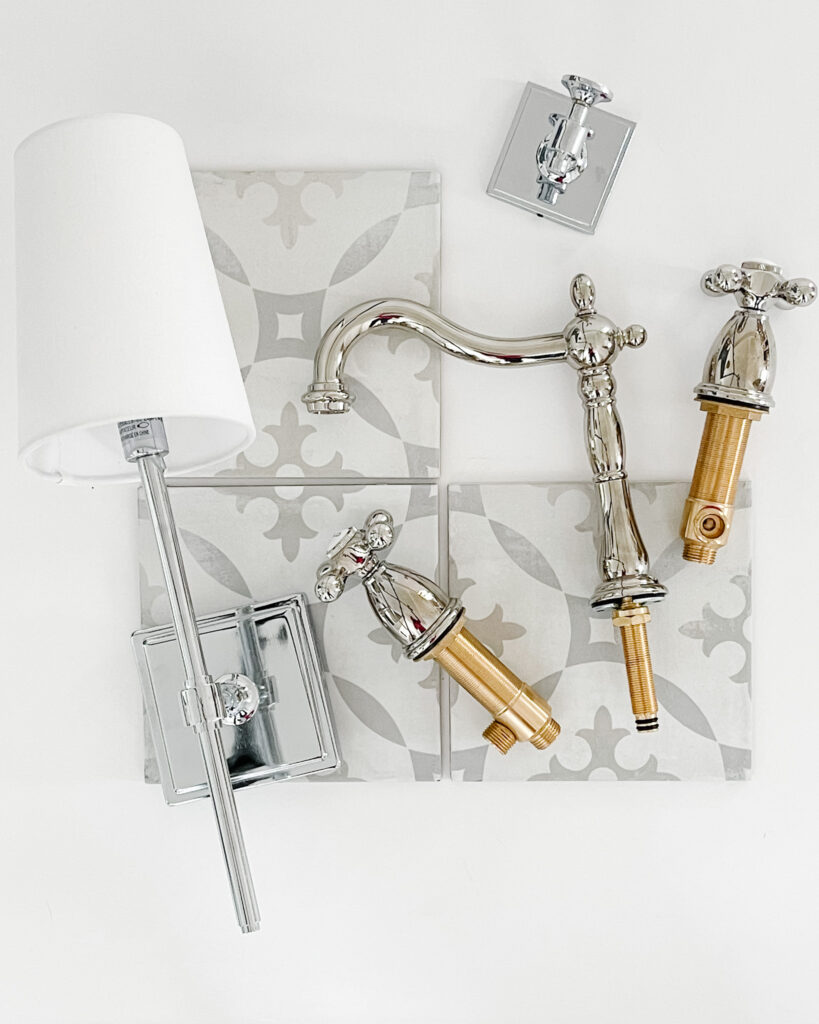
BATHROOM SOURCES: Sconce Light | Tile | Robe/Towel Hook | Faucet
For this tile, again, I was trying to avoid too much contrast. Although the tile is much different than the Carrara marble flooring in the other bathroom, the Silverado grout was the winner here as well!
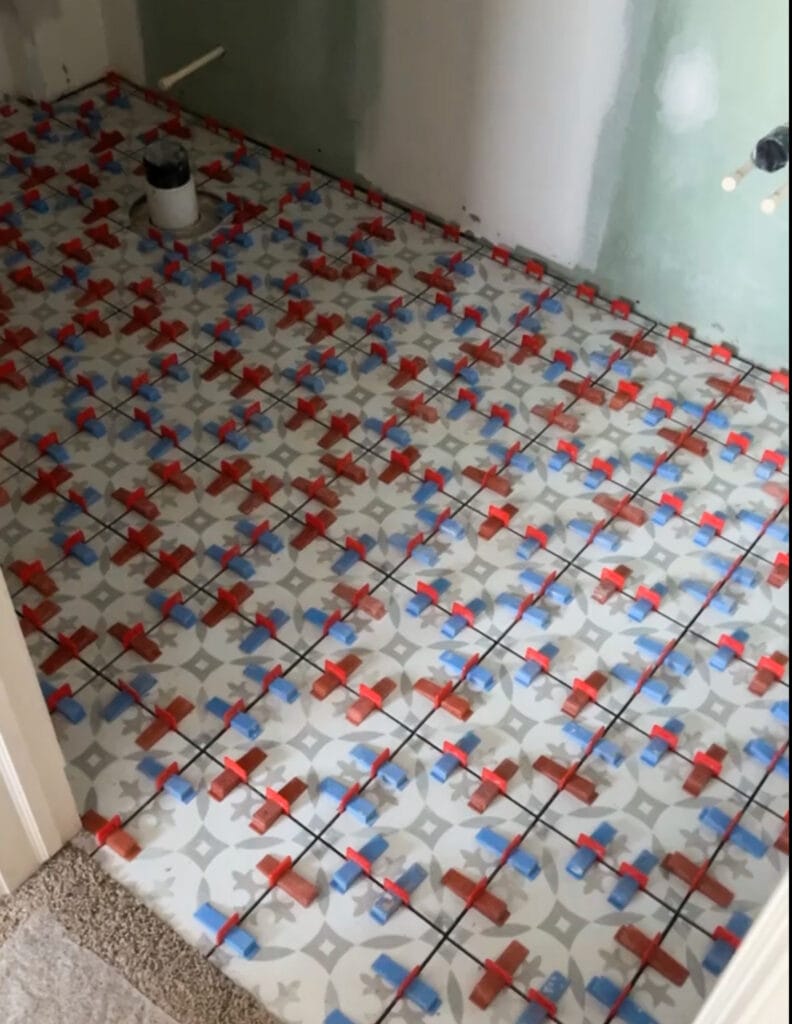
This is a screengrab from a video, but just look at all those glorious spacers! You can hardly even recognize the tile with them!
We went back and forth for a week or so on whether to do a frameless clipped hinge glass door or a new slider (that would work more like a barn door than traditional sliders). There are definitely pros and cons to each, so if you’re in the same boat, you have to decide what works best for you. Our opening is super tight (44″ total width with a 26″ door) but we ultimately decided on the door. We ended up swapping out the elongated toilet we originally had planned for a round bowl (which is what we had before) to ensure clearance. But after getting a ton of feedback on Instagram, we decided the door made the most sense for us. Here’s some of the most common feedback I received regarding both options:
- Shower doors are cleaner but drip water when you open them
- Shower sliders are hard to clean and dirt and grime get in the tracks
- Most people prefer the aesthetic of a shower door
- You need a lot more clearance for a shower door than you do a slider
- Several reports of shower door corners catching on legs when trying to open them
They were able to finish grouting the floor in this bathroom and add new baseboards yesterday and I love how it turned out! The painters will be starting in here today or tomorrow as well!
The biggest delays we’re facing right now will likely be with the arrival of the window and the shower door. The contractor has a photographer (my favorite, Mandy) scheduled on March 3rd, so I’m hoping to share both of the reveals the following week, assuming there aren’t any delays. Until then, I probably won’t be sharing too many looks into the spaces until the big reveals!
Things to Expect During a Bathroom Remodel
If you’re planning to tackle a bathroom remodel, I thought I’d share a few things we’ve learned along the way. The same could be true on most of these regardless of what type of renovation you’re doing.
- Do your research before selecting a contractor! We’re using Gitt Construction after talking to several other contractors. In January 2020, I had even considered just subbing all the work out myself, but could quickly tell it would be a nightmare when I could barely even get people to call me back for a bid. I had heard rave reviews about Gitt’s tilework, and that was a huge concern for me. If you don’t use spacers, I’m not going to hire you 😉 They also assured me about their process to keep the house as clean as possible, and even hire a cleaning crew for you when the work is all finished. It definitely helps to work with an end-to-end solution (they also have a showroom if you need help picking finishes). We’ve been really happy with them so far!
- We’ve come to realize that communication is just as big of a factor with who you hire as the actual work. If they can’t communicate well, there are going to be issues. I love that I get texts letting me know who will be arriving at what time each day if a new crew is coming in. If there are delays or a crew isn’t able to make it over that day, I don’t care – just tell me! If you say you’re going to have a bid to me by Friday but it’s going to take longer – that’s fine – just communicate it to me and set expectations! We’ve come to learn over the years that red flags early on in the communication process are ultimately going to lead to much bigger issues down the road. I also think it’s important to make yourself feel approachable. The crew is much more likely to ask questions on preferences along the way if they don’t feel like they’re annoying you every time they ask a question. I would much rather they ask preferences along the way than make assumptions that may or may not be right!
- Expect the unexpected. I’ve had a number of messages on Instagram about how calm I seem about everything. I think I’ve just learned over the years that you will encounter issues, regardless of how smoothly your renovation goes. Things as simple as outlet location, a finish color, delays, etc. So, it’s best to just plan on having a few kinks in the plans along the way and try and decide what are negotiables and what aren’t. For me, even when I was told the window wouldn’t work, I knew that was something I really wanted and would be the most disappointed about if it didn’t happen. So, when they tell you they “can’t” find out if they can’t for your current budget, if there are workarounds, or what some alternate options are. Once I started asking a lot more questions (I can be pretty persistent) 😉 I found what the issue was, and said I was willing to pay for the extra cost to make it happen. I knew I’d regret it immediately if I didn’t. Issues like outlet locations were no brainers and I agreed to whatever made the most sense, even if it wasn’t my original ask.
- I’ve yet to ever encounter a renovation that is finished even close to when you’re told it will be. Since I’ve come to expect that, it doesn’t bother me quite as much as it used to. But depending on the scope of your project, I’d add 1-2 weeks minimum to the timeline and then you’ll just be pleasantly surprised if they finish early 🙂 We even had a few snow days where the vans weren’t able to get here, so I’d always expect the unexpected so you’re not stressing about timelines!
- If you’re working from home, expect noise. Our crew themselves are very quiet. But saws, hammers, chiseling, etc. gets very loud. Invest in some sound cancelling headphones or identify a quiet place in your home where the noise won’t impact you as much.
- We’re fortunate that these are secondary bathrooms in our home. However, if you’re tackling your main bathroom(s), you seriously need to consider timing and how it’s going to impact your day to day life. We found this out quickly during the kitchen renovation. And just know that no matter what, there are going to be interruptions to your daily life and you’re going to have to work around them. Just keep in the back of your mind that it will be worth it in the end!
- I don’t care how great your crew is or how clean they are, you’re still going to get sick of people in your house all the time. And unfortunately, until all the work is done, it’s nearly impossible to stay on top of the dust and dirt that gets tracked all over. Our crew covered the adjoining bedrooms in plastic, but there is still dust and dirt everywhere from the construction and going in and out of the house constantly. If you have any furniture or other items you want to ensure are safe, I would move them as far as possible from the construction site and still cover them in plastic or a blanket. And please know that I am not saying any of this to complain, because that’s not the case at all. But I also want to share the “real” side of renovations. It’s not just the pretty “after” photos and it’s okay to experience some frustrations along the way!
Overall, this remodel project has gone fairly smoothly, so we’re definitely grateful for that! If any other questions come up about the process that I haven’t covered yet, feel free to let me know!
Additional Bathroom Inspiration
- Jack & Jill Bathroom Design Plans
- Small Guest Bathroom Design Plans
- Bathroom Sconces
- Small Bathroom Ideas & Makeover Inspiration
- 48″ Bathroom Vanity Ideas
- Stylish & Affordable Bathroom Vanity Lights
- Classic Coastal Bathroom Vanities
- Guest Bathroom Renovation: Current Situation & General Ideas
- How To Make Your Bathroom Feel Like A Spa
- An Under $200 Coastal Bathroom Makeover
- How To Paint Thermofoil Cabinets
- Powder Bath Reveal
If you would like to follow along on more of my home decor, DIY, lifestyle, travel and other posts, I’d love to have you follow me on any of the following:
Pinterest | Instagram | Facebook | Twitter
disclosure: some affiliate links used
Everything looks awesome. Can’t wait to see finished product. You have great a great eye for design. In the Jack and Jill Bathroom, are you mixing gold and chrome? I have a bathroom that I would love to change the light fixture to gold or black and gold but not ready to change sink fixtures which are chrome, because they match the shower and I am not ready to change yet. So asking if it is ok to mix or will it look just off?
We are doing a full bathroom reno right now and I echo everything you said – covid delays a have stretched out our progress but we know it’s eventually going to be done and fabulous.
Everything looks great! Can you share the feedback and thoughts on the shower door option…did most people not like the slider/barn door option? Curious for my own upcoming renovation. Thanks!
Could you share the feedback on why NOT to go with a frameless slider door. In the process of redoing a bathroom with a tight space and trying to decide what to do with the shower. Can’t wait to see your bathrooms finished!!
Preparing to renovate my own bathroom for some time and this article brought a couple of new ideas. Thakn You for sharing.
It all looks so good. Love the inspiration boards. Can you tell us more about replacing the bathtub? I’ve heard they sometimes cut the old one in half to get it out more easily? Did they fit through the doors okay? Was it easy to find a new one of the right size? We are looking into a bathroom remodel this year, too. Thank you!
Everything looks great! Can you share the feedback and thoughts on the shower door option…did most people not like the slider/barn door option? Curious for my own upcoming renovation. Thanks!
Yes! I actually added it back into the post in that section as bullet points if you want to check it out!
Hi! I love your bathroom!! Wondered how is the upkeep of the marble tile? Is it difficult to clean and keep looking nice? I want to use it in my own bathroom remodel because I LOVE how it looks but I am a little afraid of using marble. Thanks so much!
So far it hasn’t been bad! But, honestly, it hasn’t seen a ton of traffic yet. I still need to seal the marble countertops and have contemplated trying it on the floor too. Hopefully I’ll have better feedback after a year or so!
Would love to know how it is holding up and if you ended up sealing it!
It’s been great so far! We still haven’t sealed any of the marble (although we say weekly we need to). We even bought the sealer and rags, but just need to make it happen!
Currently in the process of renovating my master bathroom and stumbled upon your page. I absolutely love this bathroom! One question, how many inches is your vanity from the side wall? Noticed that there’s a small gap with your vanity from the side wall which looks great and I’m trying to figure out what size vanity to get in my space.
Hi Sheila! Thank you so much 🙂 We moved from this home about a year and a half ago, so unfortunately I am not able to get those measurements for you.