Sharing all the details of our Jack & Jill bathroom design plans! I’m also including details on the classic and slightly coastal inspired pieces we selected for the space.
Good morning! I had every intention of posting both bathroom design boards yesterday, but the crew showed up first thing to start demo and then I had meetings and got caught up in all the activity afterwards. So, today I’m sharing both sets of design plans. I’m splitting them into two separate posts for easier linking reference in the future and to avoid confusion between the two.
For simplicity purposes going forward, I’m going to refer to the bigger guest bathroom (that connects to our guest bedroom and den) as the Jack & Jill guest bathroom. I’ll call the other one the small guest bathroom. I’m super creative with naming around here 😉 But the reality is, these rooms keep evolving the longer we live here. We actually call them the king and queen bedrooms and bathroom (based solely on mattress size). Kurtis recently has been referring to the smaller bathroom as his “office bathroom.” He said he always wanted a private bath for his office some day. Ha!
After reading this post, be sure to also check out our small guest bathroom design plans!
This post contains affiliate links for your shopping convenience. Click here to read my full disclosure policy.
While I plan to share fairly real-time updates on my Instagram Stories, I’ll also plan to do some additional recaps here on the blog as progress occurs. I also have a highlight saved called “Bath Renos” if you ever want to refer back to any that I’ve already done!
Jack & Jill Bathroom Design Plans
If you’ve been reading my blog for more than a year or so, you may remember this time last year we started talking about renovations again. The post, called Guest Bathroom Renovation: Current Situation & General Ideas, outlines the current state of the bathroom and my initial plans. Then things shut down in 2020 and we put the project on the back burner. But after staying almost exclusively at home for 9 months, we realized how much we’d appreciate the updates. Especially as Kurtis worked from home exclusively the whole time (and still will for at least five more months).
After reviewing my initial plans, we talked through our final picks and then met with a contractor. All picks below are final with one tile exception that I hope to have nailed down today. But we’re 99% sure this is the final plan!
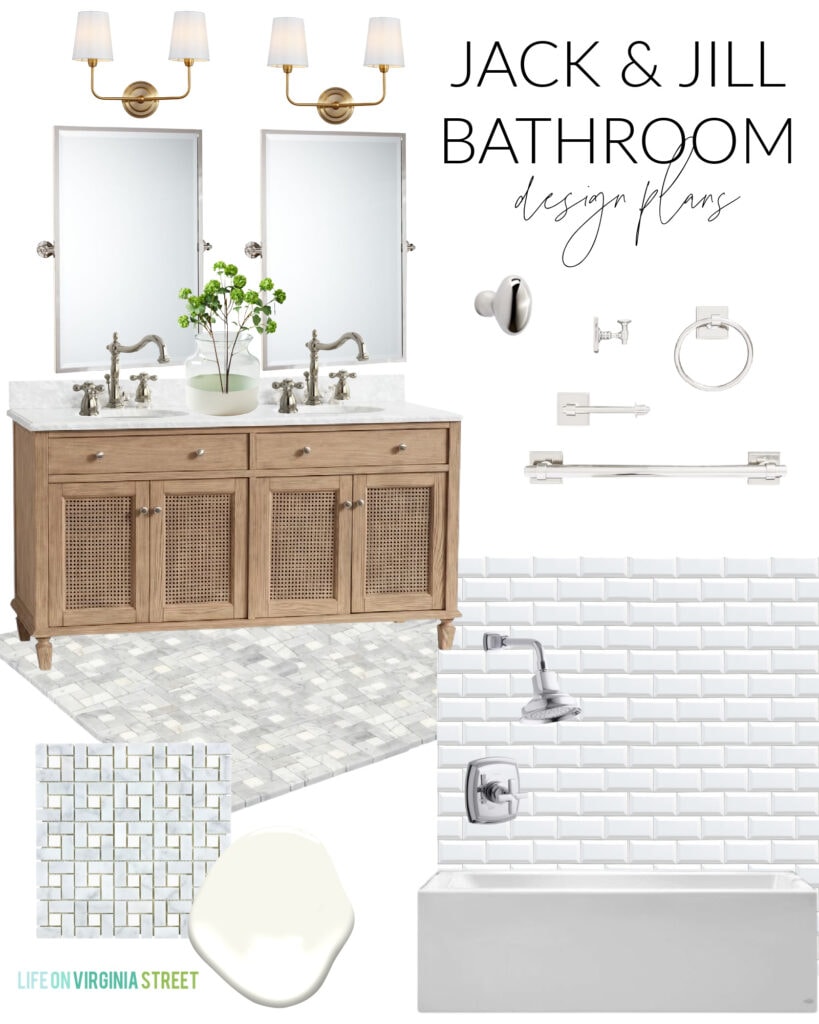
JACK & JILL BATHROOM DESIGN BOARD SOURCES: Vanity | Pivot Mirrors | Light Fixtures | Sink Faucets | Bath Accessories Set | Pinwheel Carrara Marble Floor Tile | Beveled Subway Tiles | Shower/Tub Fixtures | Bathtub | Paint Dipped Vase | Faux Viburnum Stems | Paint Color: Benjamin Moore Simply White
Bathroom Design Board Details
Let’s jump into the details of each of the items we chose for the space! I think the biggest challenge for me was deciding on the floor tile (not 100% final) and whether or not I should mix metals. Not major decisions by any means, but those are the ones I went back and forth on the most!
THE VANITY
The wood cane vanity was the jumping off point for this entire makeover! I had actually picked it out in late 2019 and we started making plans for the renovation in January 2020. We have the bed from the same line in our smaller guest bedroom and the dresser in our bedroom, so I knew I loved the wood tone. It also helped achieve the classic but slightly coastal look I was going for. When things were shut down early last year, we paused the reno. But buy summer we really wanted to get moving again, so I waited for the Labor Day sale to order the vanity since I knew it was “the one” regardless of anything else I picked. That help to finally get me motivated to get bids and start wrapping up the design plans! So, it’s been sitting in our upstairs hallway since October 🙂
THE MIRRORS
Over the holidays I went back and forth on whether I should use a pivot mirror or something flush with the walls. I ultimately decided to go with these pivot mirrors. I liked the squared-off corners (they also have a more rounded version) and the old-school Restoration Hardware vibes. I’ve been super impressed with PB mirrors I’ve ordered in the past, and since I had reward dollars to spend, these were the winner!
THE LIGHT FIXTURES
I haven’t actually ordered light fixtures for the space yet but plan to do so today. I’ve gone back and forth on a polished nickel finish vs a brushed gold finish. I like that the brushed gold would bring in more of the warmth that the vanity adds, since everything else is very cool-toned. I’m leaning towards these light fixtures because they achieve that warmth, are relatively affordable, and have excellent reviews!
THE FLOOR TILE
I haven’t actually purchased the floor tile yet because I go back and forth on what to use. But I have to make a decision today so that it is all here in time. But, since the beginning, I’ve really loved this pinwheel Carrara marble tile. I think if I choose a similar tone grout, it won’t feel too busy and will give a classic look. My biggest fear is the volume of grout lines, more so because if they’re crooked at all, it will drive me nuts. But I know cleaning it could be an issue too. I’m going to make a trip to Home Depot today to check out their in-stock selection and see if anything else catches my eye!
THE SHOWER TILE
I was originally going to go with the beveled white subway tile we used in our kitchen renovation (and also used in a shower at the flip house). However, it appears Lowe’s is in a bit of a tile shortage, so I found this option at Home Depot that is even more affordable and has excellent reviews. Since they look nearly identical, it’s a no-brainer, and is such a good option on a budget! I’m hoping to pick it up today, but I’m confident it will be every bit as good.
BATHROOM HARDWARE
With the slightly more modern and coastal vanity, I wanted to go a bit more classic and almost vintage-y with the bathroom hardware. When I found these faucets, a highly-rated look for less option to another one I found, it was an easy decision. When they arrived, I was shocked how heavy they were, and the quality looks incredibly solid. I also love that the neck pivots!
THE BATHROOM ACCESSORIES
I share more in the post about the small guest bathroom, but the towel bars and TP holder were stumping me. Mostly because I don’t really care about them, but knew what I didn’t want 😉 After the trial and error in the other bathroom, I ultimately ordered this set for this bathroom as well. I’ll be using polished nickel here, like the other fixtures in this space, but will be using chrome in the other bathroom to coordinate with the shower set we ordered.
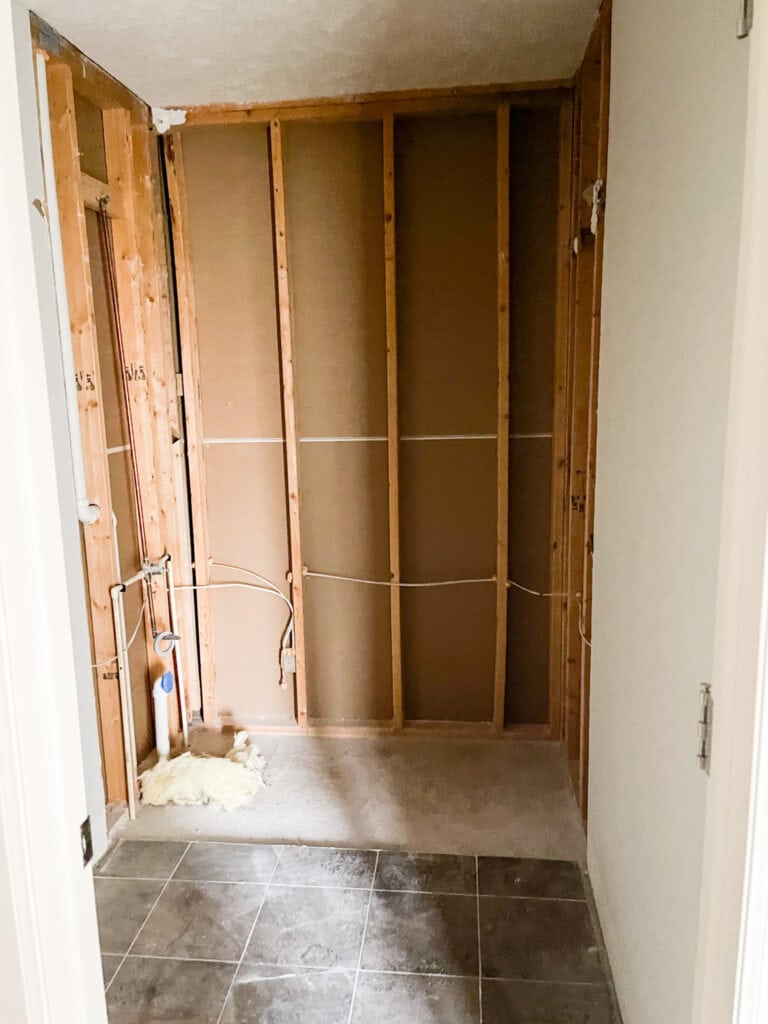
Jack & Jill Bathroom Demo Update
Yesterday, the bathroom was almost 100% cleared out! They have to come back to use a jackhammer on the tile floor, but other than that, the space is cleared out! The new bathtub is scheduled to be installed next week some time and from there, I believe they’ll start working on the electrical and plumbing!
I’ll plan to share more updates as they occur, both on Instagram Stories and the blog over the coming weeks! We’re tentatively hoping to be wrapped up in 30 days, but 5-6 weeks max!
Be sure to check out our small guest bathroom design plans next!
Additional Bathroom Inspiration
- Small Guest Bathroom Design Plans
- Small Bathroom Ideas & Makeover Inspiration
- 48″ Bathroom Vanity Ideas
- Stylish & Affordable Bathroom Vanity Lights
- Classic Coastal Bathroom Vanities
- Modern Traditional Wall Sconce Lighting
- Guest Bathroom Renovation: Current Situation & General Ideas
- How To Make Your Bathroom Feel Like A Spa
- An Under $200 Coastal Bathroom Makeover
- How To Paint Thermofoil Cabinets
- Powder Bath Reveal
- 10 Small Powder Baths with Big Style
If you would like to follow along on more of my home decor, DIY, lifestyle, travel and other posts, I’d love to have you follow me on any of the following:
Pinterest | Instagram | Facebook | Twitter
disclosure: some affiliate links used
As always, your designs are beautiful! Thanks for sharing.
One word of caution, when mounting light fixtures above pivot mirrors, make sure the fixture’s projection from the wall is greater than the projection of the mirror. Otherwise, the mirror is inadequately lit because the light falls behind the mirror. Unfortunately, that was a mistake made on our first bathroom reno and we had to replace the fixture.
Such great advice! I may have to order two to test them once the mirrors are installed. I appreciate you letting me know!