It’s pool house addition reveal day! Are you just as shocked as I am that this day is finally here? Despite some delays with a few of the product selections, this project actually moved fairly quickly by today’s standards and we couldn’t be happier with the end result! So, grab your flip flops, turn on some summer jams, make a piña colada or margarita, and pretend you’re in the heat of summer rather than holiday mode. It’s time for our pool house addition reveal!
This post contains affiliate links for your shopping convenience. You can read my full disclosure policy here.
I was incredibly selective on the partners I chose for this project, so a huge thank you goes out to Serena & Lily, Café Appliances, and CKF for helping to make this project a reality and partnering with me!
Before we get into all the details, we can’t thank our builders, BlueStone Custom Builders, enough for all their incredible work on this project. They were so great to work with, had great communication skills, and became people we enjoyed spending time with. It’s actually going to feel weird to not talk to them or text them daily. Although, they’re probably okay with that 😉 Highly recommended if you’re looking for a builder or remodeler in the Omaha area!
Pool House Construction Progress & Design Plans
In this post, I’ll be sharing a few before photos of our backyard and the addition progress. However, if you’re looking for the nitty gritty progress details or to see where we started, be sure to check out these additional posts:
- Pool House Ideas & Tentative Plans
- Pool House Plans
- Pool House Renderings, Selections & Progress
- Pool House Progress & More Selections
- Pool House Progress Report
- Pool House Final Progress Report
In an effort to keep this post less lengthy, I won’t be repeating much of what was already shared in those posts. But they’re full of a lot of great info and more specifics on why we chose some of the final finishes you’ll see in today’s post!
The Backyard Before Photos
It’s still so hard to believe, but this is how our backyard looked when we first bought the house nearly nine years ago. Although technically, we didn’t even have the fence when we bought it so this was a year or so later. This was the view from our covered patio, where the pool house ultimately sits today.
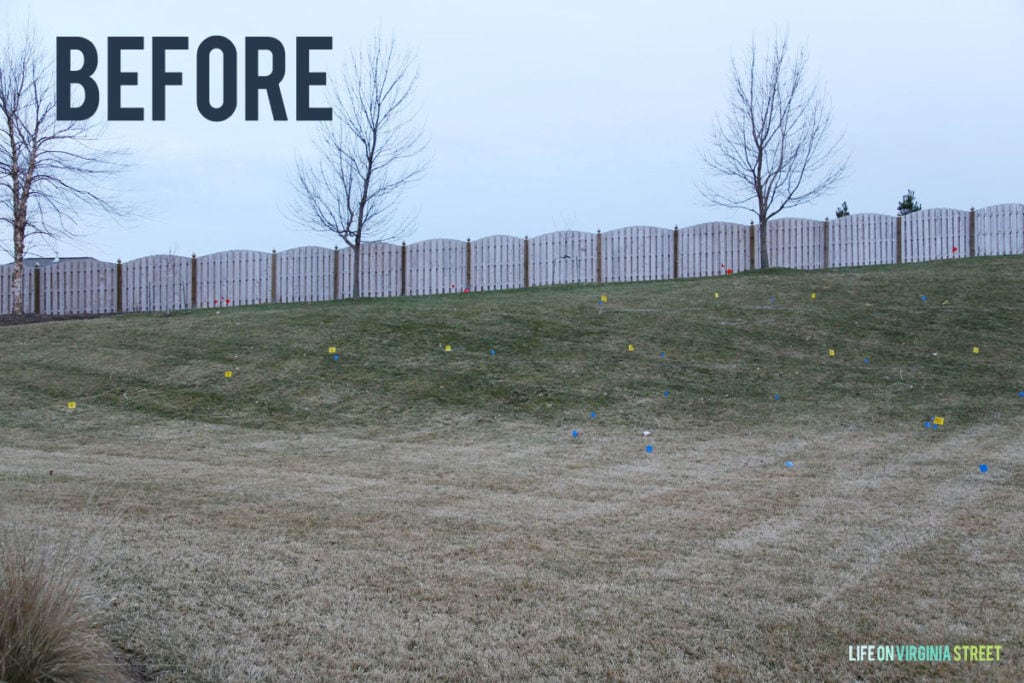
And here was the view of most of our backyard from the top of the hill. It was basically a blank slate! Our house was also brown at the time!

We always knew we’d have to create our dream backyard in stages. For the first few years, we worked on planting trees and shrubs. In 2016, we added a pool and retaining walls (read more about that here). But, we always knew we had a final phase in mind, since our covered patio was far too small to entertain. We couldn’t grill and have people sit at the table at the same time. So, plans have been forming for several years to include a pool house.
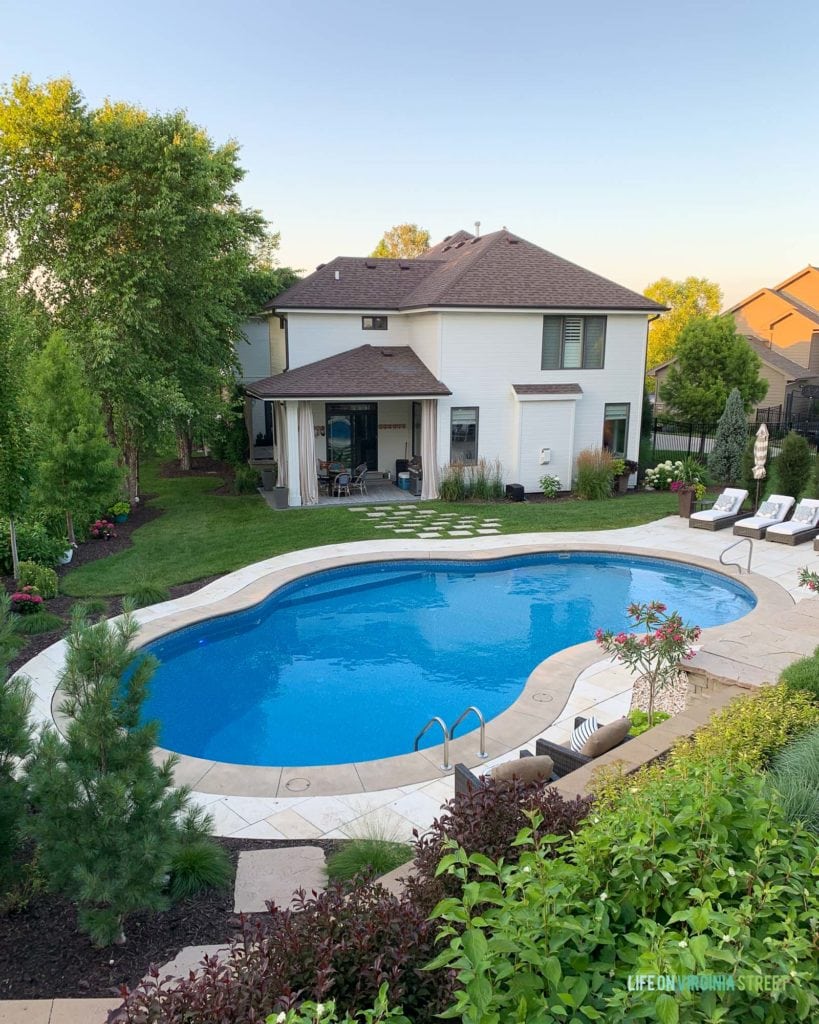
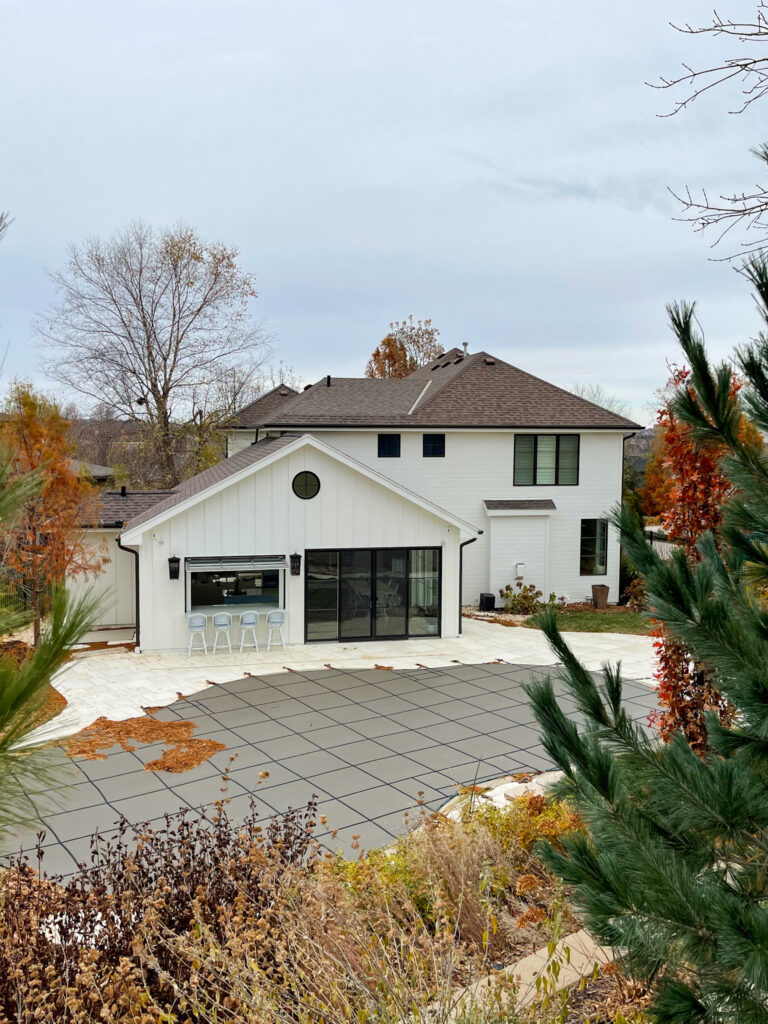
And now, nearly nine years after we moved in, the backyard looks like this! Let’s just focus on the pool house and bar area, and not the very-fall-like plants outside 😉 I can’t wait to take another version of this angle come summertime! But we’re so excited to now have an indoor/outdoor space that can be a respite from the sun, and a bathroom that doesn’t require wet feet having to run through most of our main floor to get to the powder bath! We always have the most fun with our pool when we have friends and loved ones over, so we’re so excited for this new entertaining space! But, we’ve already found so much enjoyment using it in the “off-season”. Not to mention, the cats are obsessed. We’re so happy we ultimately decided to make it a four-seasons room!
Pool House Addition Reveal
It’s been months (well technically years) in the making, so let’s get right to the pool house reveal! Let’s just envision the pool is open, the trees are green, and the planters are overflowing with colorful flowers!
Do you remember these renderings we received from Structur Design? Highly recommended if you’re ever taking on a large-scale project and need to better visualize the space. Although I had a general idea of how things would look in the end, this really helped Kurtis get on board with the project!
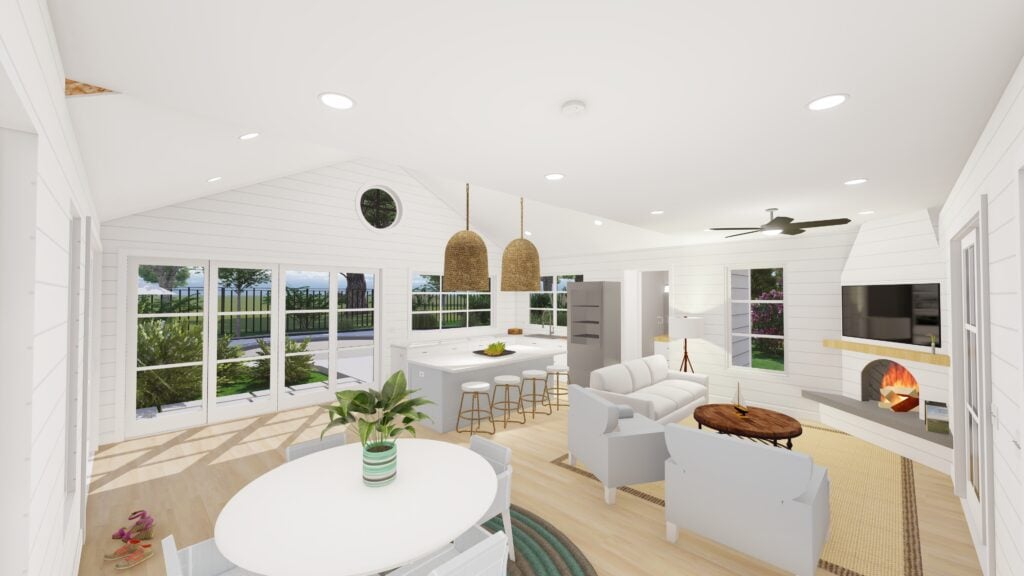
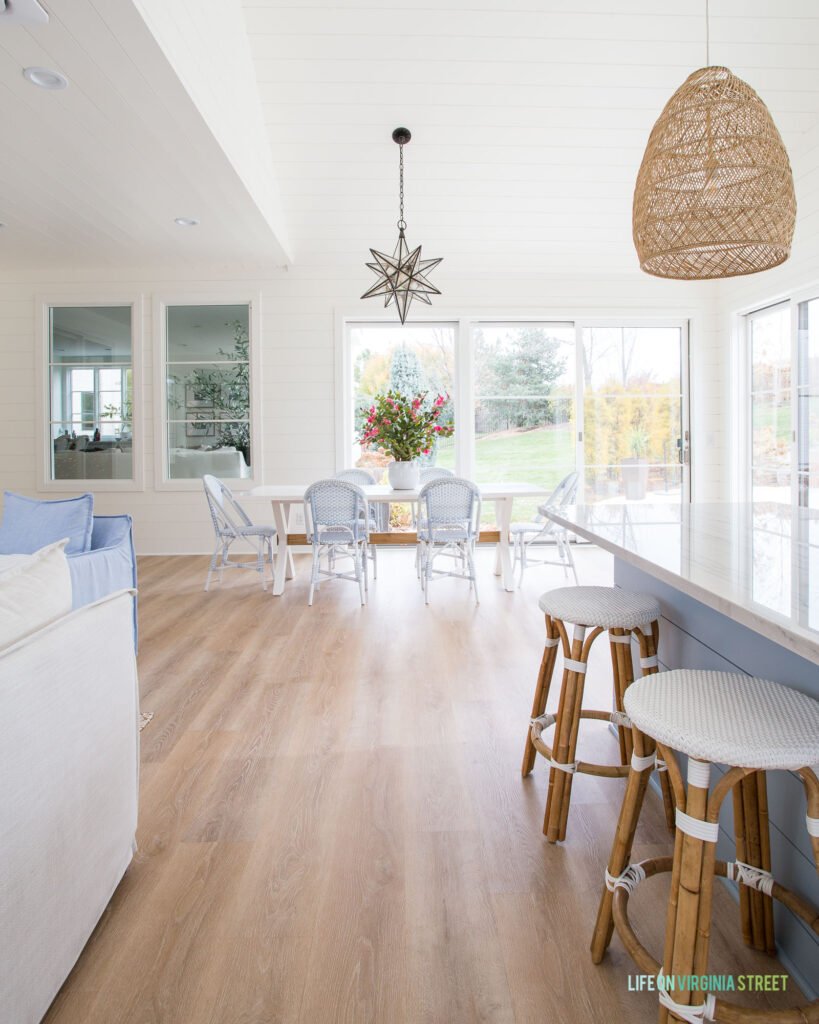
Here’s a wide-angle shot of the actual interior now that we have the finished project to show the overall layout. Isn’t it incredible just how similar it looks to the rendering? Welcome to our pool house!
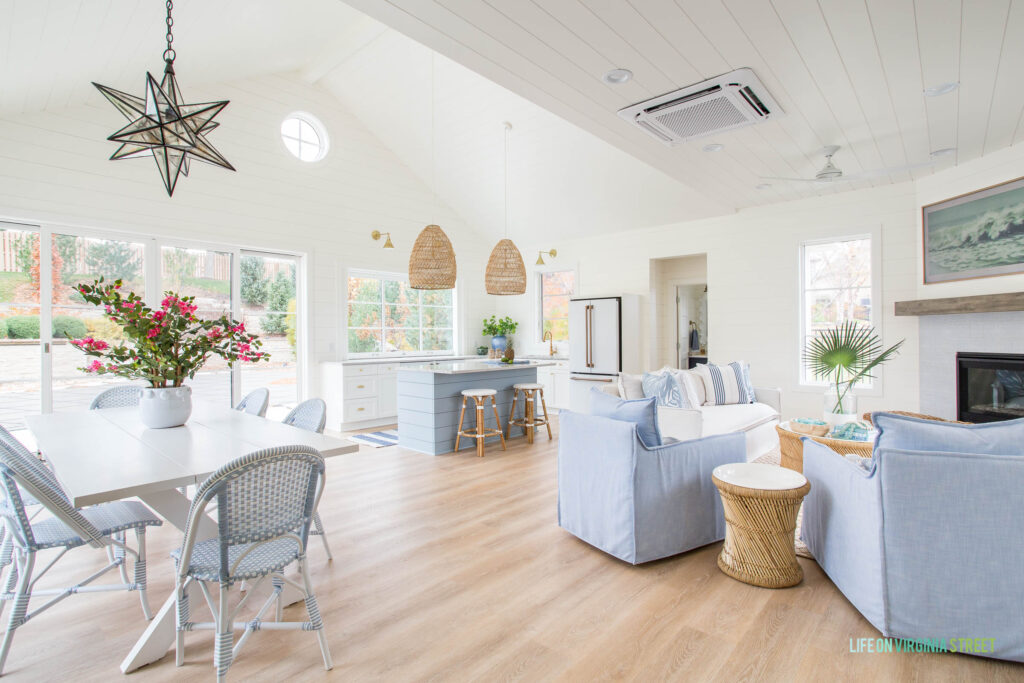
Now I’m going to break down each of the designated spaces within the pool house and provide some more details! I styled each of the spaces very minimally and for summer months and really wanted the focus to be on the space itself. Within the next week, I’ll be sharing the space decorated for Christmas, as well! For reference, the pool house is about 26′ x 26′ plus the bathroom, which with the hallway, is about 6′ x 6′ (the bathroom is about 4′ x 6′). So, in the main area, each “room” is just under 13′ x 13′ which includes any walkways between spaces. I get asked about room measurements a lot, so I hope that is helpful!
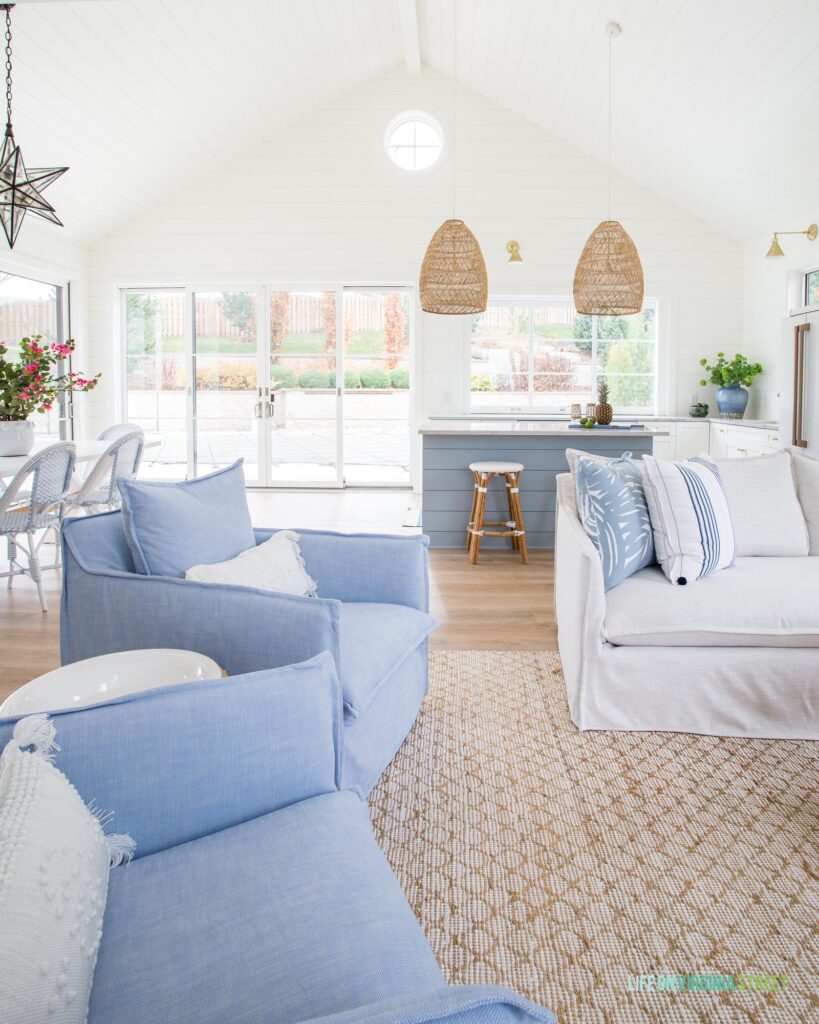
POOL HOUSE KITCHEN & BAR
Let’s start the tour with the kitchen and indoor/outdoor bar area – perhaps my favorite of all the spaces!
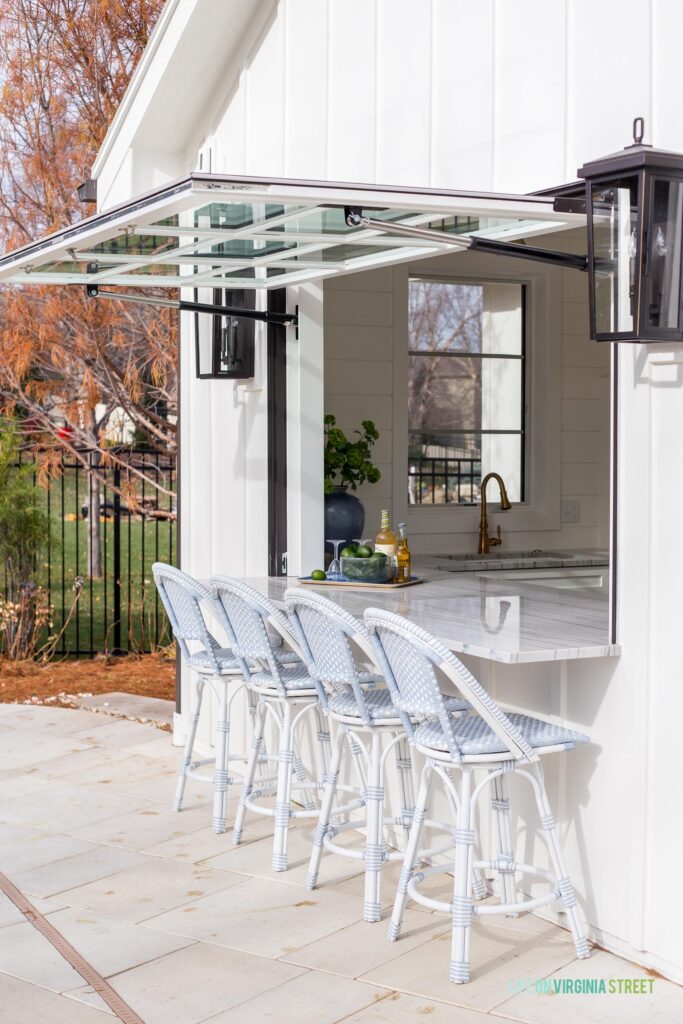
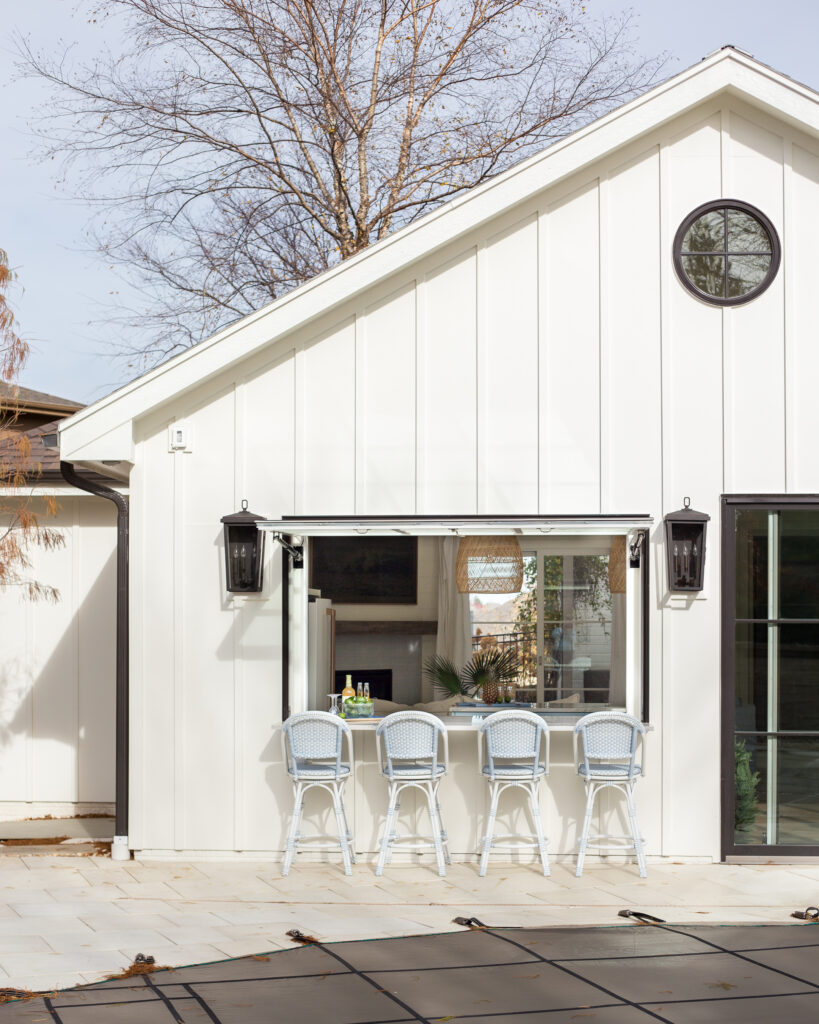
I’ll focus on the bar window further down in the post when I talk about the exterior, but while you’re scrolling through this tour, keep in my that the large kitchen window fully pivots open with a remote in one of the drawers. It’s probably our favorite feature of the entire space!
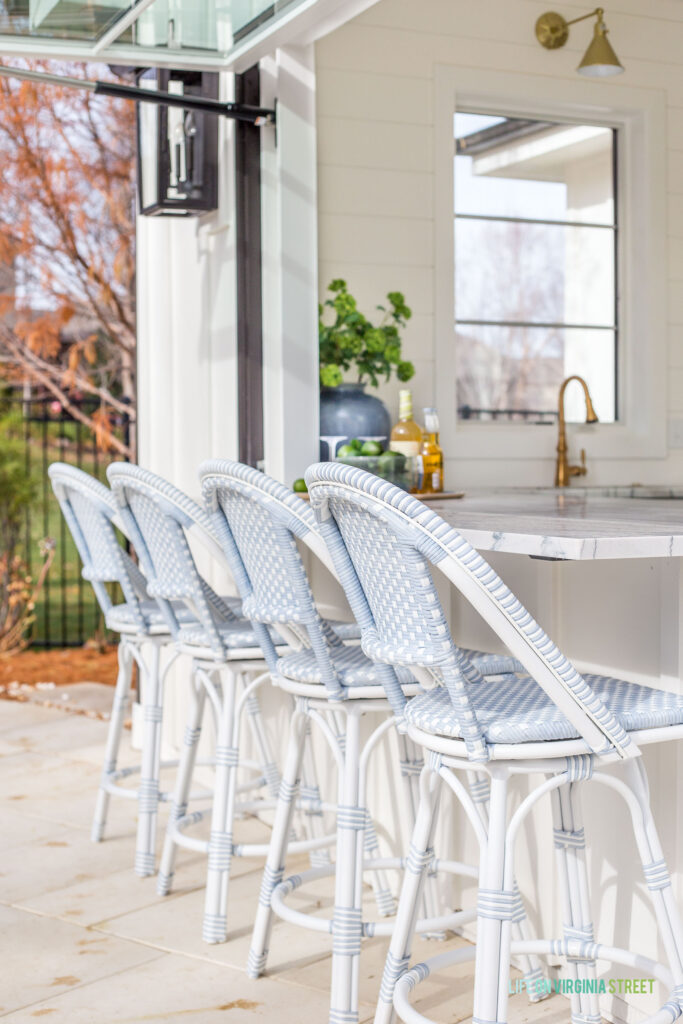
And here’s how the gas strut window looks from the inside when it’s fully opened! I’ll share some videos soon to show how easy it is to open and close.
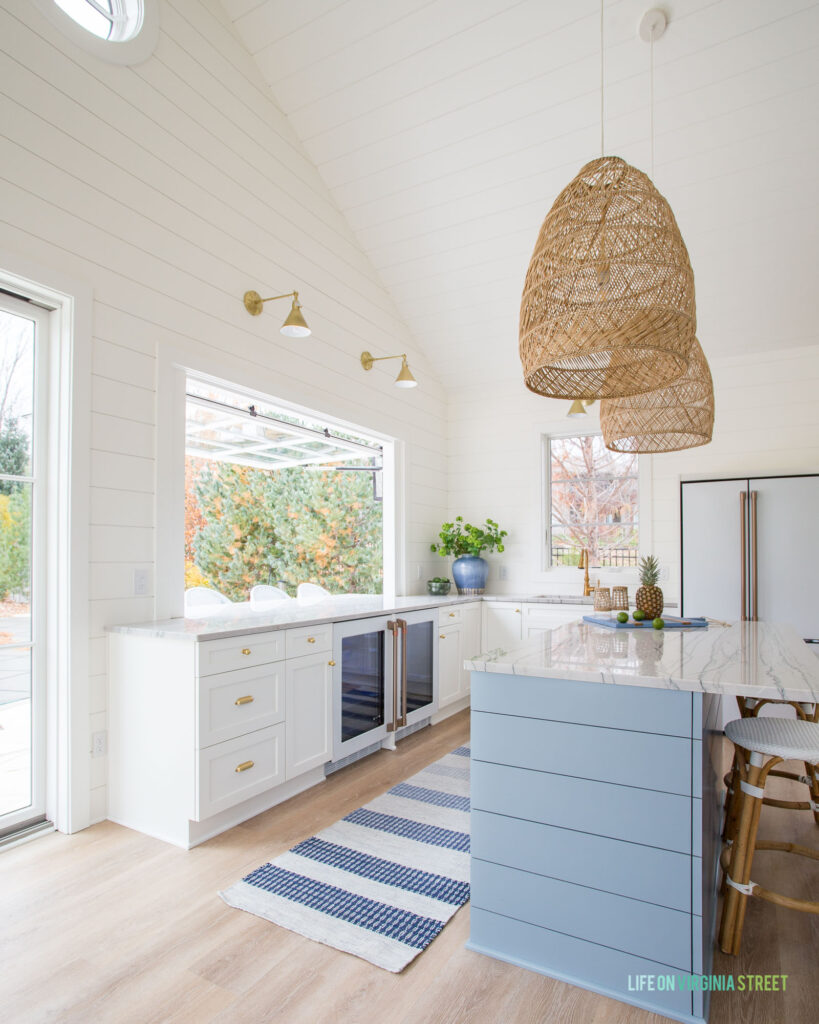
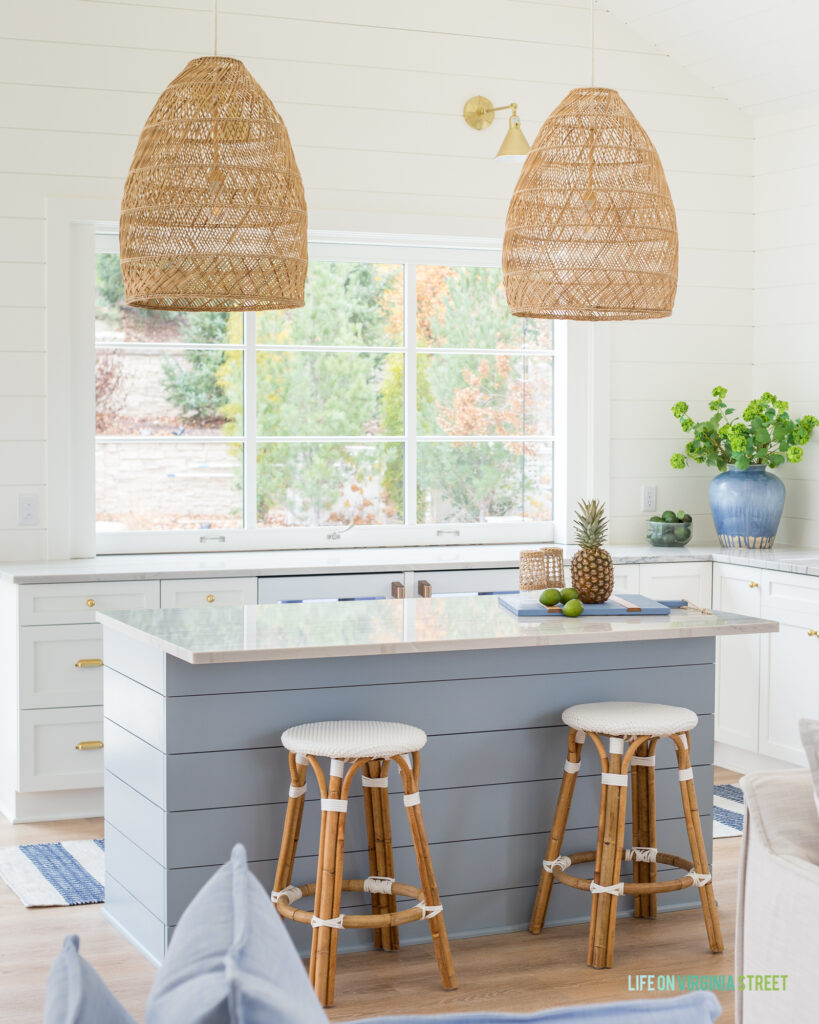
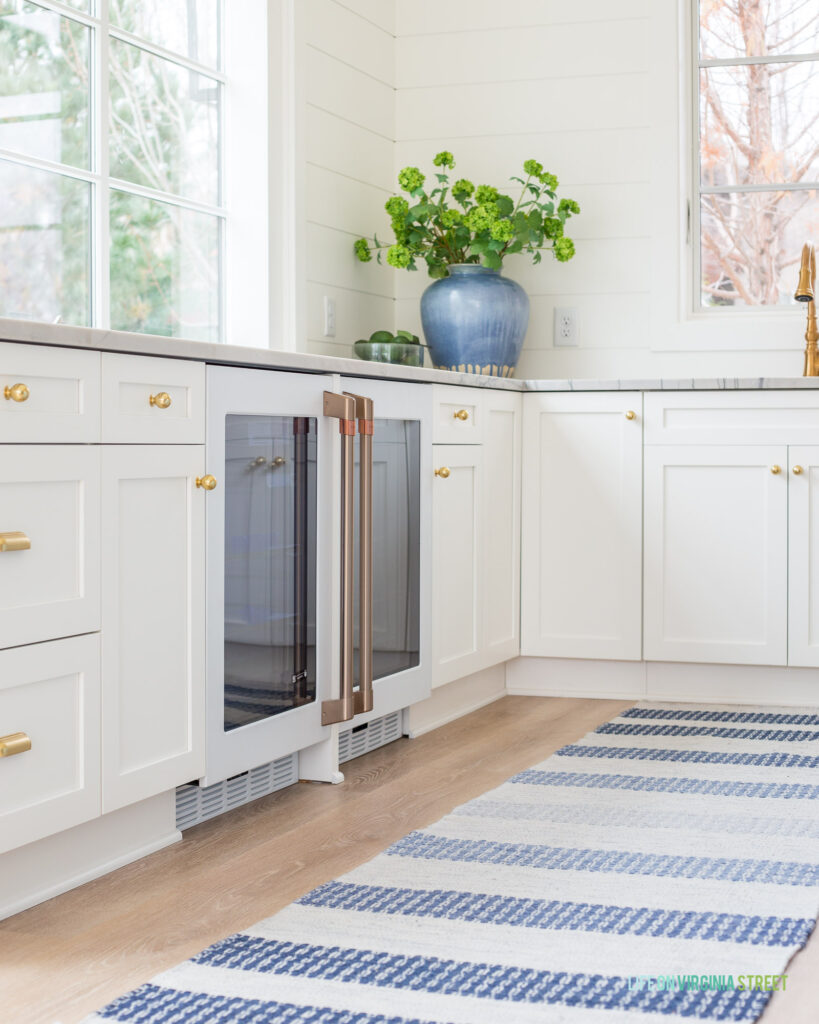
We kept the kitchen fairly simple, with minimal appliances and these gorgeous cabinets from CKF. We went with a simple shaker style door/drawer on both the perimter and the island. I was able to pick my paint colors (even though they’re finished at the factory) and went with Benjamin Moore Simply White and Benjamin Moore Santorini Blue! The pros at CKF helped maximize storage in the space we have, and it’s the perfect mix of drawers and cabinets to store our entertaining essentials!
The sink includes a garbage disposal, but with our main kitchen fairly nearby, we opted out of adding a dishwasher. And since we still love to grill so much, it didn’t make sense to add a range or microwave out here. The main goal of the space is entertaining, which includes plenty of beverage storage and places to serve food! We’ve had this rug for a few years, but I knew it would be perfect out here! As, you can see below, I also played with using the outdoor swivel counter chairs indoors. This may be an option we use in the months when the pool is closed! Side note: the touch-up painter from CKF hasn’t made it back out yet, so if you see unpainted wood anywhere on the cabinets, rest assured, it will be painted soon!
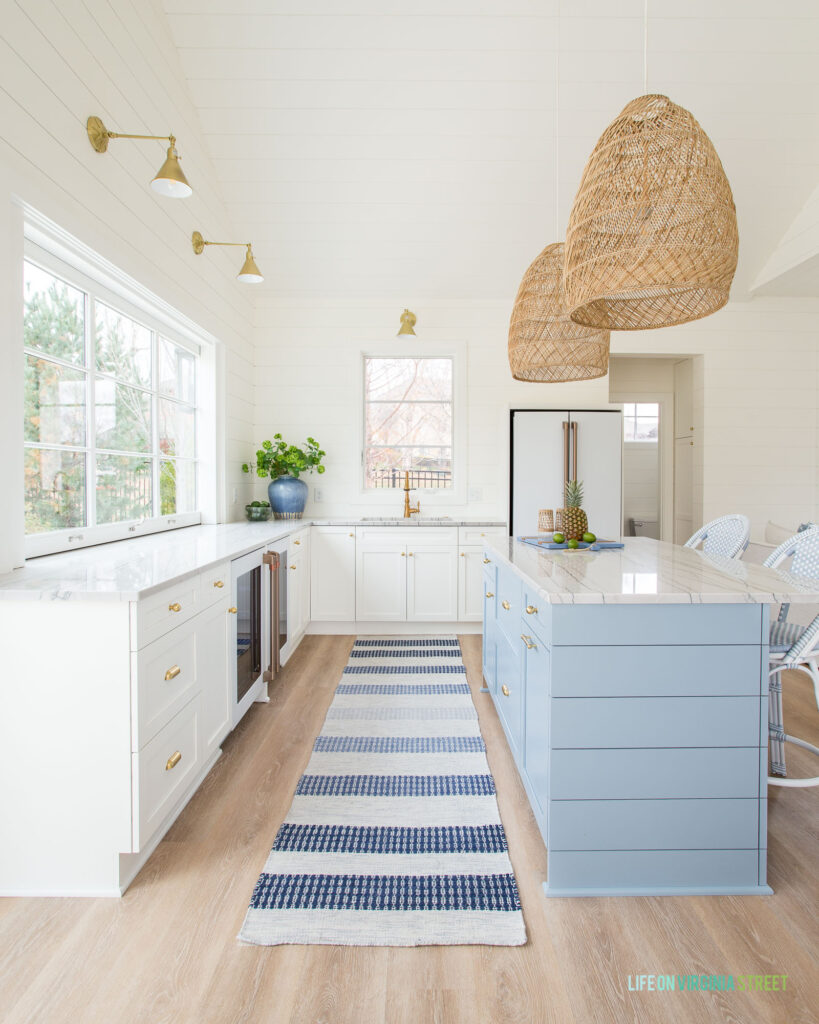
As you may recall, we went back and forth on whether or not to add a dedicated ice maker. We ultimately decided it made more sense to get a counter-depth fridge with an ice maker, instead. I knew I wanted the matte white Café counter-depth fridge, so I was thrilled they wanted to partner when I reached out to them. We have other GE appliances in our kitchen, but felt the Café line was perfect for the pool house! I opted for the counter-depth version since it’s main purpose is ice, water dispenser (hidden inside!!) and storing food for parties and entertaining!
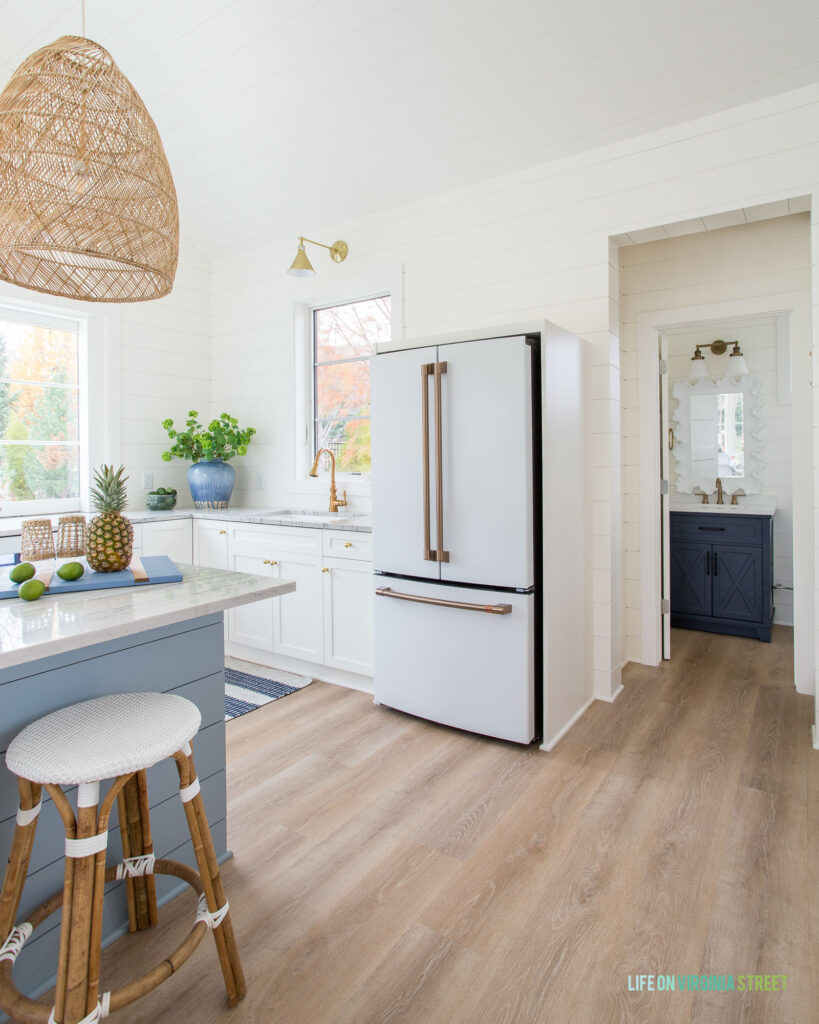
The Café beverage fridges are so dang cool! They have motion sensors to light up the back LED panel when you walk by. In some of my kitchen images, you’ll see them glowing, and it almost makes it look like the bar is two-sided and the fridges back the outdoors! You can easily swap the direction of the doors, so I opted to go with a French door look. We plan to keep one stocked with kids drinks and the other with the adult beverages. They can each hold up to 14 wine bottles and 126 cans and has built-in WiFi so you can control it from anywhere! I couldn’t be happier that they actually add to the design of the space, rather than detract from it!
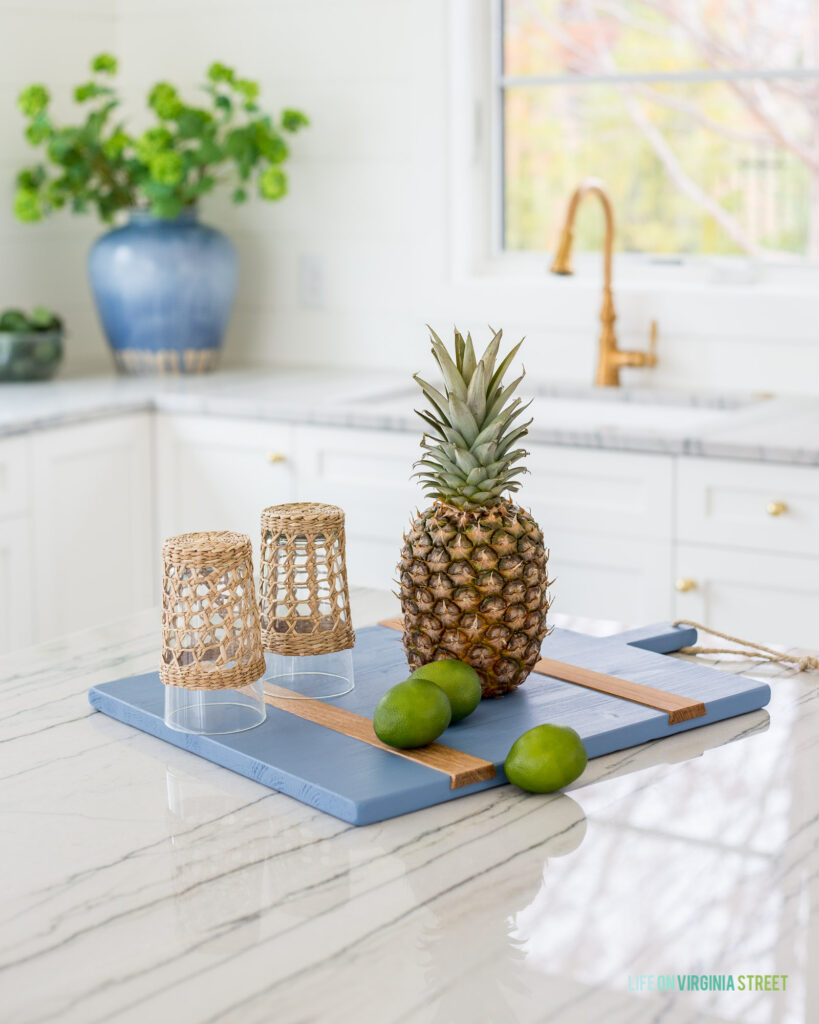
We’re so happy we went with the White Macaubas Quartzite countertops! After speaking with the stone experts at Unique Stone Concepts and explaining the indoor/outdoor need, they gave us a limited list of options they felt could work. Most were very dark and/or very dramatic. I was so happy this quartzite was an option! It has a lot more movement and veining than I would typically be drawn to, but we’re both very happy with it! I love that although it mostly has gray and white undertones, there are some warm areas as well. We found that each slab varied so much, we were happy to find two that were fairly similar and quarried from the same place! We then had CKF fabricate them for us once the cabinets were ready and they helped us determine overhangs for both the outdoor bar top and the island top.
I actually ordered a third backless counter stool after seeing just how much space we have at the island. Kurtis and I have already met out here for lunch several times in the past two weeks. It’s fun to sit and eat and watch the cats stalk the squirrels jumping around in the trees. They could sit at these windows for hours, and sometimes do!

POOL HOUSE KITCHEN & BAR SOURCES: Basket Pendant Lights | Aged Brass Star Sconces | Striped Runner Rug | Backless Counter Stools | Outdoor Swivel Counter Chairs | Cabinet Ball Knobs | Drawer Bin Pulls | Faucet | Counter Depth Fridge | Beverage Fridges | LVP Floors | Blue Serving Board | Similar Snowball Viburnum Stems | Blue Vase | Cabinet Colors: BM Simply White (perimeter) & BM Santorini Blue (island) | Countertops: White Macaubas Quartzite
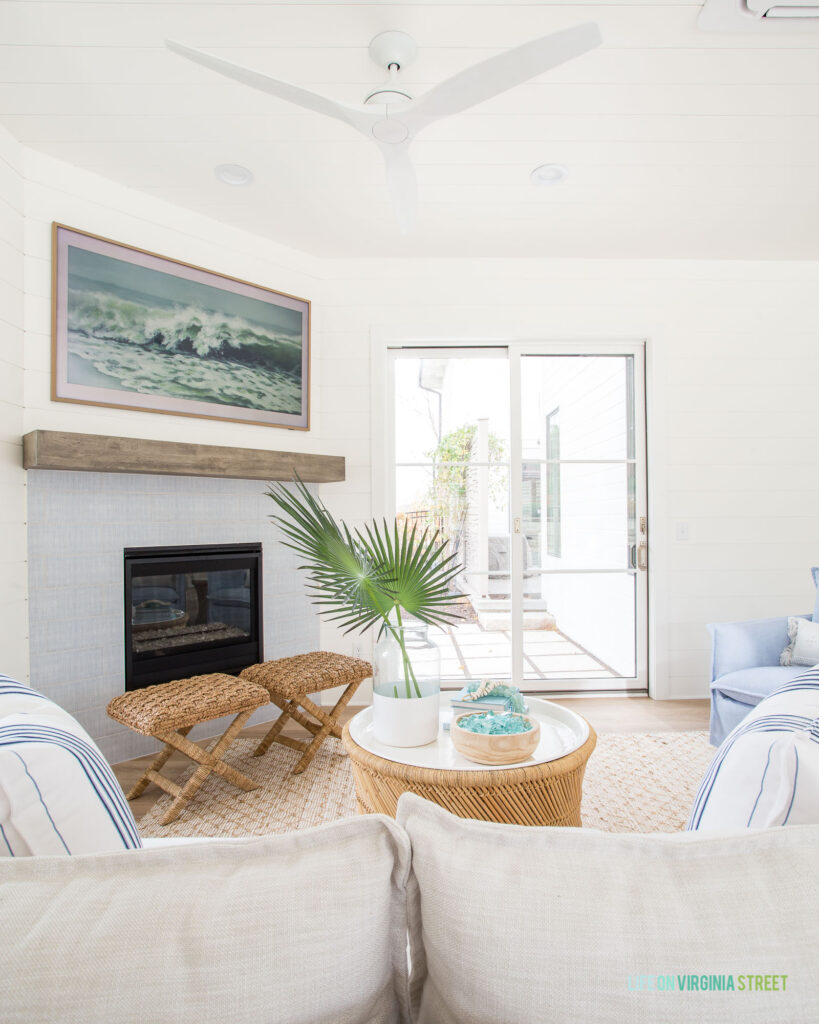
POOL HOUSE LIVING AREA
When we talked about potentially building a pool house, one of Kurtis’ main goals was to ensure he could watch football in the pool. You know, for the two weeks that football and pool season actually overlap 😉 But, I accepted the challenge and found a way with the angles that he can technically sit in the pool and look through the open bar window and watch football. He’s going to be a pretty happy camper when he can try it! I’m typically not a huge fan of angled walls, but in this space, it made the most sense not only so the whole room can see the TV, but also to provide maximum privacy. I only agreed to a 65″ TV if we could get a Frame TV and Kurtis conceded to get the larger TV. It was a win-win!
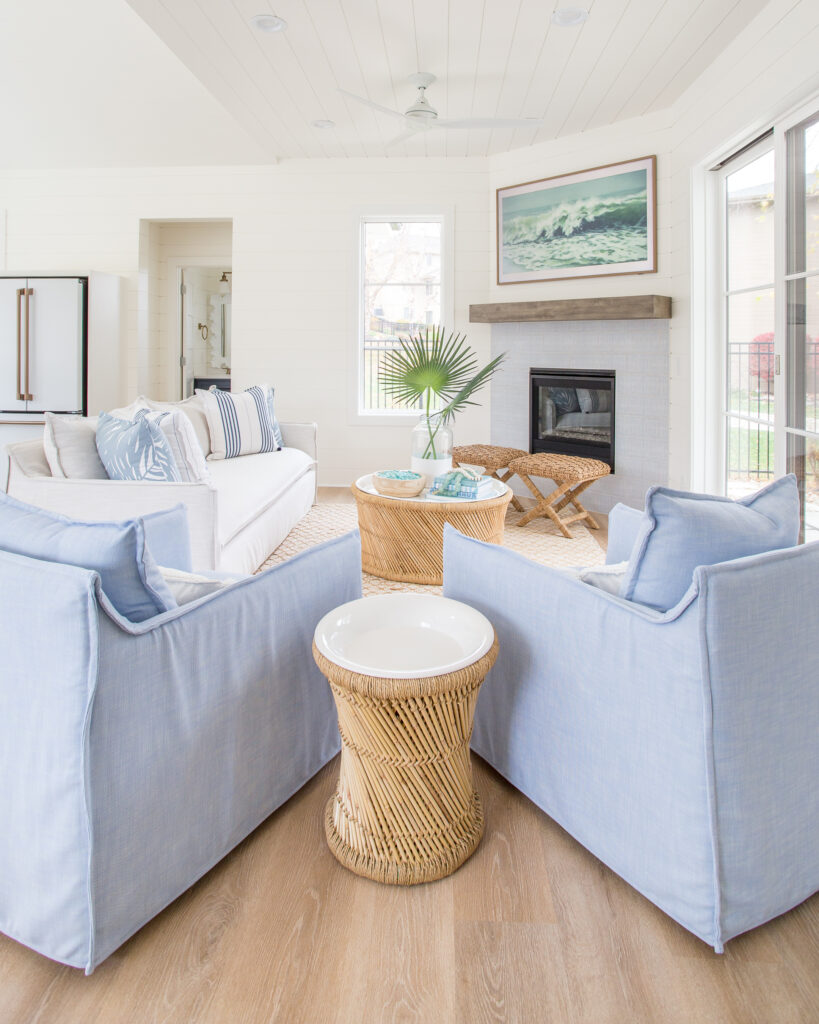
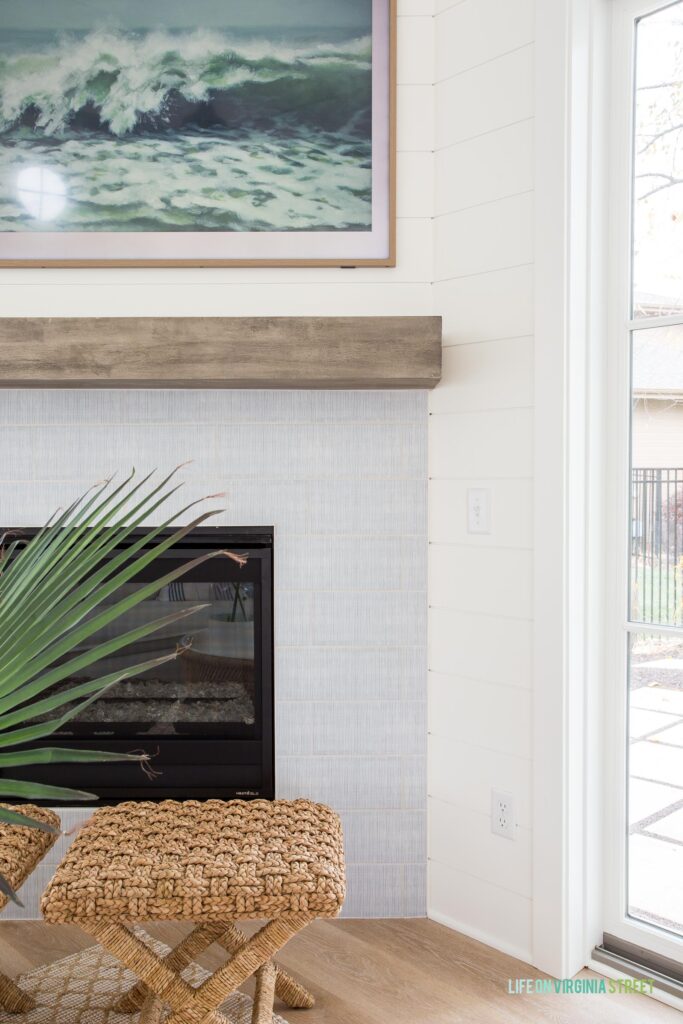
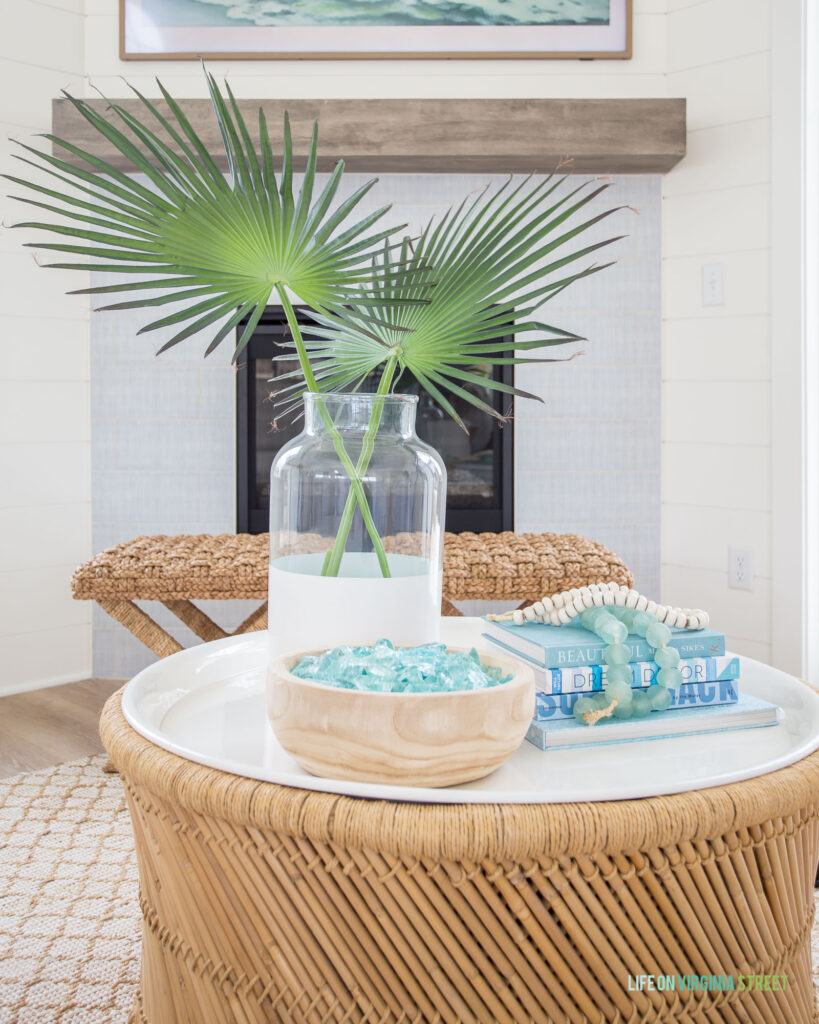
Here’s a closer look at the fireplace details. We’re so happy we went with this fun tile for this space. We ended up bumping out this wall a few inches, simply so we could fit this floating shelf on the wall as our mantel! It fits perfectly and was exactly the look we were going for! And if you look closely in the image below, you can see we opted to go for glass pebbles in our fireplace in lieu of faux logs. The look appealed to us much more, and it was actually a cost savings to go this route!
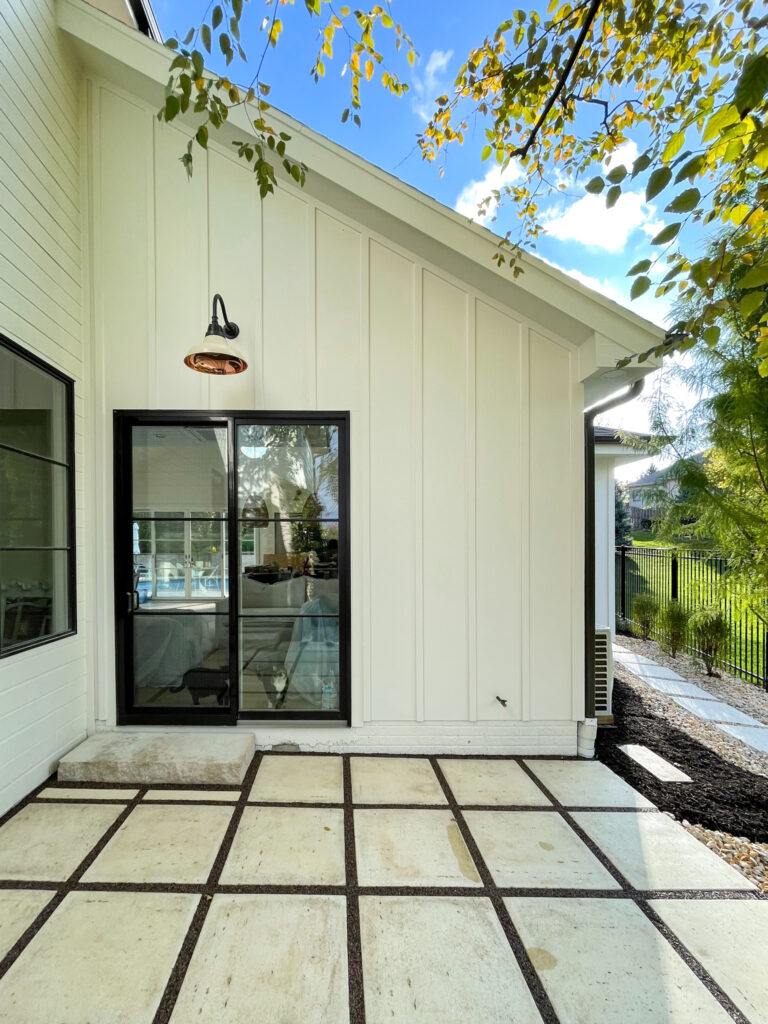
Here you can see the sliding door that leads out to the grilling patio and courtyard. We reused the pavers from our old checkerboard path out to the pool in this area, and I love how it turned out! Since this photo was taken, Kurtis and I also hung this curtain rod, curtain rings and these curtains (two panels on each side) for a little privacy on this side, since it is the one area where we look out onto neighbors. I’ll be sure to include the updated view in my Christmas home tour!
When I first thought of designing the pool house, my first thought naturally went to the aesthetics (not football). I also knew that Serena & Lily would be a dream partner to make this space look exactly how I envisioned! I’m guessing most people see the furniture in here and panic a bit, knowing that wet bathing suits will be all over it. BUT, I specifically chose this furniture for that reason! Not only is it all absolutely gorgeous, but the sofa and swivel chairs are indoor/outdoor and I chose a performance fabric for both. Before placing the order, I did a number of tests on the fabric (including with red wine) and I was blown away by how well it cleaned up! I’ve learned pretty quickly that quality is imperative with outdoor furniture if you don’t want to have to be replacing it every two years or so. The best part is they don’t feel like outdoor fabric and they’re all super comfy, which was also super important to us since we plan to use this room year round!
You may also recognize the Round Storage Side Table and Rug, both of which used to be in our den! But I knew the vibe for both would work perfectly out here. Not only that, I love that the coffee table top easily lifts off to reveal hidden storage. Perfect for storing throw blankets and extra throw pillows when not in use! We’ve had both for several years and know they are durable enough to work out here!
I also selected indoor/outdoor pillow covers for the space to ensure they’d wear well in the room and love the combination of the palm leaves and stripes!

POOL HOUSE LIVING ROOM SOURCES: Outdoor Sofa (Perennials Basketweave – Chalk) | Outdoor Swivel Chairs (Perennials Basketweave – Coastal Blue) | Round Storage Coffee Table | Round Storage Side Table | Rug | Woven Stools | Indoor/Outdoor Palm Pillow Cover | Indoor/Outdoor Striped Pillow Cover | Indoor/Outdoor Fringe Lumbar Pillow Cover | Floating Shelf Mantel | Frame TV (teak frame) | Ceiling Fan | Colorblock Vase | Wood Bowl | Seaglass | Recycled Glass Beads | Bone Beads | “Beautiful” Coffee Table Book | “Dream Decor” Coffee Table Book | “Surf Shack” Coffee Table Book | “Escape” Coffee Table Book | Fireplace Tile: Annie Selke Watercolor Lines in “Sky” from The Tile Shop
POOL HOUSE DINING AREA
I wanted to keep this half of the pool house with the dining space fairly open, since it’s also the main walkway from the house and out to the pool.
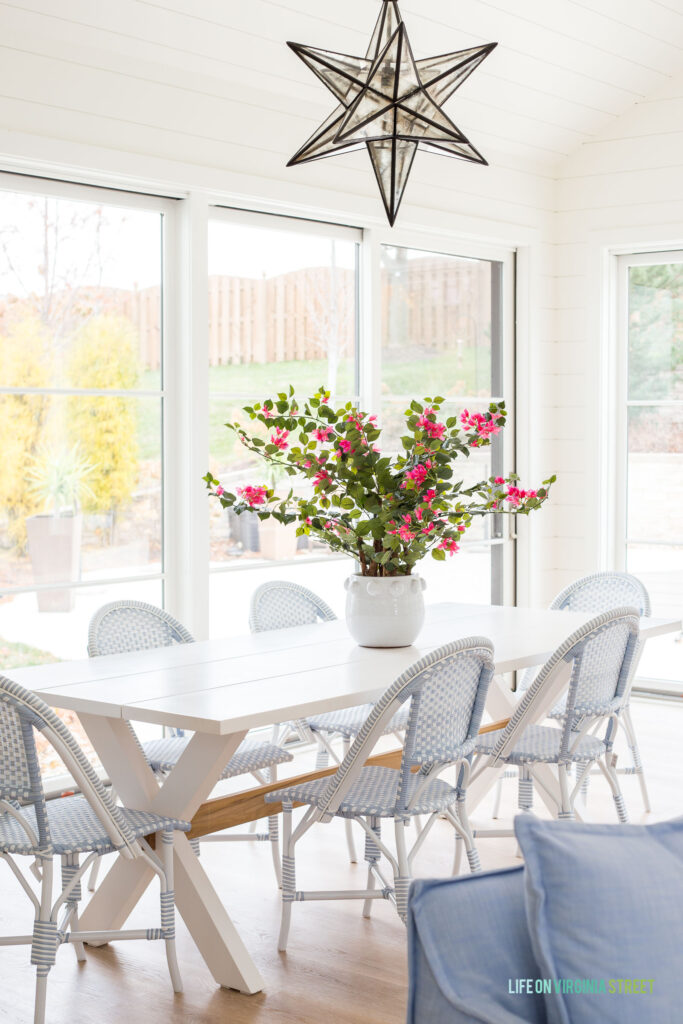
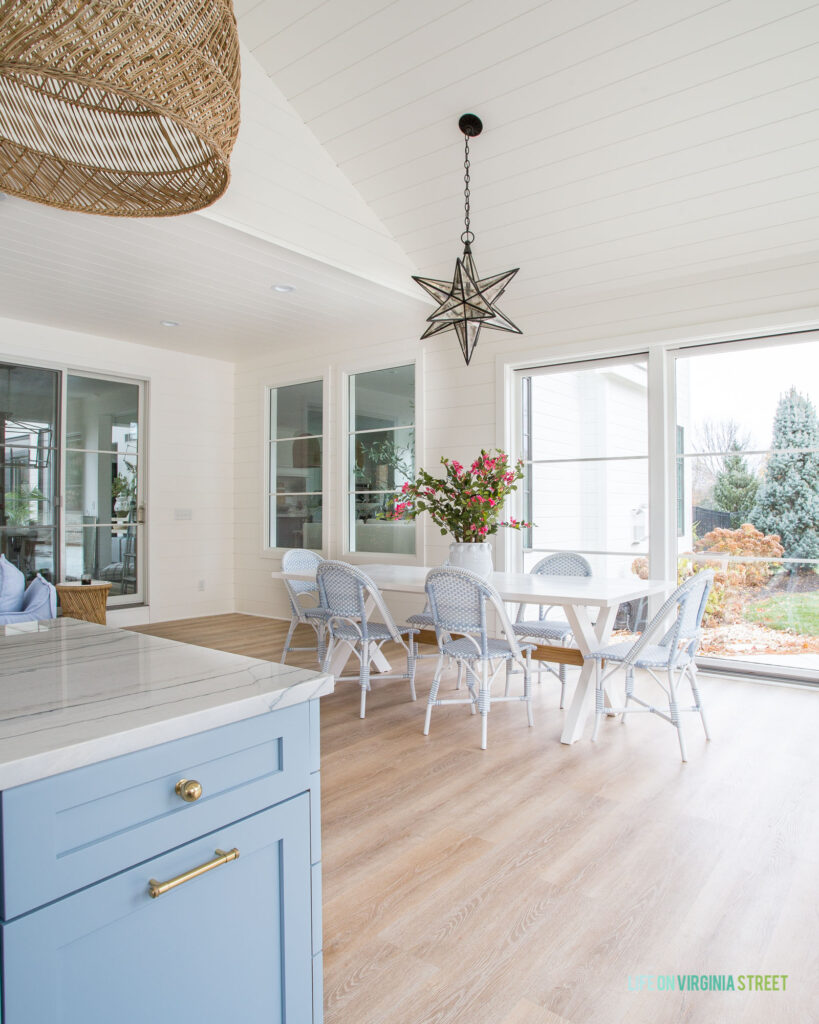
Knowing that this room will be hosting a lot of wet bathing suit bottoms, I opted for these Outdoor Riviera Dining Chairs in our dining space. I’m clearly a huge fan of the Riviera line (read my review here), not only because they look great, but they are so durable and easy to care for! Not only that, they’re comfy and have higher weight limits than many others out there! The California Dining Table is the perfect addition to the space! With the LVP floors, I knew I would want a white dining table, but I love that it has the teak accent to tie everything together! It also easily seats 8 people (I have it styled that way for my upcoming Christmas photos) so it will be perfect in this space that was meant to entertain!
Here you can see how the space flows with the others, as well as the extra floor space we’ve left for walkways. One other thing I wanted to point out. That flat square box thing on the ceiling over the living room is the mini split for the air and heat. It was a great alternative to one of the giant boxes you have to mount on a wall! So far, we’ve been really happy with how it has worked for the space! And it’s nice not to have the HVAC tied into the main house, since we plan to open this up some in the summer!
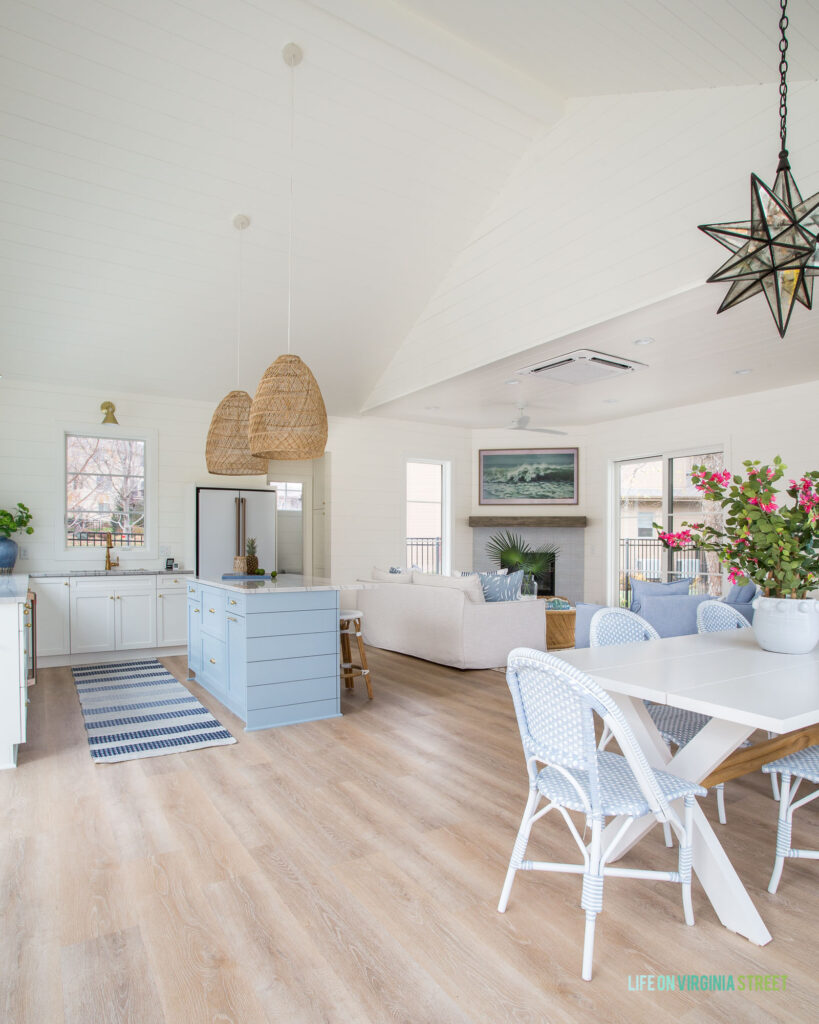
Here is the view standing in the kitchen looking into the dining space. From here you can see how it connects to our house. That back corner is our prior covered patio. Although we initially built this space for the summer months, we’re so excited how much more space we’ll now have to entertain all year long! We’re already envisioning family holidays and parties in the space.
This is the view when you exit the dining room in our house out into the pool house. I can’t wait for all the summer colors outside, although it’s just as beautiful with the fall foliage! We’re still debating on whether or not we should add a rug here. It would certainly help make things more cozy in the winter months, but it might just end up being a pain during pool season! In regards to the sliding doors. On the left, we have a sliding door that opens on the far end. I then had a third panel of glass added to the end closest to the vantage point in this photo. This helped make it look like a giant sliding door, but was much more cost-effective. Straight ahead, we have two sliding glass doors that meet in the middle. This was also a much more affordable alternative than a giant slider or accordion style doors. We love how much natural light they allow to truly make this feel like an indoor/outdoor space!
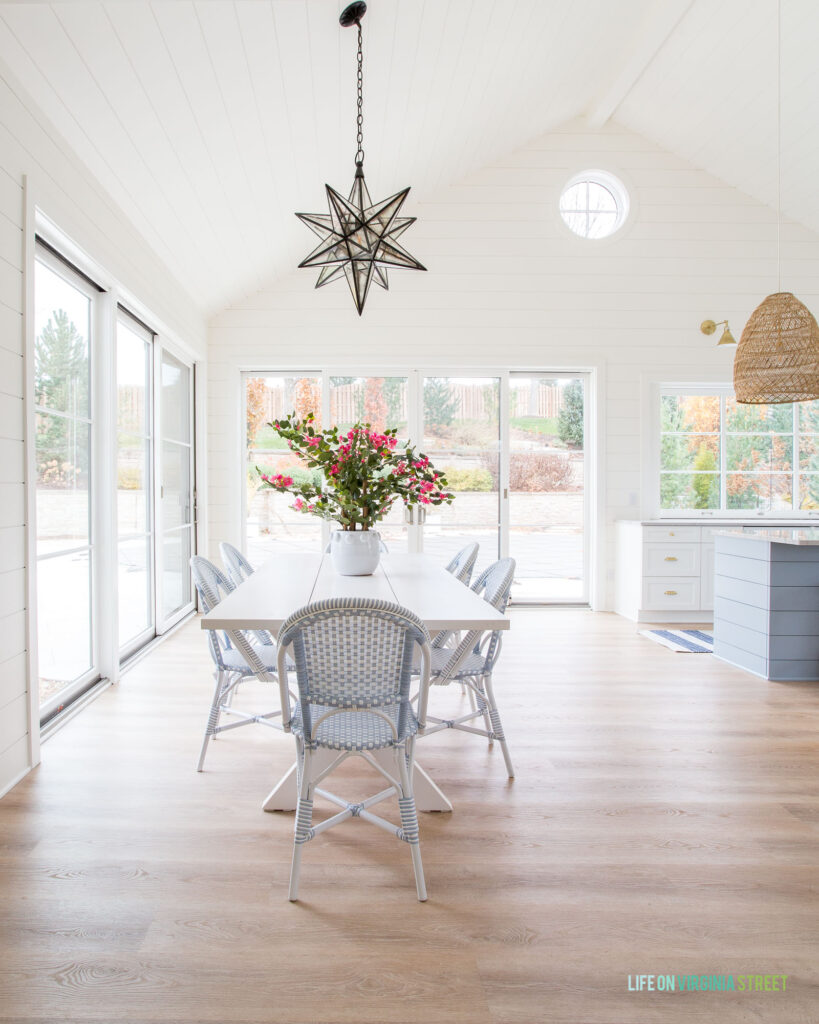
POOL HOUSE DINING ROOM SOURCES: Dining Table | Outdoor Dining Chairs | Star Pendant Light | Faux Bougainvillea | White Circle Dot Pot
I also shared this sneak peek a few weeks back when the pool was still open. I was determined to get a few images of the space while you could see the water and umbrellas (even if it was freezing out)! But, it makes me super excited for what’s to come next summer!

POOL HOUSE BATHROOM
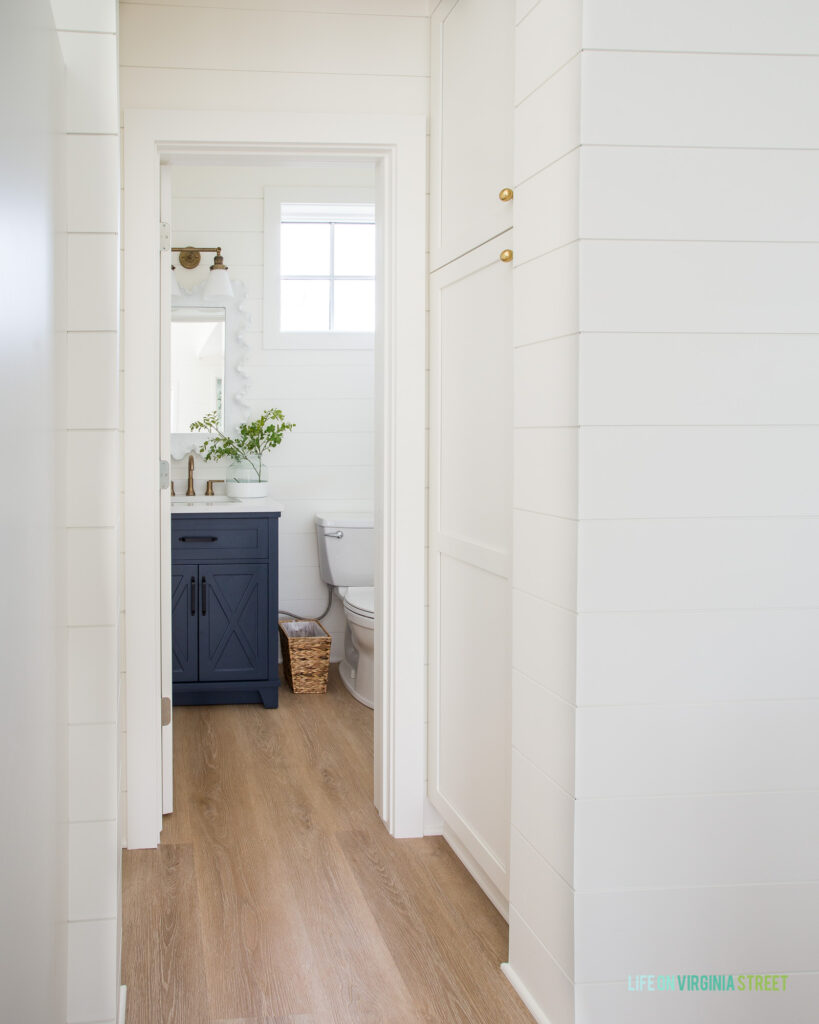
The pool house bathroom is quite small. As in, so small, the door only clears the vanity by about an inch. However, it has all the essentials we need and we didn’t have any more play with our property line! But, it packs a lot of personality into one tiny room and we love it!
I’m thrilled with the vanity we ordered, and although I planned to replace the included hardware, I’m actually happy with it now that all the other elements are installed.
I do need to find a better solution for the toilet water line (paint it white? get a taller trash can?) but other than that, I’m super happy with how it turned out! This vase also won’t be staying since the counter has limited space, but I needed a little greenery in here for now! I’m particularly excited that we don’t have to have trails of salt water in and out on our dark hardwood floors, as people run though the house to the powder bath. This will be one of the biggest upgrades for us, come summer time!
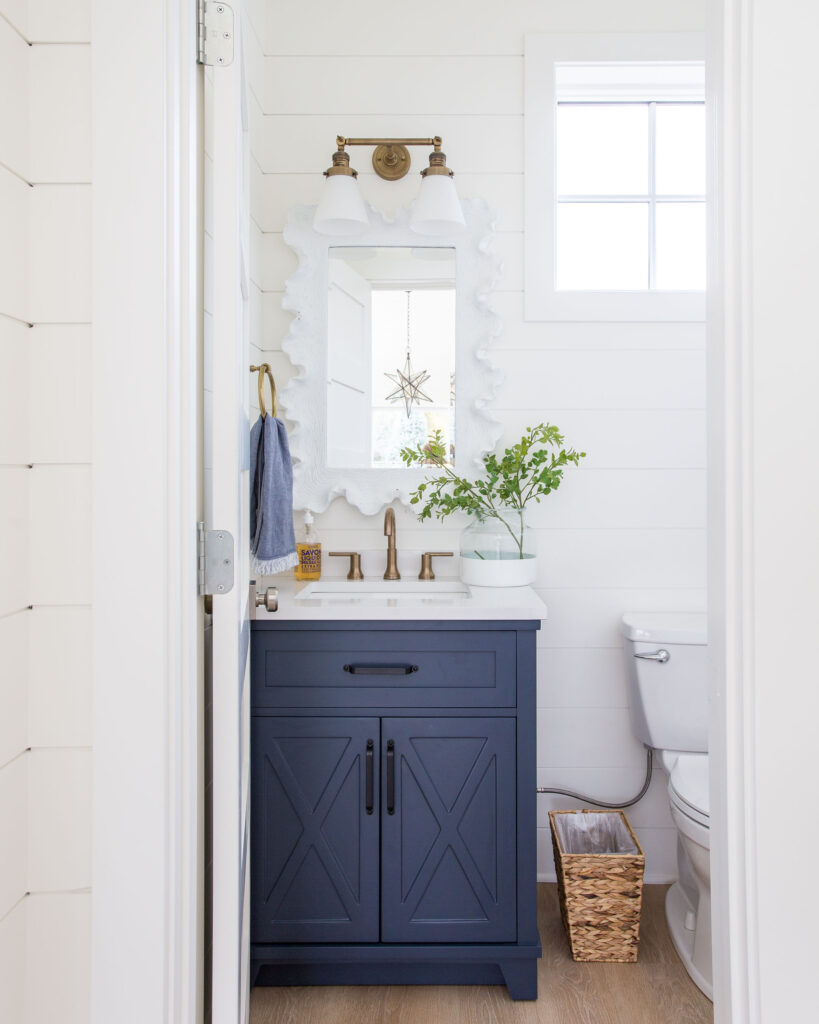
POOL HOUSE BATHROOM SOURCES: Vanity | Light Fixture | Mirror | Towel Bar | Toilet Paper Holder | Hand Towel | Hand Soap | Faucet | Vase | Faux Greenery | Seagrass Trash Can | Door Hardware | LVP Floors
Here’s the view from the bathroom “hallway”. We just love all that natural light pouring in!
We added this little hallway to accommodate a small linen cabinet, as well as to keep the bathroom door from being right in the kitchen and living area. The cabinet holds pool towels and cleaning supplies/mop/vacuum. It’s already proven rather handy!
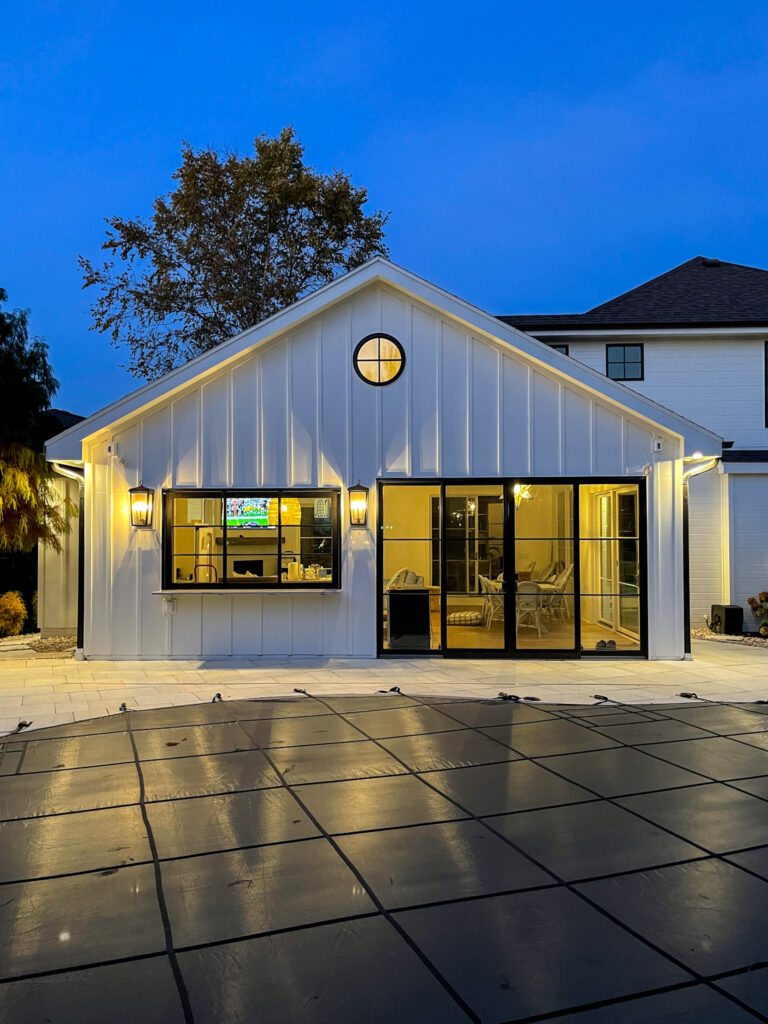
POOL HOUSE EXTERIOR
The changes to the exterior and landscaping probably warrant a post of their own! But, I’m going to share a few of the details here and can then do a follow-up at a later date if needed.
The star of the outdoor show is the indoor/outdoor bar. It’s something we’ve dreamed of for years, but with our climate, we weren’t entirely sure we could make it a reality since it’s not covered. But, with the help of our builders, CKF, and Millard Lumber (and even a few readers!) we couldn’t be happier with the gas strut window! And these Riviera Outdoor Swivel Counter Stools are going to ensure this area is the life of the party! Kurtis might be just as excited about this feature as he is the TV watching in the pool!
Here’s the area just outside the living space. It’s where the grill will now be located, and since the fireplace is on the opposite wall, we had them run natural gas out here in case we want to get a converter for our propane grill! Behind me in this photo is the entrance to the courtyard. Although this is a decent size surface, I’m not sure we’ll place patio furniture here since it likely wouldn’t get used as much as other areas would. But this prior eyesore now look so much better and it was a great way to use our leftover pavers! This picture is a few weeks old (hence the leaves and green grass), so that patch of concrete has since been painted. The gooseneck light is one of my favorite fixtures from the project!
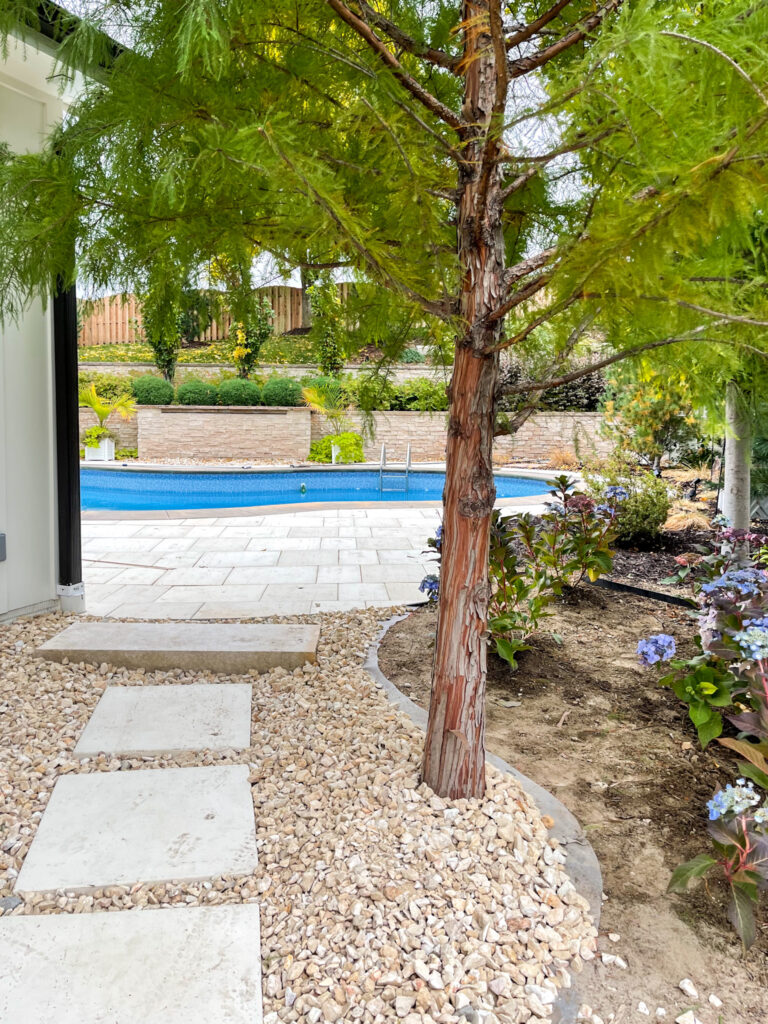
In the image above, you can see a little path we created to get from the front to the back of the pool house along the side yard. The stones act as a dry creek bed to help with drainage, and the fineline buckthorns will help add some privacy! Below you can see what it looks like at the end of the path. Love this view! Since I took this photo, the dirt has been filled with mulch. It’s all so beautiful and Innovative Outdoors did an incredible job!
I’m so excited to see how this entire space evolves through the seasons!
EXTERIOR POOL HOUSE SOURCES: Outdoor Swivel Counter Stools | Wall Lanterns
I took this evening shot a few weeks back when there was still some construction going on. But we’d had our friends over for a few hours that day and it really gave us a taste for just how much fun we’re going to have in this space! And I can’t wait for the glow from the pool house to reflect on the pool water!
Master Source List
Following is a master source list for everything used in this project. If there’s anything I missed, feel free to let me know in comments and I’ll be sure to get it added if I have the information!
GENERAL BUILDING DETAILS
Nearly all of the supplies were ordered through our builder, Bluestone Custom Builders. They also were responsible for hiring all the subcontractors and tradesmen for this project which was a huge benefit! Here are a few other details on building supplies and subcontractors I’d like to call out. Please note some of these are not linkable, but I’ve included links where I can:
- Builder: Bluestone Custom Builders – so wonderful to work with!
- Designer: ME 🙂
- Drafting & Renderings: Structur Design
- Painters: Marshall Painting – I can’t say enough good things about Ryan and his crews!
- Landscaping: Innovative Outdoors – Loved their creativity and help to bring the hardscapes and landscapes to life!
- Cabinetry & Countertop Fabrication: CKF
- Shiplap: We used a 3/4″ pre-primed poplar siding that was 8″ x 16′ (custom ordered through Millard Lumbar)
- LVP Floors: Lifeproof 8.7″ Wide Planks in Dusk Cherry
- Windows: Andersen 400 Series, Dark Bronze Exterior Frame, Unfinished Pine Interior (we had them painted in the BM Simply White), 7/8″ Grille Bars – ordered through Millard Lumber
- Sliding Doors: Andersen 200 Series, Dark Bronze Exterior Frame, Unfinished Pine Interior (we had them painted in the BM Simply White), 7/8″ Grille Bars – ordered through Millard Lumber
- Gas Strut Window: Parrett Windows ordered through Millard Lumber
- Patio/Pool Deck Pavers: Ivory Antique Travertine Concrete Pavers from Rochester
FURNITURE, LIGHTING & DECOR BY ROOM
Following is a master list of all furniture, lighting, and decor, sorted by each “room”. If there are items you’re interested in, I’m guessing many will go on sale sometime in the next week or so if they haven’t already, with Black Friday quickly approaching!
POOL HOUSE KITCHEN & BAR SOURCES: Basket Pendant Lights | Aged Brass Star Sconces | Striped Runner Rug | Backless Counter Stools | Outdoor Swivel Counter Chairs | Cabinet Ball Knobs | Drawer Bin Pulls | Faucet | Counter Depth Fridge | Beverage Fridges | LVP Floors | Blue Serving Board | Similar Snowball Viburnum Stems | Blue Vase | Cabinet Colors: BM Simply White (perimeter) & BM Santorini Blue (island) | Countertops: White Macaubas Quartzite
POOL HOUSE LIVING ROOM SOURCES: Outdoor Sofa (Perennials Basketweave – Chalk) | Outdoor Swivel Chairs (Perennials Basketweave – Coastal Blue) | Round Storage Coffee Table | Round Storage Side Table | Rug | Woven Stools | Indoor/Outdoor Palm Pillow Cover | Indoor/Outdoor Striped Pillow Cover | Indoor/Outdoor Fringe Lumbar Pillow Cover | Floating Shelf Mantel | Frame TV (teak frame) | Ceiling Fan | Colorblock Vase | Wood Bowl | Seaglass | Recycled Glass Beads | Bone Beads | “Beautiful” Coffee Table Book | “Dream Decor” Coffee Table Book | “Surf Shack” Coffee Table Book | “Escape” Coffee Table Book | Fireplace Tile: Annie Selke Watercolor Lines in “Sky” from The Tile Shop
POOL HOUSE DINING ROOM SOURCES: Dining Table | Outdoor Dining Chairs | Star Pendant Light | Faux Bougainvillea | White Circle Dot Pot
POOL HOUSE BATHROOM SOURCES: Vanity | Light Fixture | Mirror | Towel Bar | Toilet Paper Holder | Hand Towel | Hand Soap | Faucet | Vase | Faux Greenery | Seagrass Trash Can | Door Hardware | LVP Floors
EXTERIOR POOL HOUSE SOURCES: Outdoor Swivel Counter Stools | Wall Lanterns
POOL HOUSE PAINT COLORS & FINISHES
- Pool House Exterior: Benjamin Moore White Dove
- Pool House Interior Shiplap Walls: Benjamin Moore Simply White – Scuff-X line, matte
- Pool House Interior Trim & Doors: Benjamin Moore Simply White – Aura line, semi-gloss
- Pool House Kitchen Island: Benjamin Moore Santorini Blue
- Pool House Perimeter Kitchen Cabinets: Benjamin Moore Simply White
- Exterior Window & Door Trim Color: Prefinished by Andersen – Dark Bronze Exterior Frame
Pool House Addition Costs & Follow-up FAQs
I know many of you come here simply for the pretty photos and decorating inspiration and don’t care about all the nitty gritty details! But, I also know several of you are planning to take on a similar project soon, based upon online conversations we’ve had. So, I want to ensure I address any specific questions you may have!
I will not be addressing costs for the total project, simply because it really isn’t applicable unless you do the exact same finishes with the exact builders, etc. Building costs are so volatile right now! However, if you’re looking to do something similar, I would find average building costs per square foot in your area for a similar finish level you’re looking for and then go from there based on the square footage you plan to accommodate. That should give you a relatively good ballpark idea. However, supplies and labor shortages are so crazy right now, it could really also vary at any given time even if all else were constant! In fact, since we started this project, nearly every single thing we used from the supplies to the furniture and decor has gone up close to 10%. It’s crazy!
Because there were so many moving parts on this project and so many spaces, I’ll plan to do a handful of follow-up posts as needed. If you feel I didn’t cover something in enough detail below, please feel free to leave a comment and I’ll address it there or do a follow-up post if it warrants it! However, I’ll plan to do some follow-up on the topics below based on questions I’ve already received. They’ll come in the form of one big FAQ post (depending upon how many questions come up) or dedicated posts.
- Gas Strut Windows
- Mini Split HVAC options
- The Closet Addition (other than the room build-out over the space, we have put this project on hold so more details to come down the road)
After living through a project of this magnitude, I cannot stress enough the importance of having a builder or contractor you trust that has the right connections! Especially nowadays with demand skyrocketing and qualified labor harder to find. We were so happy we ultimately decided to work with Bluestone on this project, as we couldn’t have done it without them!
I hope you enjoyed our pool house addition reveal! We are thrilled with the end result. A huge thank you to all of you that have followed along with us on this journey!
If you would like to follow along on more of my home decor, DIY, lifestyle, travel and other posts, I’d love to have you join me on any of the below channels:
Sarah you have exceeded all expectations! Everything is gorgeous with each detail well thought out. Here’s to many happy memories being made in your pool house!
Thank you so much Denise! I really appreciate you following along 🙂
Remarkable job Sarah. I have done many remodeling projects through the years and know the number of decisions it took to achieve such a gorgeous space. Love all your choices especially the flooring. Enjoy it!
Thank you Sharon! You’re right – SO many decisions! I really appreciate you following along on this journey!
Wow, so stunning. Congrats on such an awesome space!!!
Thank you Karen! I really appreciate it!
I’m speechless. All I can say is WOW!!!! What and amazing and beautiful space. You knocked it out of the park Erin. This space is going to bring you so much joy!! Just stunning. Kindly, Beth
Thank you so much, Beth!
The window at the bar! SOOOO good
Thank you! We’re so excited to use it to it’s fullest extent!
The whole pool house is beautiful, I am a blue girl and just love it! But I just have to ask – what happened to the star pendant light that was missing one point? The one you have now looks whole. Did you replace it or were you able to fix it and attach the point that had broken off?
Thank you so much! And great question! I didn’t mention it here but did in one of the progress posts. We were able to glue the broken glass together and it’s only noticeable if you know where to look. We were able to reattach the broken point. It happened to be the one you use to change the light bulb. The repair job is honestly a little sketch, so at this point, we won’t allow anyone to touch it other than us. We’re thinking we can make it more secure soon with some floral wire, but I only had green on hand! Unfortunately the JB-Weld stuff we tried worked until we had to open the door to put the bulb in.
Thank you for your reply and I’m sorry to make you repeat yourself, somehow I missed the answer to the pendant light situation in your progress post. We have a pool and one of those plastic Rubbermaid “shacks” to hold the pool equipment but no pool house. Congratulations! I’m so happy for you.
Oh my gosh! No problem at all! This post alone was nearly 5,000 words, so you can only imagine how much I’ve talked written about this project in the past six months. It would be easy to miss! And we still have a Rubbermaid “shack” too. I’ll be sure to share it in the summer. They’re pretty much a necessity for pool toys 😉 Thank you again!!
Amazing job, Sarah! It looks stunning! I love your style. This was such a large undertaking and you pulled it all together. Thanks for sharing!
Thank you so much, Caroline!
It’s amazing, Sarah!! Of course it would be! I enjoyed every detail and am now considering coming to visit you next summer 😉
Jamie xo
Thanks Jamie! You know you’re welcome any time!
Congratulations…it’s SO beautiful, I can just imagine sitting outside with an umbrella drink with my flips on!
And I love seeing those lil sweet faces peeking outside 😉
Woohoo, Santa came early to your house.
Beautiful and so many possibilities with decorating and entertaining.
I could live in that pool house! It really turned out beautiful. Congrats!!
Looks amazing! Great inspiration for a pool house I have in the works. Curious, how big is the island? Thanks!
We are trying to decide on what kind of window to use on a similar bar. Why did you choose gas strut over bifold?
Your pool house is beautiful! I love the way it turned out! And you utilized all the space perfectly. We just completed our pool house. It’s also similar size at 26’x30′ but not enclosed. I designed it myself and it was a ton of work! But so glad it’s done and we love it. You are so right…getting the right contractor is huge. I GC’ed the whole project and managed 14 sub contractors! Life was crazy for sure…but so happy it’s complete!! Enjoy your beautiful space!!
Hi! Absolutely gorgeous! Could you please tell me the dimensions of the bar window?
Thank you!
Thank you! The overall frame was 96″ w x 54″ tall 🙂
I am in the process of designing a floor plan for a pool house. Would you mind sharing your floor plan/blue print? I love what you have built!