Today I’m touching base on all the progress we’ve made since my last post with progress on the project, our Pool House Plans, back in early May. I have a lot to share so let’s jump right into it!
This post contains affiliate links for your shopping convenience. You can read my full disclosure policy here.
If you’re looking to get caught up on this project or see where we started, be sure to check out these additional posts:
I’ll be digging into our 3-D renderings, finish selections and progress on the project below!
Updated Pool House Renderings
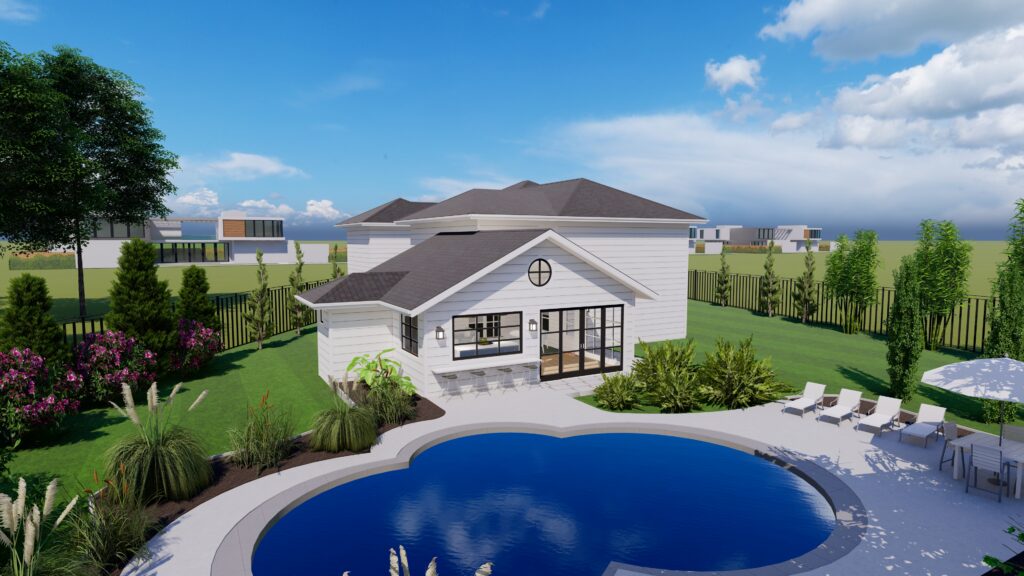
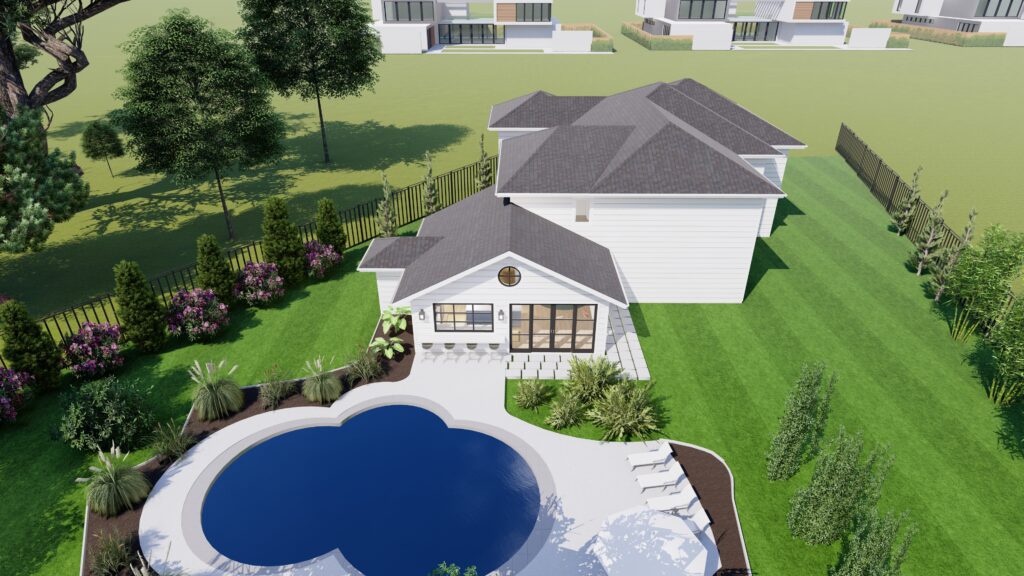
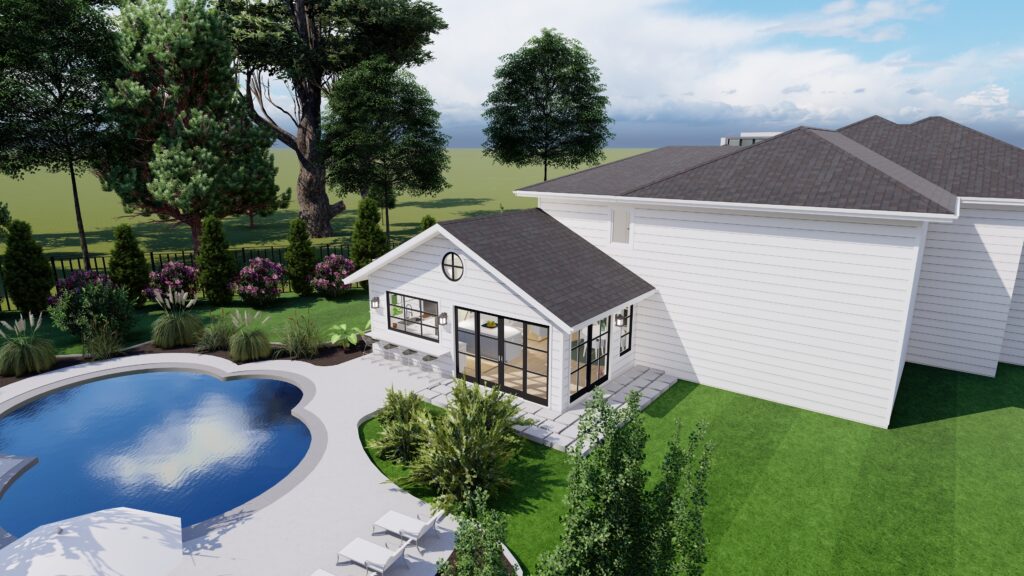
In my last post with our Pool House Plans, I shared some renderings that I had mocked up in RoomSketcher. My skills were pretty limited, so the folks at Structur Design made me some legit 3D renderings that have me even more excited for the project. They are also the ones that created the plans for us to use to submit to the city for our permit (includes the behind the scenes specifics like plumbing/electrical/roof pitch/foundation details, etc.). We basically met with them onsite once we had rough plans developed with our builder, BlueStone Custom Builders, handed over measurements and the finishes we chose, and they did all the dirty work! These images will help you all be able to visualize the space so much better! If you plan to embark on a large renovation or build, these renderings from the professionals can help you identify things you want to change before it gets too costly to do so!
We’ve made a few changes since these were finalized, so I’ll walk through them in detail below. Also, keep in mind that windows are only shown that are part of the addition – our existing windows aren’t included on the renderings. I think for me personally, the most helpful aspect of these renderings pertained to roof pitches. I can visualize most of the other details in my mind, but roof angles are a whole other animal! I also found these super helpful when judging scale of various elements.
One of you actually recommended we look into a gas strut window for our bar top counter that will open up (in lieu of accordion style doors). After doing some research, we realized that would be the perfect alternative for our project. So that window will actually lift up like an awning overhead the bar area.
We’ve made a few slight modifications to this view. We actually plan to have pavers run all the way up to the house (without the landscaping in between). We’ve also change the slider on the right to have three panels. The left will be moving, and the other two stationary which means we won’t need that window shown. It will basically just look like one really large sliding door.
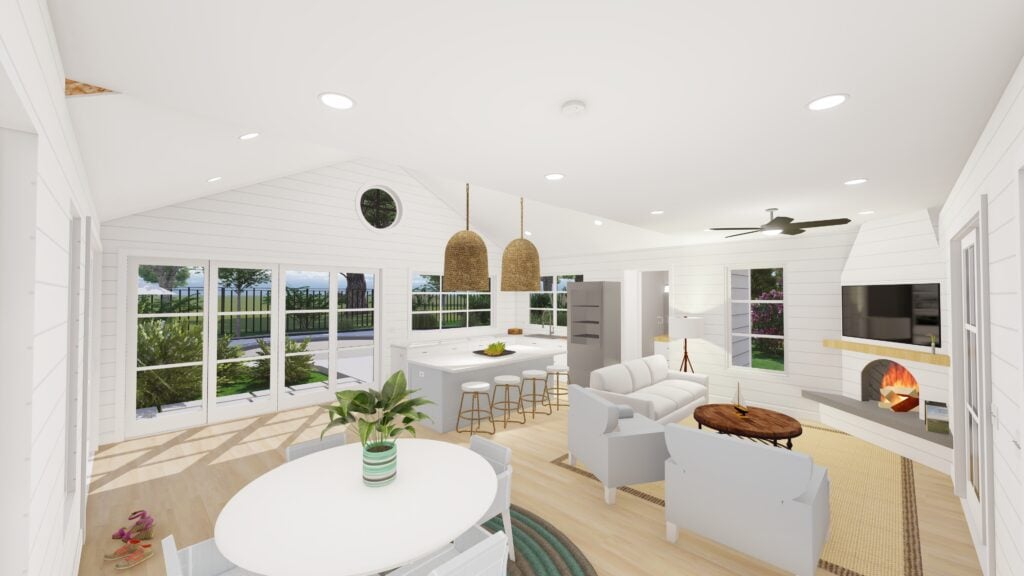
Moving indoors, this view is essentially looking out from our existing dining room door. I think it’s my favorite, because it really helps to visualize how the rooflines all work together! The flat portion above the living area and part of the dining area is where our closet will be up in our bedroom. Past that, the ceiling will vault to about 16′ at the highest point.
This view is standing by the sliders that lead out to the pool. Aside from finishes, the layout and scale of these images are super close. Our fireplace won’t have a hearth (it will just be an angled wall with shiplap and a small tile surround around the gas fireplace insert). But, because the space will get so much humidity when we open the doors in the summer, we opted to use an exterior siding material that will mimic shiplap. We’ll actually be running it on the ceiling as well.
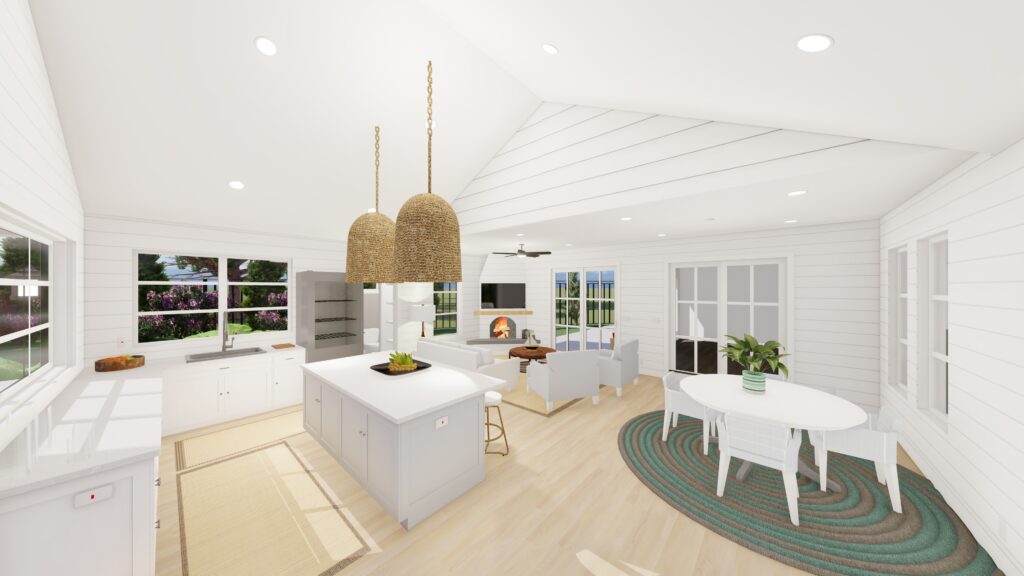
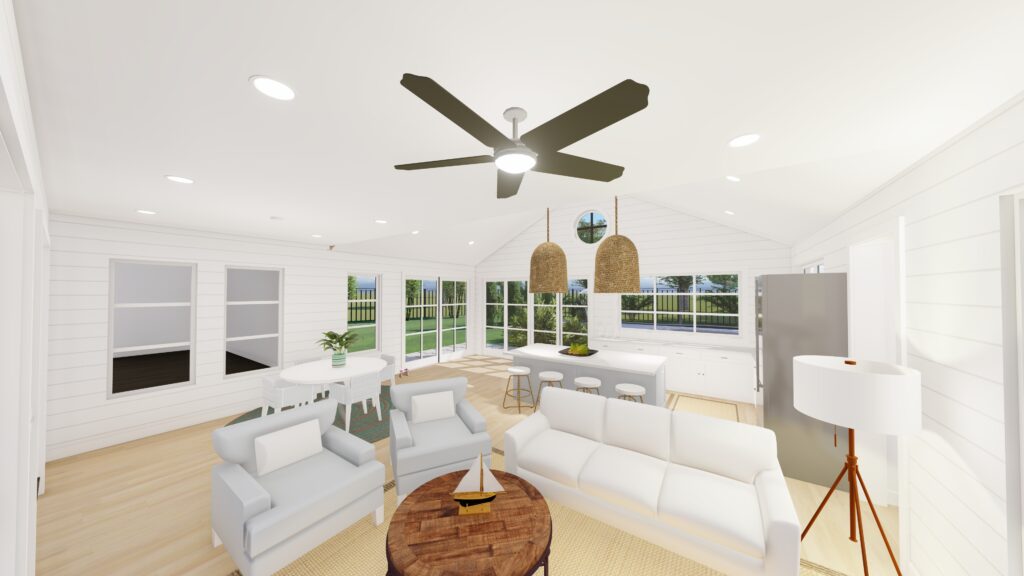
And this final interior view is looking from the fireplace corner out into the space. Those two windows you see on the left are the ones that would look into our existing living room inside. In terms of all the other windows, I may have gone a bit wild. But I really wanted this space to be part of the outdoors as much as possible, and not just feel like another interior room in our house since it’s all connected.
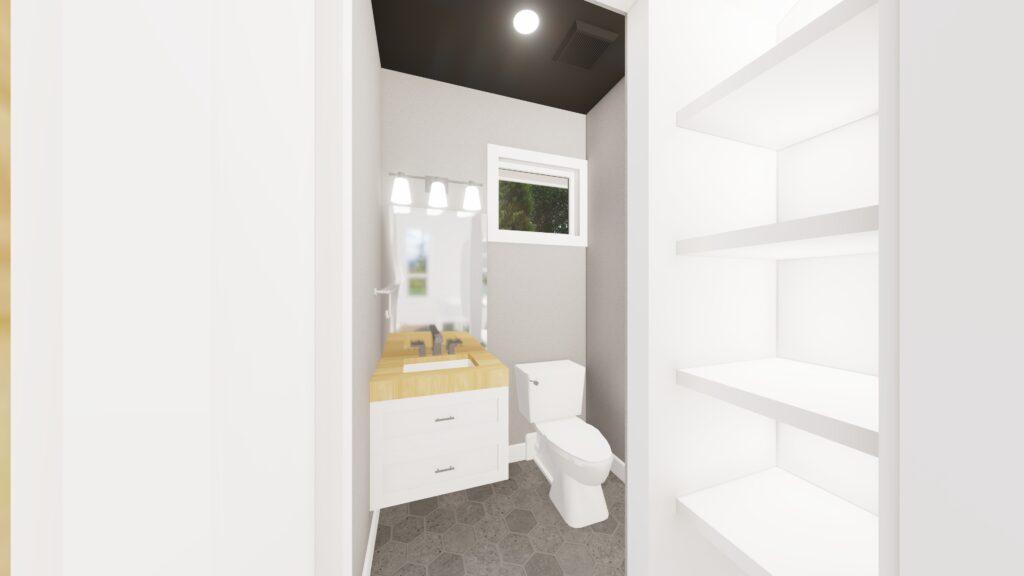
Lastly, here’s a pic at our little bathroom! We’ve already changed a lot here (the window will actually be on a side wall) and the storage will actually be in the bathroom (likely behind doors). But it will be so nice to no longer have wet bodies traipsing through most of our main floor to get to our powder bathroom! We’ll, for simplicity of install, we’ll be carrying the luxury vinyl in here on the floors, as well. The walls and ceiling will also be the white shiplap. And, as you may know from my post on Tuesday, we’re still searching for the perfect small vanity!
I can’t thank Structur Design enough for creating such lifelike visuals for us to use for this project! They’ve certainly helped us to avoid a few costly mistakes (or fix things that would have annoyed me). Highly recommended if you’re about to start a large-scale project! You can also follow them on Instagram to see how their renderings evolved into real-life homes!
Finishes and Interior Selections
I mentioned previously that we’ve almost completely wrapped up our interior selections! With lead times where they stand for most retailers and vendors, time was of the essence if we want to keep things moving. One of the challenges with the space is that we had to go with selections that can stand up to the crazy humidity and heat we get here in the summer months. We wanted to ensure everything was durable, humidity resistant and waterproof, if at all possible!
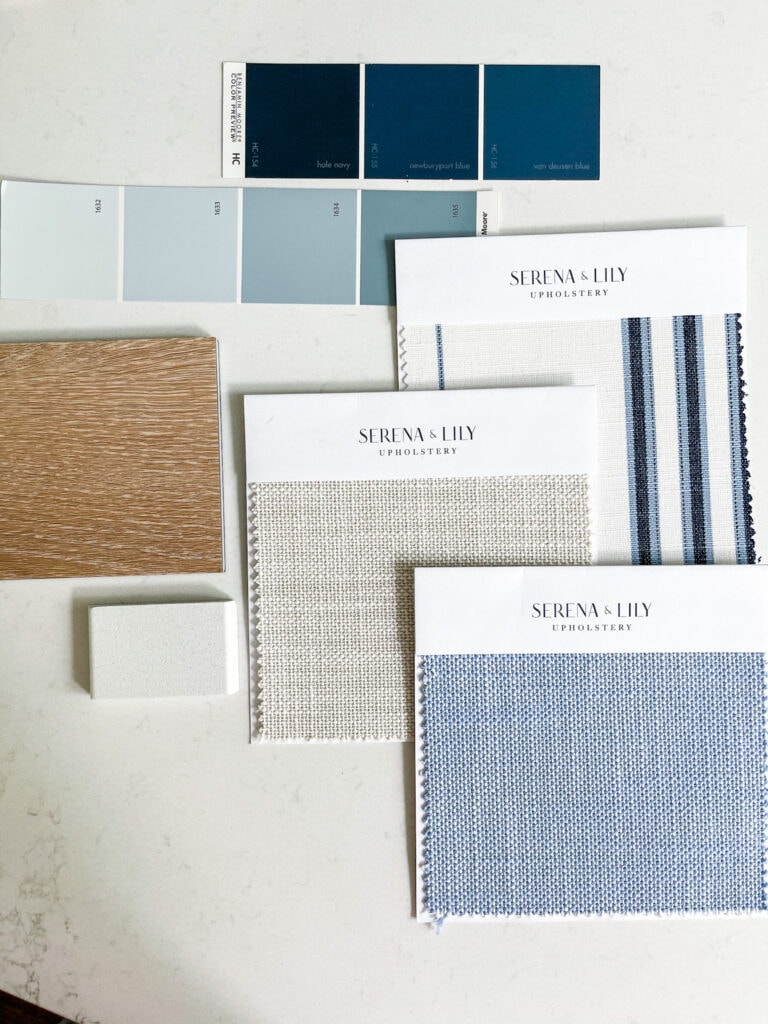
Below is a quick iPhone shot of some of the items we’ve selected. The fabric swatches are for the furniture and pillows we ordered (shown in detail below). After hearing so many great things about this luxury vinyl, we’re going to moved forward with it in the Dusk Cherry color. It’s not only waterproof, but seems like it will be more slip resistant than tile. And, we finally picked Benjamin Moore Santorini Blue for the island! It’s one shade lighter than the interior of our front door (second from the right on the lower swatch below). I got a lot of feedback from BM Hale Navy island owners and they said it is impossible to keep looking clean and hide nicks since it’s so dark.
I’ve shared these next two images before, but they’re a mix of our final selections and some still-to-be-determined items for furniture and decor. Most of our furniture has actually already arrived other than the upholstered pieces. They should be here in the next month or so, and I can’t wait to see them in person! I’m actually glad they are taking longer (since they’re made to order) because I don’t actually have anywhere to store them right now 😉
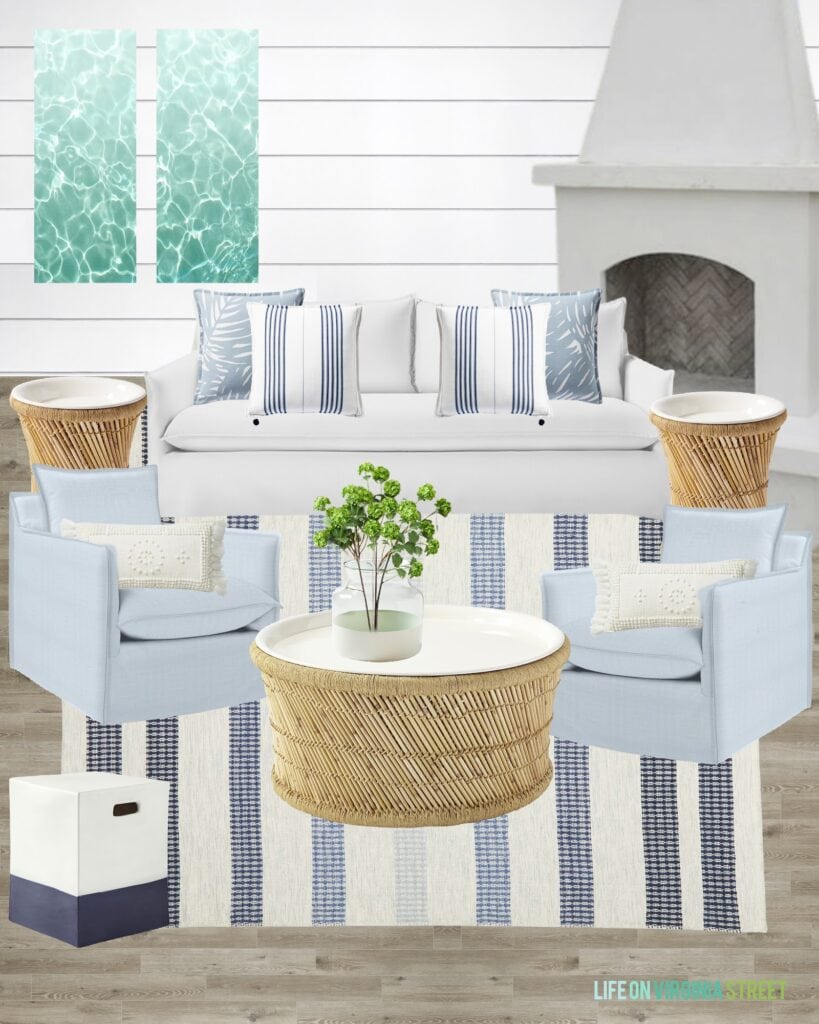
SOURCES: Pool Water Art | Upholstered Outdoor Sofa | Striped Rug | Upholstered Swivel Chairs | Coffee Table | Side Tables | Colorblock Stool | Palm Print Pillow Cover | Striped Pillow Cover | Embroidered Lumbar Pillow Cover | Paint Dipped Vase | Faux Viburnum Stems
You can see here I also added the paint swatches to the mood board below, as well! One of the last things we need to finalize is our countertop selection. Since the countertop will extend outdoors, we cannot use quartz, and need to go with a natural product like granite or quartzite. I’ve visited a slab yard but need to get Kurtis out with me this weekend.
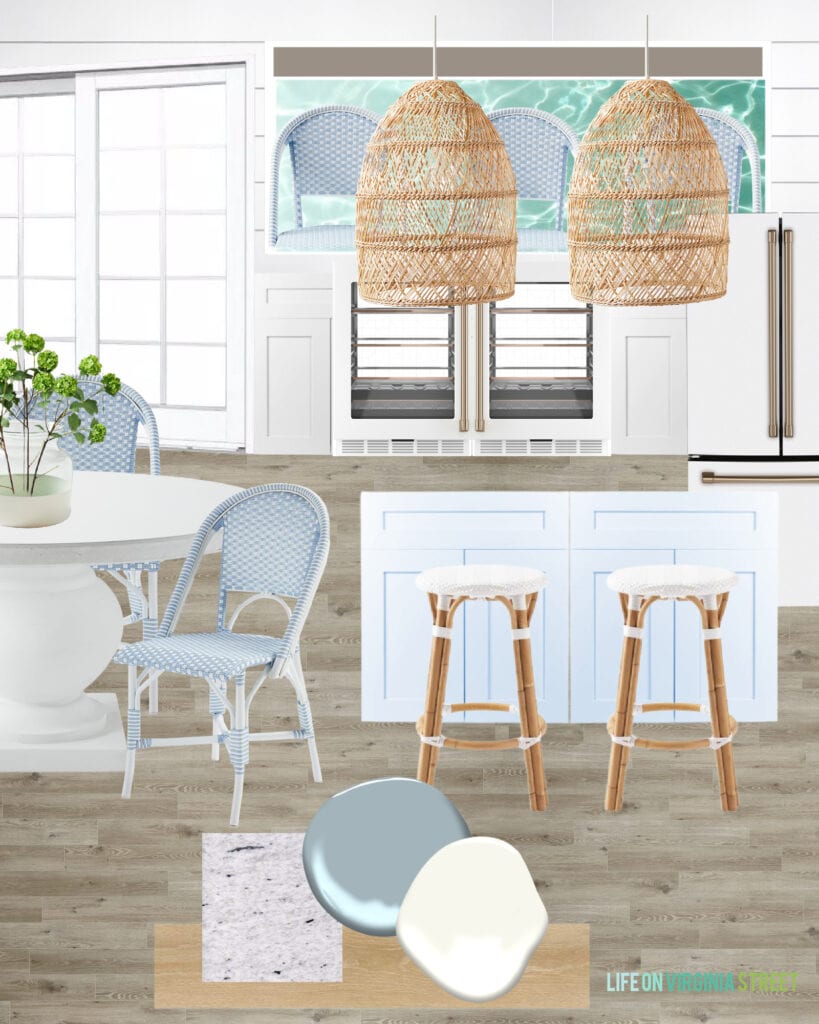
SOURCES: Round Dining Table | Paint Dipped Vase | Faux Viburnum Stems | Outdoor Dining Chairs | Outdoor Swivel Counter Stools | Basket Pendant Lights | Backless Counter Stools | Matte White Fridge | Matte White Beverage Fridge | Luxury Vinyl | Island Color: Benjamin Moore Santorini Blue | Wall & Exterior Cabinet Color: Benjamin Moore Simply White
We’ve decided to go with this Matte White Fridge and Matte White Beverage Fridge. Since we opted to go with a full-sized fridge in lieu of a beverage fridge, we also opted out of an ice maker. It was one thing we thought for sure we’d use in the space, but since the fridge has an ice maker, it seemed a bit redundant. Plus, they are so expensive! I love that the Café line of appliances offer matte white finishes, so they can help blend into the cabinets more.
We also opted out of the kegerator. After doing more research, it sounds like they are constant work, and I didn’t love the idea of drilling into the solid surface counters for something that may not have a long lifespan. We’ll also have a sink with a disposal, but no dishwasher since we don’t use glass or breakables out by the pool.
Here are some quick renderings of the cabinets from CKF. We worked with their kitchen designers to come up with the layout. We’ll have a built-in double trash bin, drawers for pool test strips, and then the rest will be storage for items we may use during parties. I told them I didn’t want this to be a mini replica of our kitchen, so we are wrapping the island with shiplap and not doing any upper cabinets. We kept it all pretty simple!
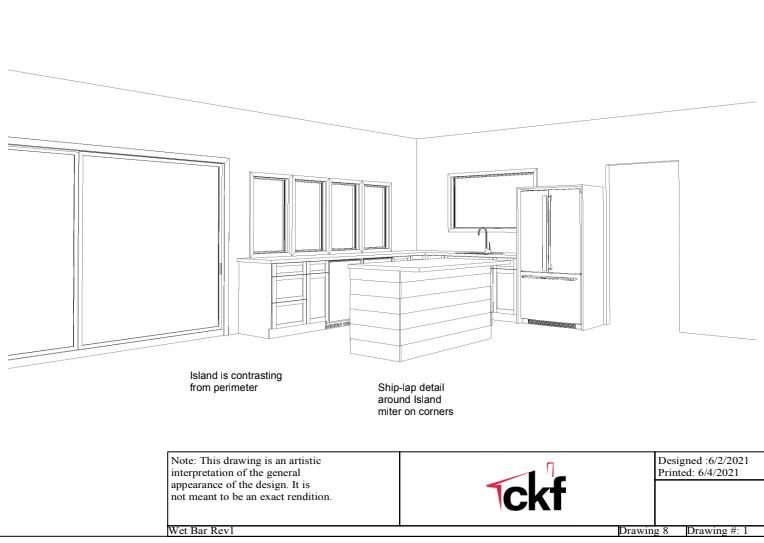
Unfortunately, cabinets are super delayed right now, so ours aren’t tentatively scheduled to be installed until mid-August. Which means the countertops can’t be templated until then which adds another 3+ weeks on to the end of that. I’m guessing at this point, we’re looking at a mid-September reveal. Even though I’m still crossing my fingers for a few small miracles 😉
The only things we have left to finalize are the bathroom vanity, plumbing fixtures, ceiling fan and tile surround for the fireplace. Other than that, I think that’s it and everything else has been ordered!
Pool House Progress
It feels like we’re finally past the waiting period of this project. I’ve had a number of people on Instagram message me and say they can’t believe how quickly the project is going, or asking if I have connections at the city for permits, or wondering why their projects are taking so long. Before we jump into progress, I just want to remind everyone that this project has been in the works for nearly a year and a half in one capacity another. That’s actually one of the reasons I hesitated sharing the project for so long! Things just seemed to move slowly for so long (as we were waiting on plans, surveys, permits, etc.) and there just wasn’t much to share on a regular basis. The reality is, projects of this scale take time and a lot of patience. Which I’m not the best with 😉 But I just want to set realistic expectations and help avoid frustrations you may be feeling with your own projects! But, our builders, BlueStone Custom Builders, have also been super awesome at organizing everything and getting all the tradesman lined up so quickly!
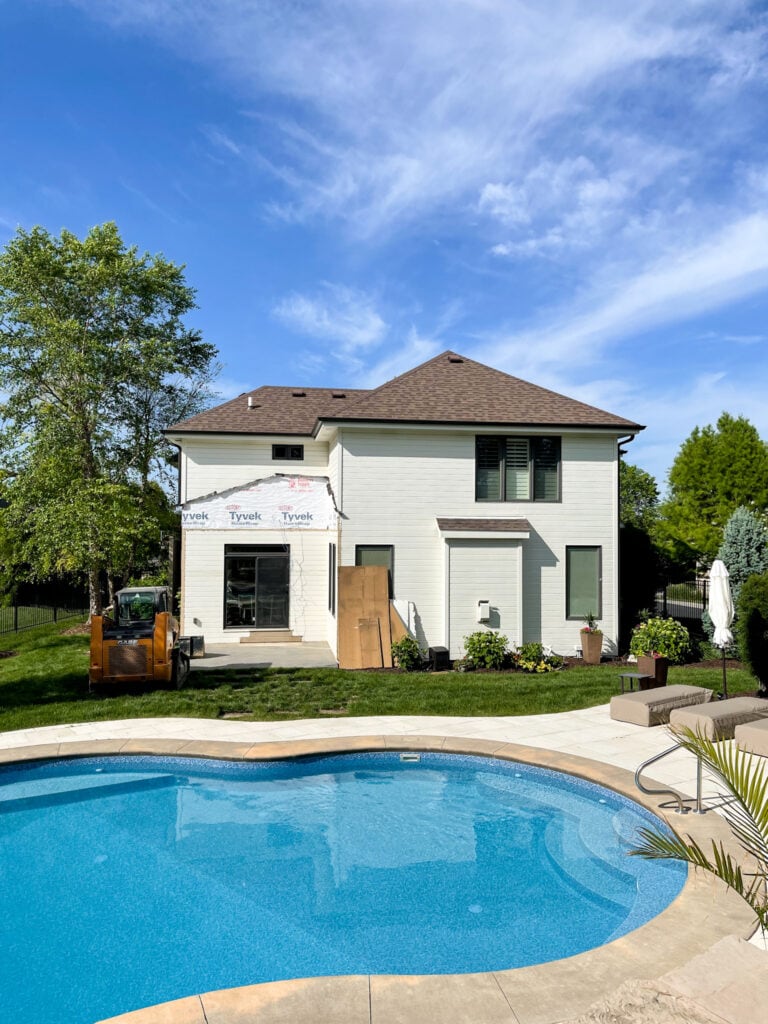
As you may have seen, demo started last week!
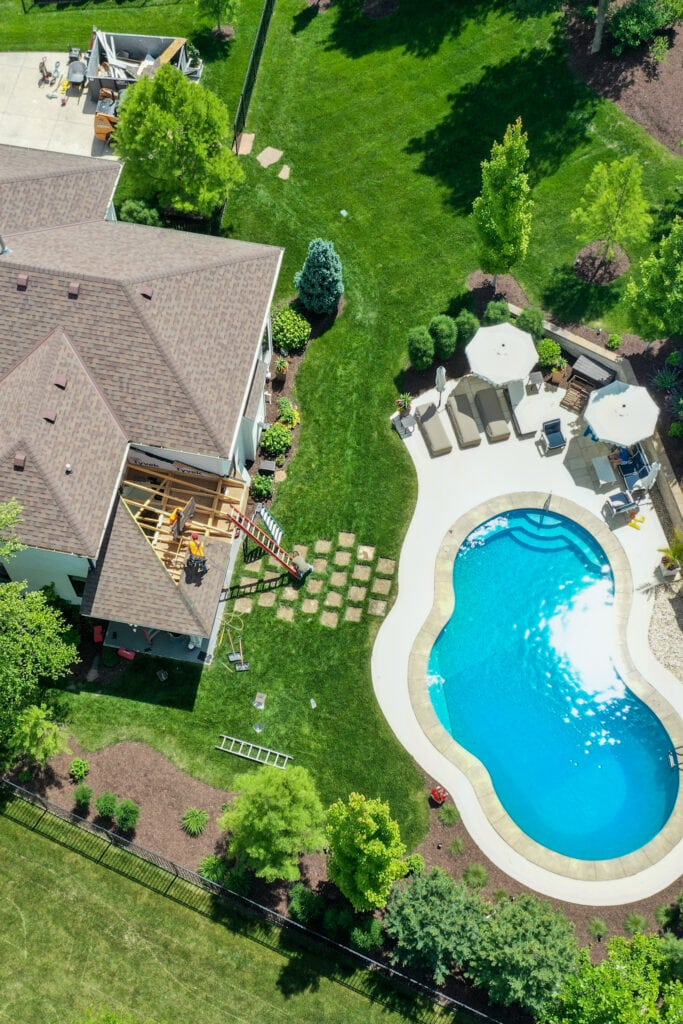
They got the covered patio off and the concrete out in about two days!
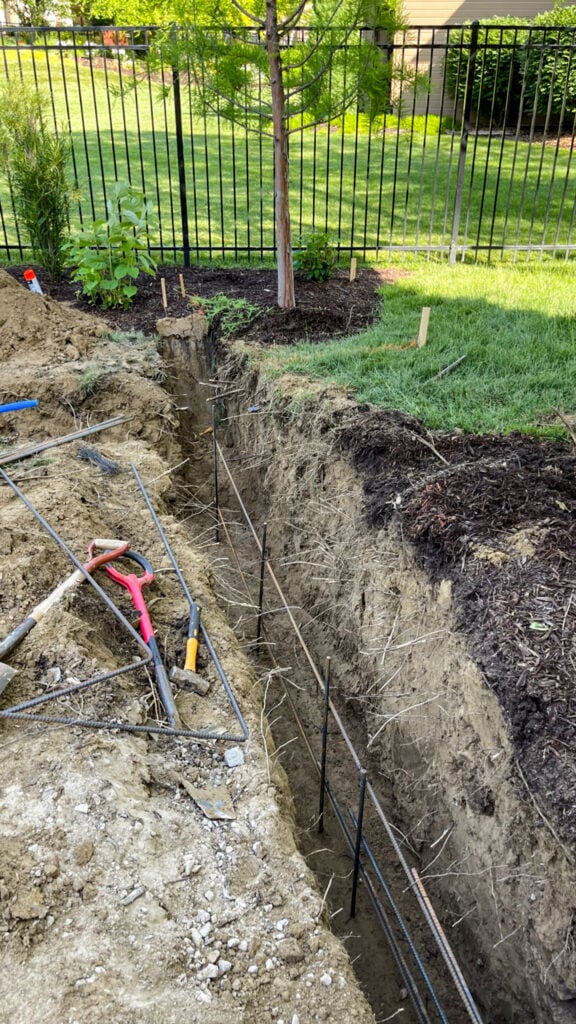
Yesterday, excavation started and the footings were poured!
It’s fun to see the footprint now from above!
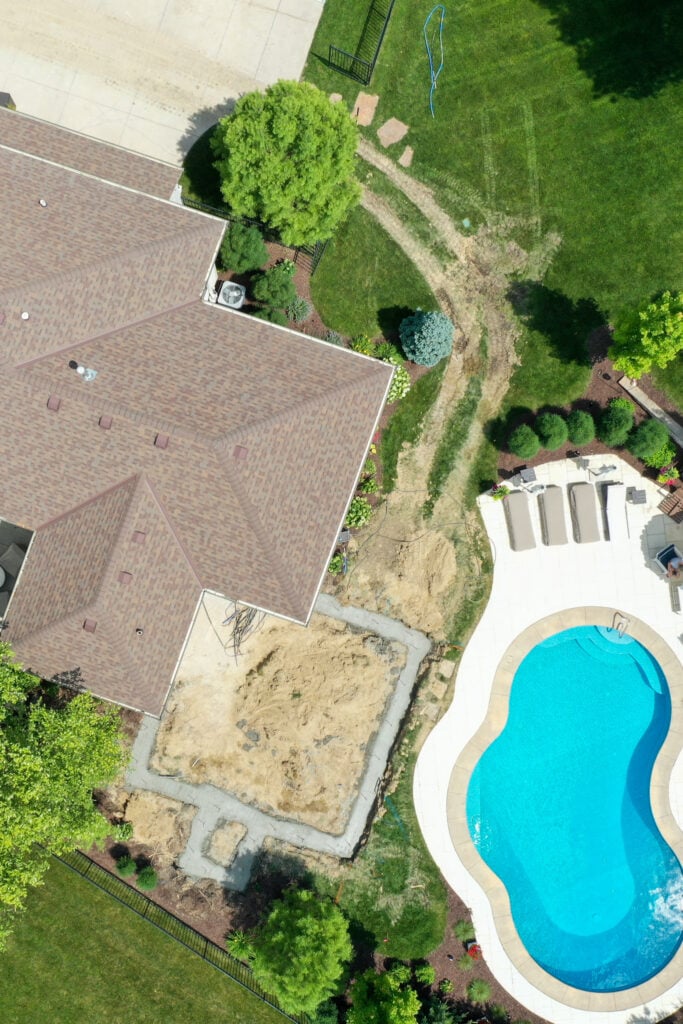
I wandered around for about 30 minutes yesterday after the guys left, just to get a feel for it all. #nerdalert
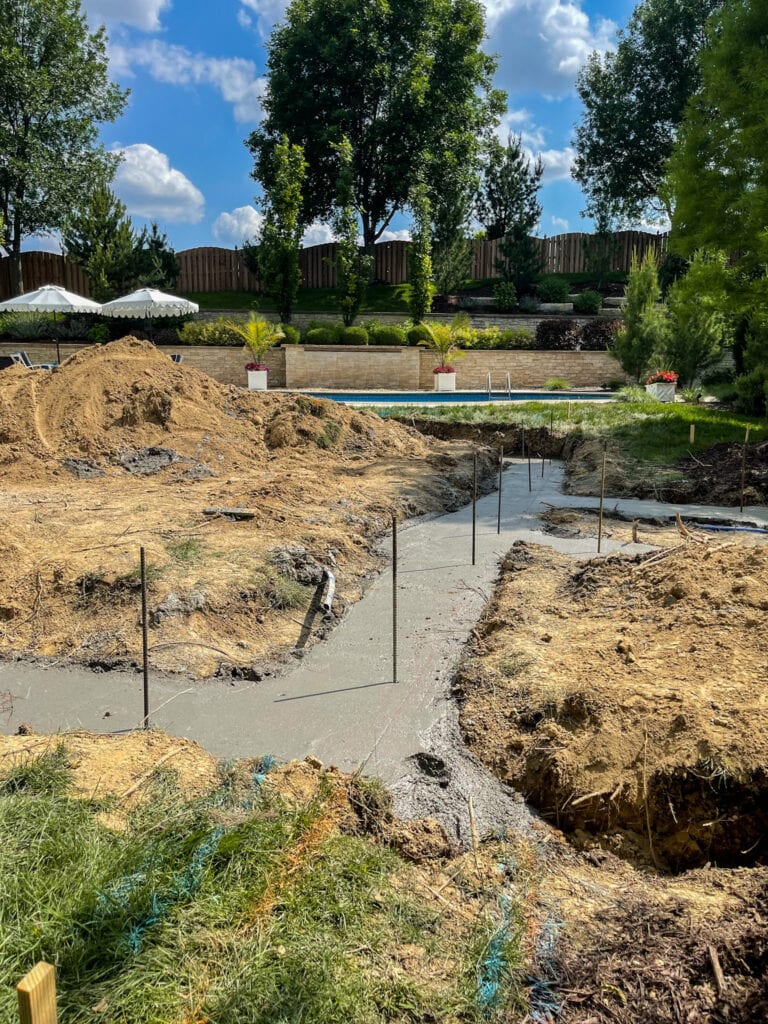
I believe they’ll be back today or tomorrow to pour the pony walls/foundation before they can then level everything out to start the slab. If you want to watch updates in real-time, you can check out my Instagram Stories! I also add all new updates to the little highlight bubble called “Pool House” – the first circle. I’m including a mix of video with me talking, drone images of progress and more!
Well, that about wraps up this progress report! Framing is tentatively set to start mid to late next week, so it will be fun to watch everything take shape!
If you would like to follow along on more of my home decor, DIY, lifestyle, travel and other posts, I’d love to have you join me on any of the below channels:
Wow! Seeing the plan in a rendering really makes it so much more exciting! It’s going to be such a fabulous space to enjoy for y’all when it’s finished.
Wow, what a great project. It’s going to be fab….congrats!
Absolutely beautiful choices! I’m excited to follow along with you. P.S. I have the Cafe appliances and they are great!
I can’t wait to see it all come together. Your vision is just that, a VISION. It is going to be so beautiful.
looks fantastic. now is your courtyard no longer there. looks great congratulations
We just put the Dusk Cherry in our master bath. If you happen to be looking for a mirror, Target has a 24′ x 64′ wood floor mirror by McGee which is identical to the DC floor coloring.
Your space looks gorgeous!