Sharing a step-by-step tutorial on how to make a mood board for interior design or fashion collages! These design boards can be helpful when designing a room in your home, or for compiling images for a project you may be working on!
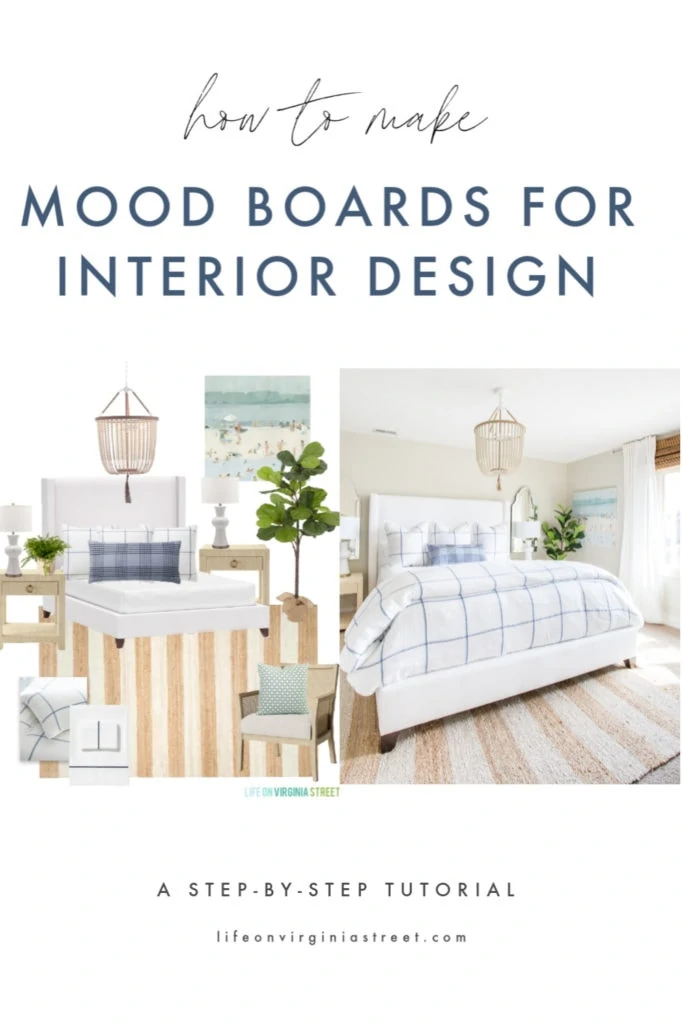
The number one question I frequently receive by far is how to create a mood board for interior design and/or fashion. Whether it be every Saturday morning I share a Weekend Sale Alert post with my collages, or when I share my seasonal decorating design boards, I am flooded with message about how to make them. Today I’ll be sharing a step-by-step tutorial on how to make your own design board or mood board!
This post contains affiliate links for your shopping convenience. Click here to read my full disclosure policy.
How to Make A Mood Board for Interior Design And/Or Fashion Collages
Mood boards can be so helpful in envisioning spaces you want to design. When you can see your vision all on “paper” you can quickly see what works and what doesn’t work. They can also help provide inspiration for outfits, gather ideas for party decor, brainstorm a new color scheme in your home… the possibilities are endless!
As much as I love mood boards, I’ve honestly avoided sharing a tutorial for a few years because there wasn’t a super simple option out there. I used PhotoShop to make mine for years, and the tutorial seemed like it would take hours to fully teach and others to understand. The software is a bit too comprehensive at times, and the learning curve can be steep.
But, thankfully, there are now several online software companies out there that have simplified the process a bit. They all still require some time and effort on your part, but they have taken a lot of the pain points out of the process! So, today I’m going to share a more simplified version of how I make my design boards. These can be helpful when you’re building a home, re-designing a space, planning outfits, or if you’re just feeling creative!
1. Collect the Images You Want to Use In Your Design Board
The first step to making a design board is to collect the images you want to use for your mood board. You can start with one or two and add more over time, or you can save them all first before you move to the next step and start compiling them in the software. If you’re struggling with the design itself, you may find it helpful to read my post on how to design a room you love.
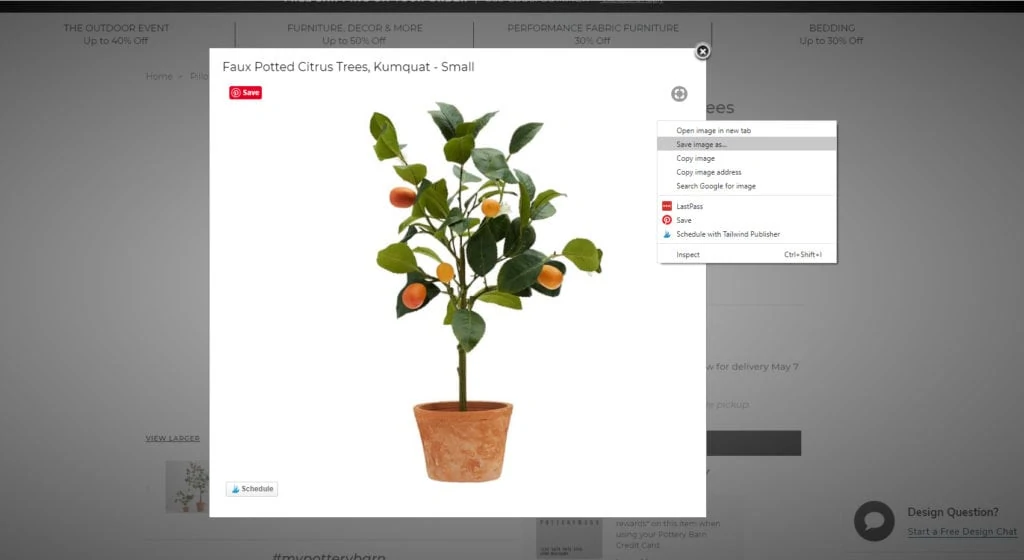
Simply save the images you want to use where you can easily locate them later. Since this step is different for each type of computer or digital device, you’ll need to know how to save images for your own device. Ideally, save the largest version of the image you can find (sometimes if you click them they’ll enlarge). Ideally, you also want a clean background! White is preferred, but really the cleanest version with the least busy background you can find will work.
Here’s a sample of how I save from Pottery Barn after clicking the image I want to save. They usually have multiple styled versions of the product but usually they’ll have one with a clean background as well. On my PC I right-click the image and then select ‘Save Image As’ and then locate wherever I want to save the photo. Again, this will be different for every type of computer/device so you may have to Google how to save images for your specific device.
A side note about the images you use. Please do your own research as to what images are okay and not okay to use. Keep in mind that images are copyrighted and you don’t want to use them illegally. If you are using your mood boards solely for personal use and your eyes only, I would argue you’ll be okay. However, if you are a designer, blogger, someone who plans to publish the boards online or in print, or plan to sell your collages and design boards to clients, you need to ensure you have usage rights to the photos in your boards. Most bloggers have access to vendor stock photos through their affiliate network contracts, however, it is your responsibility to ensure you have rights to the images you’re using in the manner you’re using them. Do not use others’ photography without their permission!
2. Create an Account with an Online Design Platform
For several years, I made all of my mood boards in Photoshop, but there are several other places that now offer similar services. I have recently started making many of them in PicMonkey, as well, so I had some other alternatives to share with you. The mood boards can technically be done for free using Canva or PicMonkey (with a few added steps), but most of the services have a small monthly fee.
You can also simplify the process significantly by paying for PicMonkey Pro or Canva Pro (they are fairly similar paid subscription services). I’ve used both platforms in the past and personally prefer PicMonkey (whereas I have friends who prefer Canva)! They’re both good options! I would recommend reading through all the steps in this tutorial before deciding which one is right for you. Following are a few more details on each.
- Photoshop. This is the software I’ve used for years and years. It probably is the most technical option, but because the program can do SO much more than any other software out there, it can be very intimidating to learn. However, since I also use LightRoom to edit my photos (you can read more about that process here), it made sense to also use PhotoShop. They are now in a bundle in the Adobe Creative Suite for $9.99/month.
- PicMonkey. Over the past year, I’ve started to use PicMonkey on a much more regular basis. It’s where I make many of my Pinterest graphics, my Facebook cover photos, my Instagram Story graphics and so much more! You can see a peek at my most recent projects I’ve made in PicMonkey below. And now, with PicMonkey Pro, you can also create design boards like mine all in the one platform!
- Canva. Canva Pro has a lot of the same features as PicMonkey Pro and at a very similar monthly cost. For me personally, I prefer the interface of PicMonkey to Canva, but I know many others that like Canva, so it’s really a matter of personal preference! The nice thing is you can try the basic platform for free before investing in the Pro options. They also have a Design School with courses on how to use many of their features which can be helpful if you’re new to the platform!
3. Start A New Project
Since I currently pay for PicMonkey Pro, and it’s the one I’d recommend as the most simple option, this tutorial will be based on that platform. I’ll include a few modifications along the way if you decide not to pay for the Pro option.
To start a new project in Canva, you’ll select “Create A Design”. The remaining steps will be similar there, just in a different interface. Going forward, all steps will be specific to PicMonkey, but the general idea is similar in Canva.
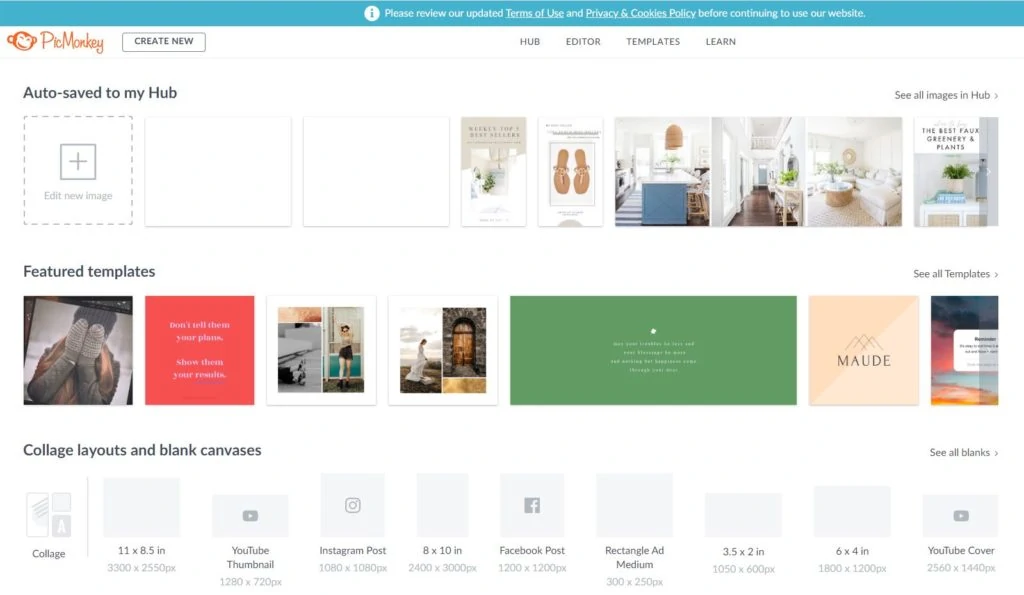
To start a new project in PicMonkey you can either start with one of their templates (they have really great options) or start with a blank canvas. For today’s purpose you’ll want to go the blank canvas route.
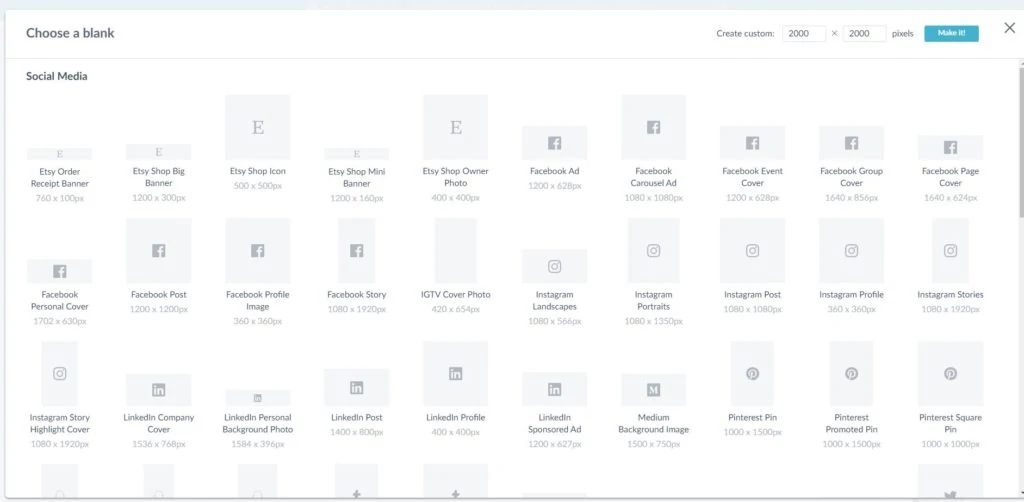
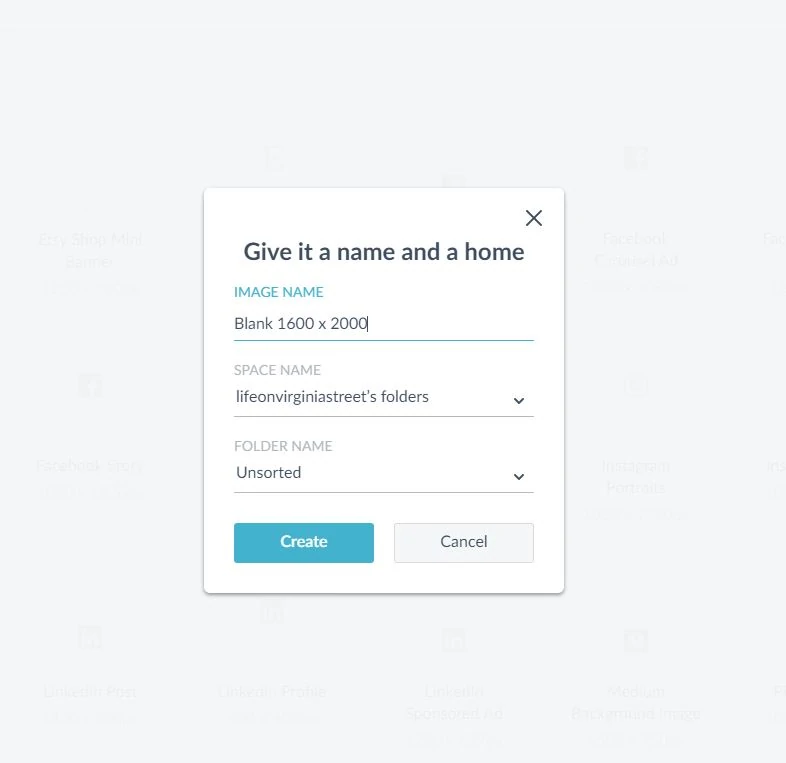
They have several size options and recommendations already created for you based upon your needs. So, for example, if you’re wanting a Facebook Post collage you could pick their pre-determined, optimal size for it. However, I always create a custom size. I usually create a custom size of 1600 x 2000 because it works well on multiple platforms for me, including my blog (and is in the 4×5 preferred ratio for Instagram). Once you pick which option you want, you click on ‘Make it!’.
You can then give your image a custom name. This is completely optional. I leave the ‘Space Name’ and ‘Folder Name’ on the default, but know that you have the ability to create custom folders for projects if you start creating a lot of images! Click on ‘Create’ and you’re ready to go!
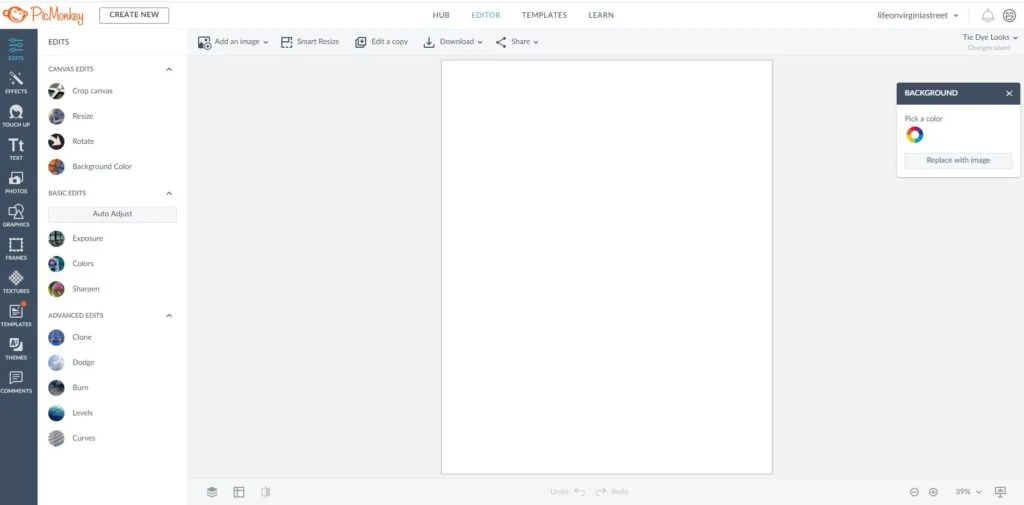
This is the blank canvas for you to start working from!
4. Import & Remove The Background From Your Photos.
This step is the number one reason why most people give up on design boards or end up with a less-professional looking board. It’s not mandatory to remove backgrounds, but I think you’ll be so much happier with the end results if you do! Keep in mind, even if your stock photos have a white background, you’ll still want to erase the background for layering purposes! But, images with white backgrounds will also be the easiest to remove (as long as your product isn’t mostly all white). This will be especially important in room designs as you try to layer items like furniture, rugs, etc.
If you’re wanting an all-in-one solution to erase backgrounds in a photo, you’re going to have to go with one of the paid versions of the software platforms listed above. Again, PicMonkey Pro is my favorite and is by far the easiest solution right now. It has saved me a lot of the headaches I used to have with Photoshop!
If you’re not on PicMonkey Pro or Canva Pro, you’ll want to use a background burner tool first before importing photos (like Background Burner) or opt to not remove backgrounds. You’ll use the tool to first erase the background (it may take some practice to get it precise) and then re-save to your computer again without the background. You will then be able to skip the rest of this step. You’ll just import your new images you want to use and then skip to Step 5.
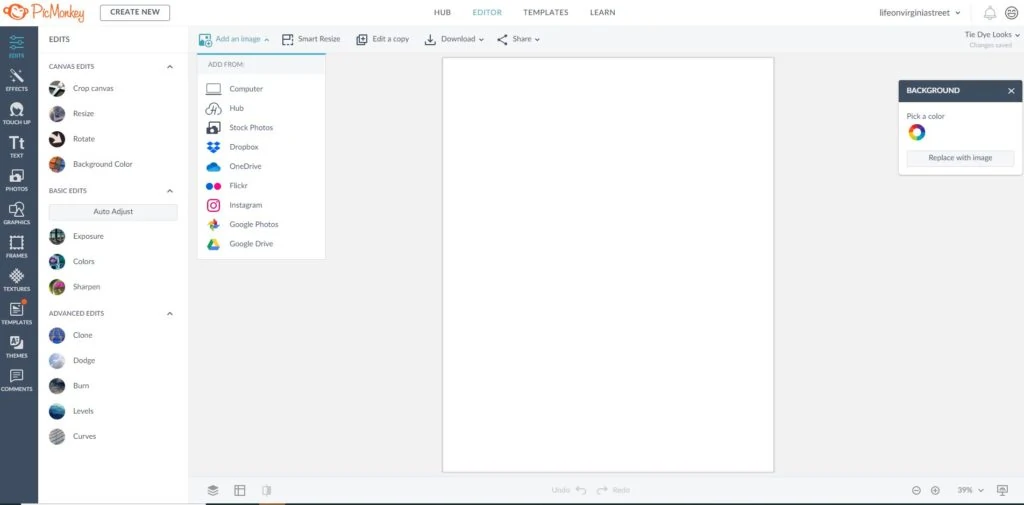
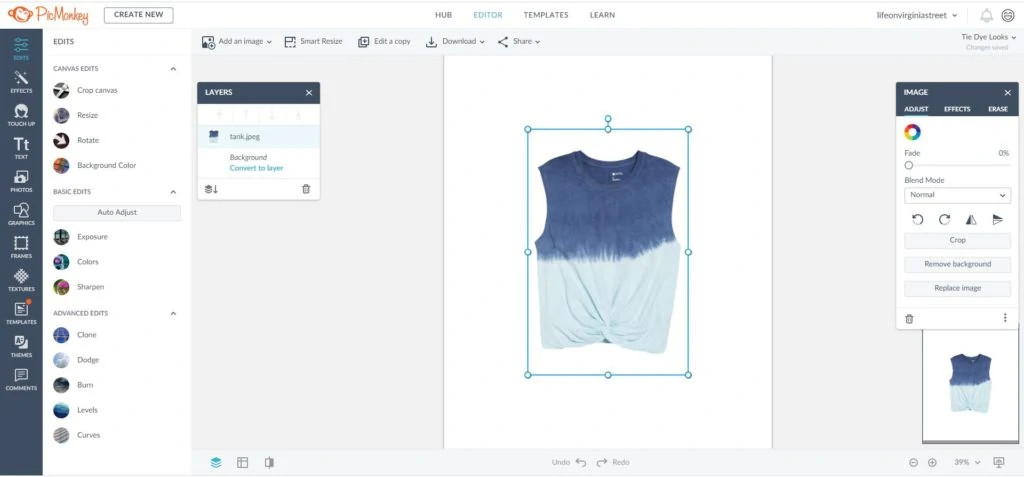
If you’re using PicMonkey Pro (or the pro version of Canva), simply import your image by clicking the ‘Add An Image’ menu item and then finding the image on your hard drive or wherever you have it saved.
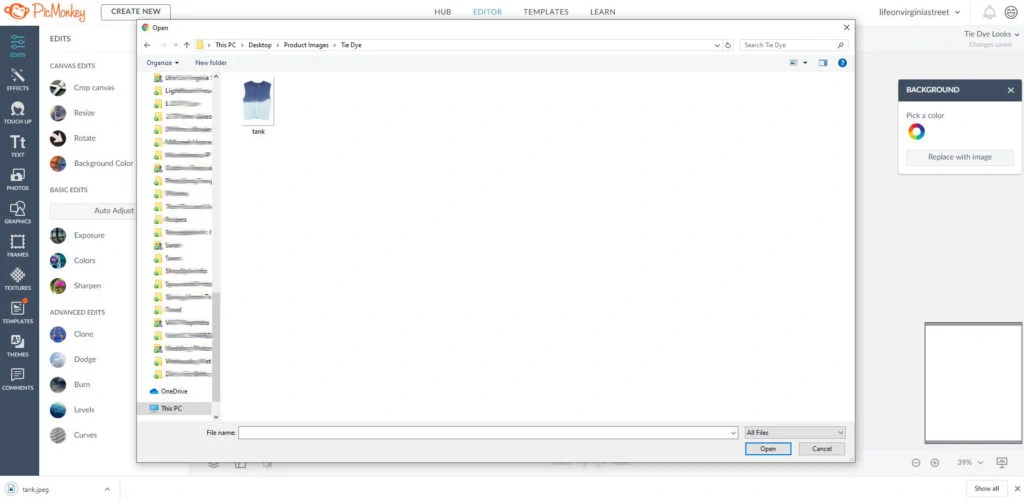
Then select the actual image you want to import. You can only add one at a time.
Then click on the “Remove Background” button on the right-hand side. In 99% of cases it will erase your background for you perfectly within a few seconds! I used to have to do this in a fairly manual process on Photoshop and it was rather tedious. I also had issues with products that were mostly white (it would over-erase). But PicMonkey Pro makes it so easy and saves so much time! Each collage now takes me about half the time it did in the past. It’s literally just the click of a button!
If you’re not paying for the Pro version, you will be able to still follow all the steps in this tutorial – but will not have access to the “Remove Background” button.
If you find that it wasn’t erased perfectly, sometimes you may need to go to the ‘Image’ menu on the right side of the screen and click ‘Erase’. You can then manually erase parts of the background that may have been left behind. Fortunately, I rarely have to do that with this tool!
5. Re-size your Images as Needed
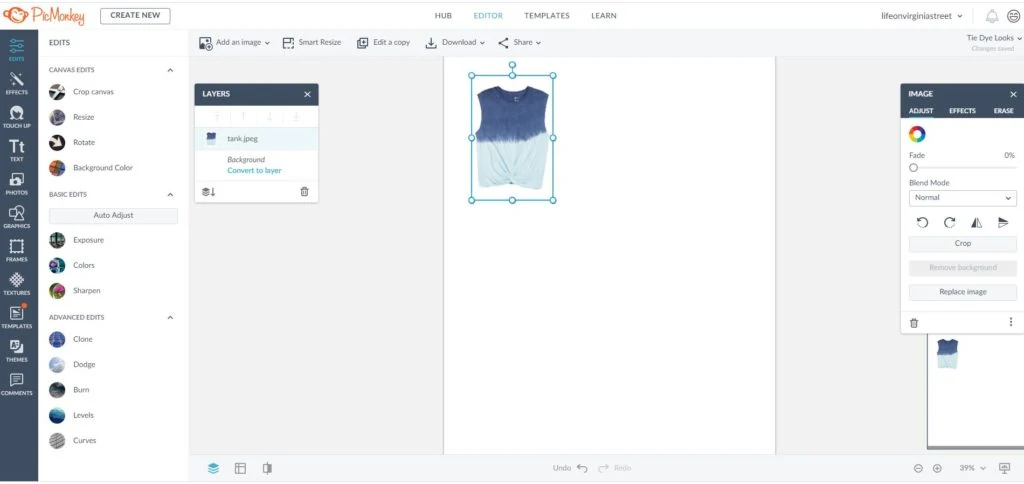
To re-size an image, simply click on the image in the graphic or on the left-hand side under the ‘Layers’ menu. Once you see the blue box around the image (as shown below) simply click one of the dots in the corners and drag to re-size. I usually start by making it smaller, but then do final sizing adjustments once I have additional products or images in the graphic.
You can then click the center of the image and drag to move it around on your collage board.
6. Arrange Your Images Into A Collage
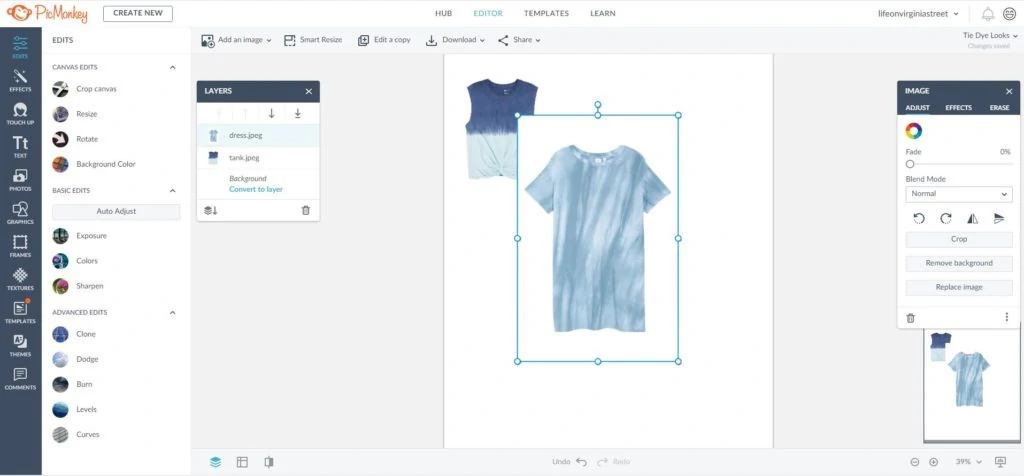
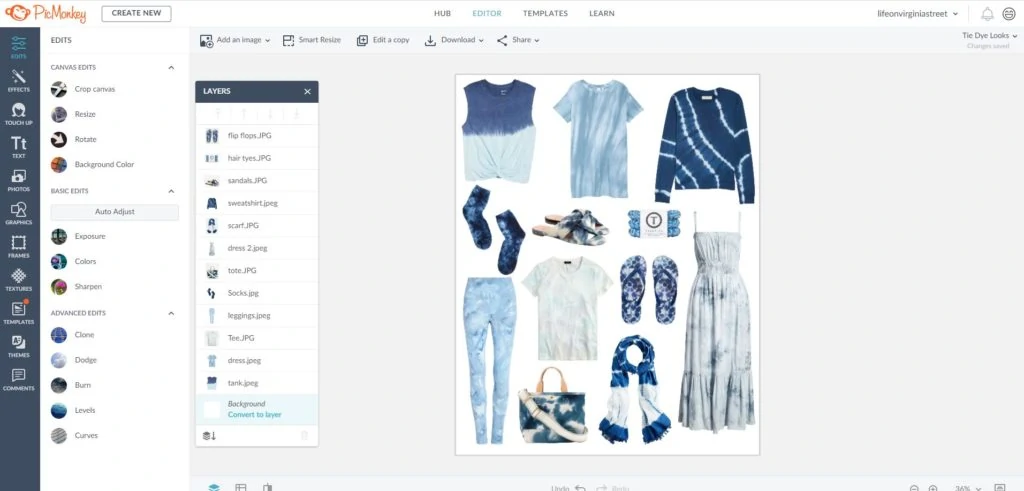
You continue to repeat the step up above with all of the images you want added to your collage. Add an image, remove background, resize and move according to how you want it to look.
There are further modification tools for each image in your graphic if you play around with it! The image toolbar that appears on the right (shown above) has tools that can be helpful. If you hover your mouse over each of the graphics they’ll give you more info on each function. But, you can rotate images, flip horizontally or vertically, fade the image, etc. All very helpful!
If you want some of your images to overlap slightly (for example, a sofa on a rug in an interior design mood board), first place where you want each image. You can then go to the ‘Layers’ box shown below and drag items in order of how you want the layers to appear. The bottom of the layers list will be your “lowest” layer and builds up from there. You can simply click on the layer you want to move and drag it up or down the list. Again, this is really only important if you actually want your images to be layered a little on top of one another.
7. Save Your New Mood Board
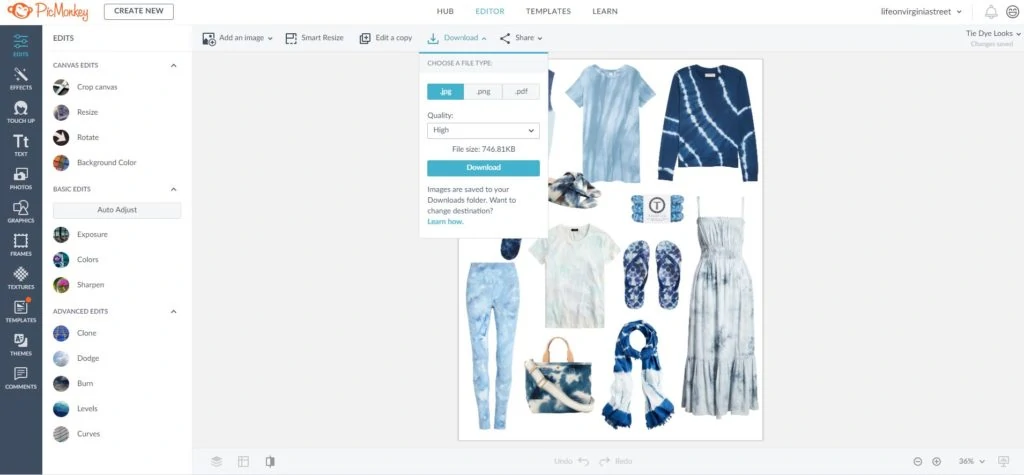
Once you have your design finished and looking the way you like it, simply click on the ‘Download’ menu item. You can select if you want a .jpg, .png, or .pdf file as well as the quality of your graphic. I typically save mine as a .jpg on High quality, but it’s really a matter of personal preference and what works best for your usage.
That’s essentially it! You can play around with all the various software options, as you can also add text, apply special effects, etc. But those go a bit beyond the purpose of this tutorial. Just know that those options are out there and the customization options are limitless!
One other thing to note. PicMonkey will save your designs as you go along, and also store them for future editing. I’ve gone in multiple times to make slight tweaks to designs I had already saved and it is a huge time-saver!
Samples of Mood Boards for Interior Design, Room Makeovers, Outfit Ideas & More
Since the steps above only show an example with clothing pieces, I thought I’d share a few other design boards I’ve made to give you a few ideas on what you can do with these boards!
Most frequently, I make design boards to share my favorite finds in my weekend sales posts!
MOOD BOARD SOURCES: Abstract Art | Cane Cabinet | Hicks Pendant Light Fixture | Dining Chair | Wood Chain Link Decor | Tory Burch Polka Dot Miller Sandals | Jo Malone Cologne | Tropical Bloom Earrings | Hair Scrunchie Scarf | Linen Joggers | Mockneck Embroidered Lace Top | Bon Voyage Sweater | Tie-Waist Chambray Shorts | Striped Knot Slide Sandals | Sectional (read my review here) | Round Wood Coffee Table | Storage Ottomans | Faux Potted Olive Tree | Woven Arm Chair
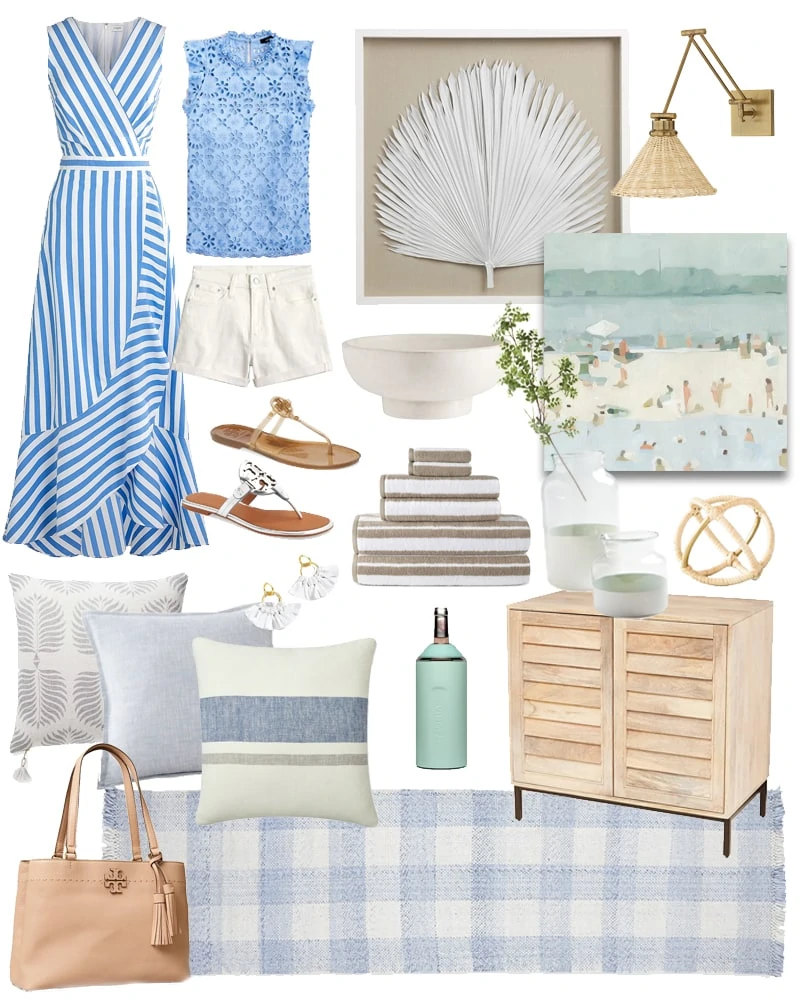
Here’s another version that has even a bit more layering involved.
DESIGN BOARD SOURCES: Striped Dress | Mockneck Embroidered Top | White Denim Shorts | Fabric Fan Earrings | Jelly Tory Burch Flip Flops | Tory Burch Miller Sandals | Palm Leaf Art | Abstract Beach Art | Wicker Wall Sconce | Footed White Terra Cotta Bowl | Wine Bottle Chiller | Striped Towel Set | Palm Print Pillow | Organic Cotton Throw Pillow | Striped Pillow | Paint Dipped Vases | Faux Greenery | Rattan Wrapped Orb Object | Shutter Door Cabinet | Tory Burch Leather Tote | Buffalo Check Runner Rug
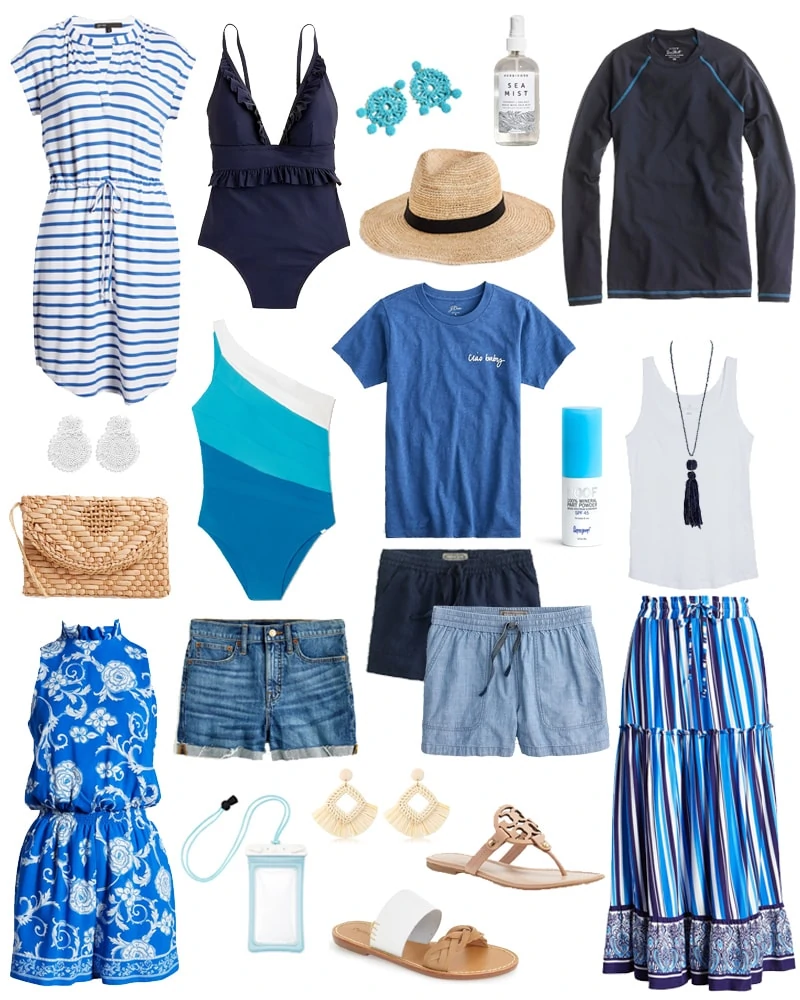
I also find that these design boards can be just as helpful on the fashion side of things! Here is a design board I made with all of my resort wear favorites for the year. Super helpful when planning outfits that coordinate when you’re packing for a trip!
RESORT WEAR SOURCES: Drawstring Jersey Striped Dress | Ruffle One-Piece Swimsuit | Sea Mist Texturizing Hair Spray | Beaded Crochet Statement Earrings | Long Sleeve Sun Shirt | “Ciao Baby” Tee | Linen Pull-On Shorts | Chambray Shorts | High-Waist Denim Cut-Off Shorts | Floating Dry Case for Phone | Raffia Earrings | Packable Straw Hat | Beaded Earrings | Tory Burch Miller Leather Flip Flops | Slide Sandals | Supergoop SPF Part Powder | Romper | One-Shoulder Bathing Suit | Woven Straw Clutch | Tank Top | Long Tassel Necklace | Maxi Skirt
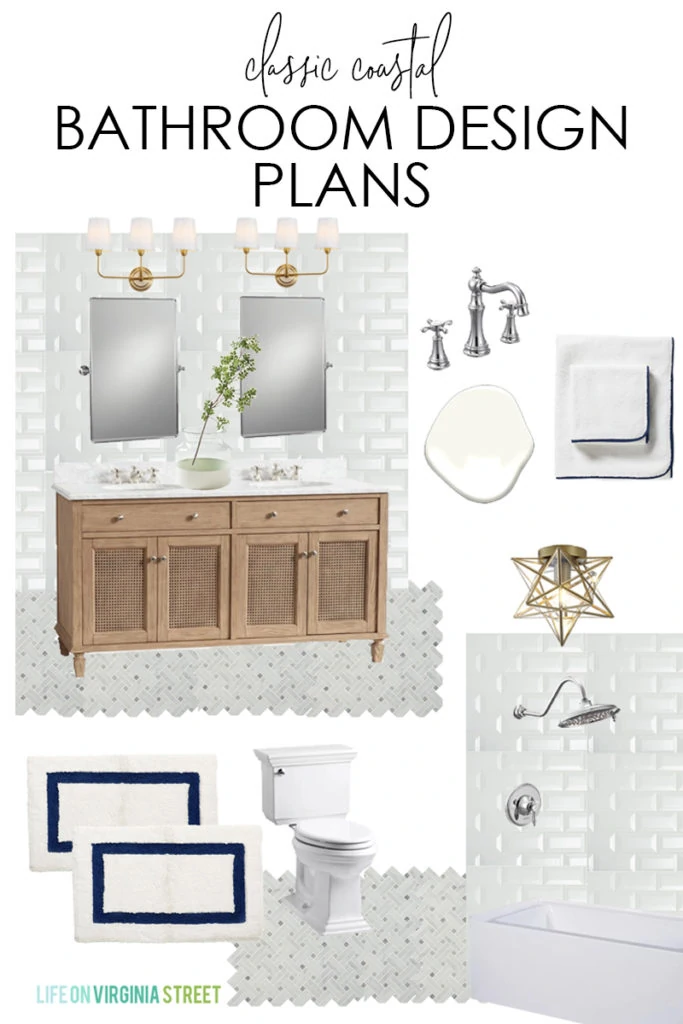
I also love using them to create design boards for spaces in our home that we plan to update or remodel. Most recently, I made this classic coastal bathroom design board for our guest bathroom!
MOOD BOARD SOURCES: Vanity | Pivot Mirrors | Light Fixtures | Vanity Faucet | Faux Greenery | Paint-Dipped Vase | Towels | Beveled Subway Tile | Carrara Mosaic Tile | Memory Foam Bath Mats | Toilet | Moravian Star Light Fixture | Shower Head | Paint Color: Benjamin Moore Simply White
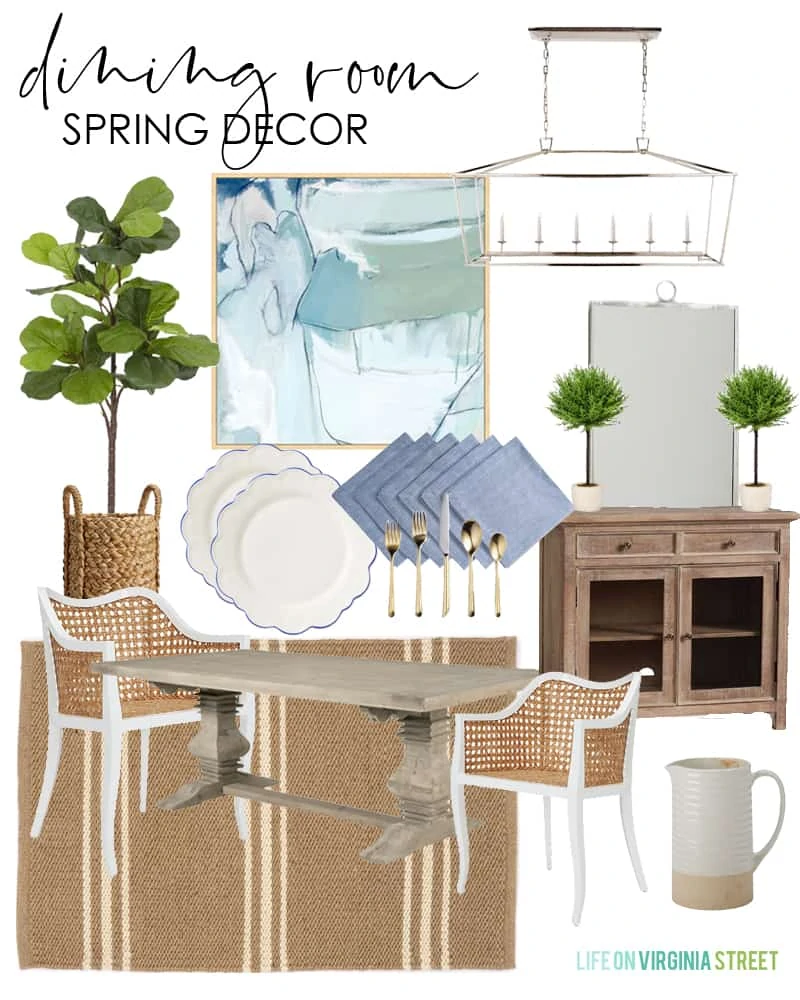
I also love to use them to create design boards for our seasonal decor. The great thing about using layers in Photoshop and PicMonkey Pro is that I can save a template of each room in our home and then just make simple swaps each season so I don’t have to start from scratch! So for example, in the board below I always keep our table, dining chairs, buffet, light fixture, etc. and then just alter the seasonal pieces!
DINING ROOM DESIGN BOARD SOURCES: Dining Table | Cane Dining Chairs (knock-off version here) | Striped Rug | Buffet Table | Chandelier (knock-off version here) | Abstract Art | Scalloped Plates | Chambray Napkins | Gold Silverware | Faux Fiddle Leaf Fig Tree | Seagrass Basket | Mirror | Faux Cypress Topiary | Ceramic Pitcher
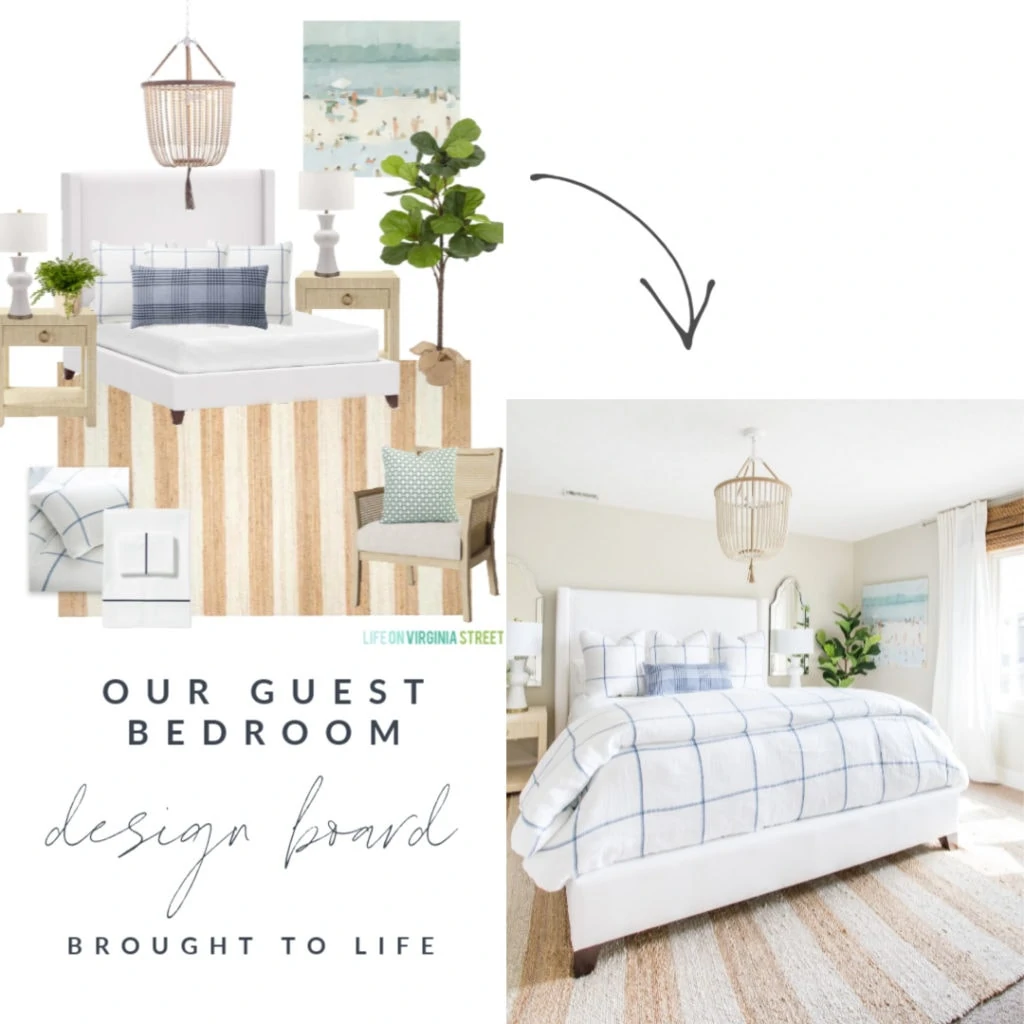
And here is how one of my design boards came to life in our guest bedroom! This collage and text was all made within PicMonkey Pro, as well! I love how the mood boards can really help you envision your space without investing in or buying any products! Sometimes it can be just the push you need to finalize your purchase plans!
GUEST BEDROOM SOURCES: Upholstered Bed | Windowpane Plaid Bedding | Plaid Lumbar Pillow | Bead Chandelier | Striped Rug | Raffia Nightstands | White Ceramic Lamps (come as a set of two) | Abstract Beach Art | Faux Fiddle Leaf Fig Tree (this is the 5’4″ size) | Mirrors | Similar Drapes | Cane Chair | Striped Pillow
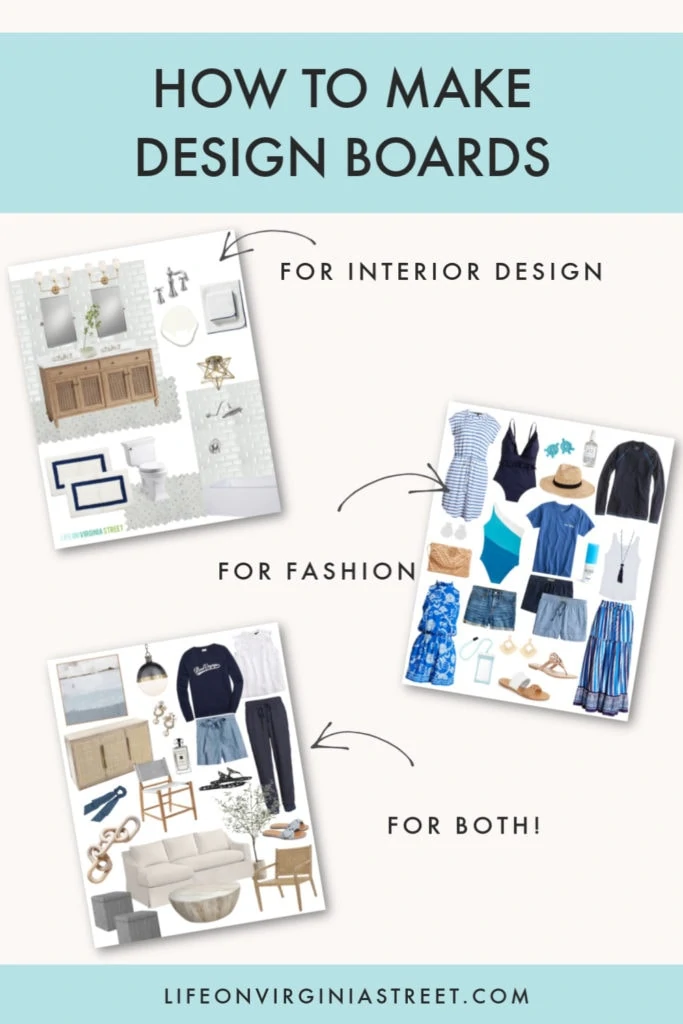
And to further show the versatility of PicMonkey Pro, I used one of another one of their templates to create the following pinnable image if you want to save this post for later!
I hope you found this tutorial helpful! If you have any questions, please leave a comment on this post and I’ll respond publicly so that it may help others as well!
If you would like to follow along on more of my home decor, DIY, lifestyle, travel and other posts, I’d love to have you follow me on any of the following:
Pinterest | Instagram | Facebook | Twitter
disclosure: some affiliate links used



Wowsay!
What a great tutorial. Thank you 🙂
You have such a good eye for the groupings!
xo, Darlene
p.s. any chance you’d like to do tutorial on how to get accepted Shopstyle? I got turned down altho don’t know why.
Sarah! You did it! So happy to see your tutorial. The internet NEEDED this and nobody makes mood boards as well as you do. And I follow evvvverybody. You’re the queen! Can’t wait to follow your steps. XoXo
LOVE IT SARAH!!!!
This was so helpful, and had so much good information and direction! Thank you for taking the time to write this up!
This is EXACTLY what I needed! I’ve asked my interior designer cousin and my graphic artist friend how to make these and they both said photoshop. Whomp whomp. I just don’t have time to learn that platform. It’s not user friendly. Though I do use Lightroom. I have Canva Pro but will be switching to Pic Monkey. I can tell from your post photo of the templates that they have way more that pertain to my business. Thank you for this amazingly thorough post!
I love your mood boards! They are always so eye-catching and I love your style. FYI.: You can also make mood boards in PowerPoint. That’s what we used to make our mood boards in design school.Super easy and free if you have Microsoft office.
Love this, I appreciate all of the info! I’ve been wondering about the simplest route!
Awesome post, thank you! I use mood boards but always struggle with how to remove the background. I use Canva all the time, so I will give that a try. Excellent info, thanks! And I love all your boards and we have the same coastal style! 🙂
Thanks for sharing this! I was struggling with how to make these mood boards! I also asked a few designers and no responses! Thank you thank you! Now let me get to work! 😊
Yay! So happy to hear that!
Love all these ideas!
This is the ultimate guide!
Thanks Sarah
This was really informative. thank you!
Thank you for this post, it’s so helpful! I wasn’t sure how you get the hyperlinks to have a text color instead of underlined? When I do it the word is automatically underlined, and your method is so much cuter!
Thanks!