I had full intentions of sharing our future kitchen, dining room, and living room plans in today’s post. And then, after what felt like 75 paragraphs on just our kitchen, I figured it was best to split up the posts into two separate ones. So I’ll be sharing the dining room and kitchen plans soon!
This post contains affiliate links for your shopping convenience. You can read my full disclosure policy here.
Before we jump into our classic coastal kitchen design plans, and in an effort to avoid redundancy, if you missed my preview update reports, you may want to start with those first! I go into more about why we’re moving, some of our favorite features of our new build, as well as the initial progress and selection meetings:
- We’re Moving! Again!
- New Build Progress: Part I
- New Build Progress: Part II
- New Build Progress: Part III
Since my last update, I’ve also started sharing some of the design selections and mood boards for various spaces in the home. I have plenty more to share soon.
- Moody Navy Blue & Plaid Home Office Plans with Ralph Lauren Vibes
- Blue & White Striped Pool Bath Design Plans
- The Case for Color: Interior Painted Doors Other Than White
New Build Kitchen & Cabinet Layout
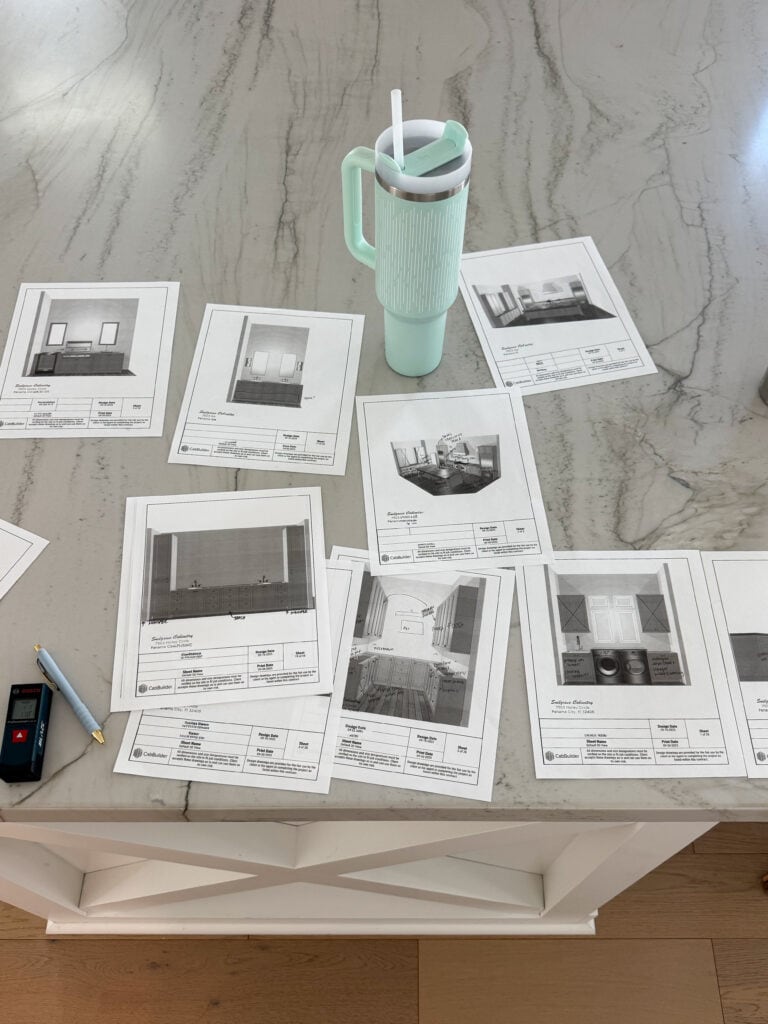
Before we jump into the design plans, I thought it would first make sense to share our cabinet design plans! My best guess is that cabinets will be getting installed within the next month, so they are already rocking and rolling with production!
While our home is not custom, we are able to customize some of the features. But the general kitchen layout and floorplan was pre-determined. When it came to cabinets, we were able to customize some features, while sticking to the general overall layout (which we already really liked)!
Our kitchen will be divided into three main areas. We’ll have the kitchen and island, then a little butler’s pantry (which is essentially the pass-through hallway from the kitchen to the laundry room), and then the pantry (which is off the butler’s pantry and is essentially a walk-in closet we’ll put cabinets in). This layout is what excites me most! For someone who isn’t overly fussy about a picked-up house, there is nothing that bothers me more than a messy kitchen. Let’s just say it’s our most common fight in this household because one of us doesn’t understand the importance of a clean kitchen for my mental sanity 😉
With this layout, we’ll use the butler’s pantry as more of a drink station and bar area and the pantry will be where Kurtis can leave out all his crap so we can hide it away. Things like the toaster, blender, microwave, etc. It will also serve as the dry storage for most of our food.
Before we finalized the cabinet layouts, I forced Kurtis to sit with me and go through our entire current kitchen and pantry. We went cabinet by cabinet and wrote down where we wanted each item to go in the new kitchen. I wanted to ensure we had the proper ratio of cabinets and drawers. As much as Kurtis likes to say he doesn’t have opinions about these things, he very much does 😉 We actually did this exercise for the entire house and all the cabinetry, which helped us to make some tweaks here and there we may not have caught otherwise.
I’ll break the cabinet design down into the three spaces.
Kitchen Cabinet Layout
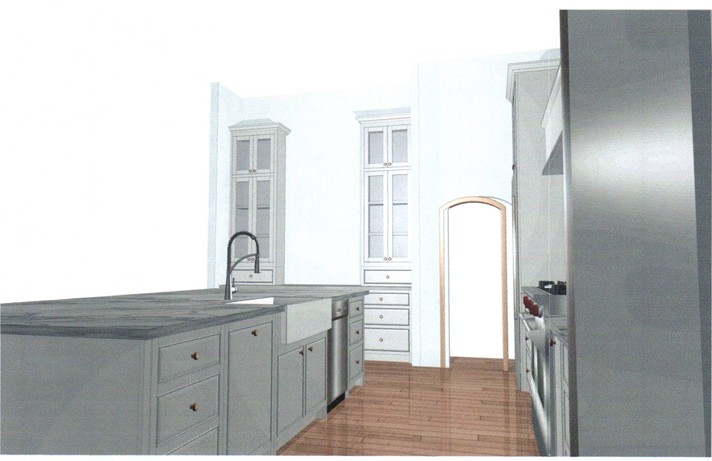
Here is the general layout rendering of the cabinets from the cabinet company, Snelgrove Cabinetry in Panama City. Their drawings purely show the size of each cabinet, not necessarily the style anywhere (I’ll cover that more in a minute).
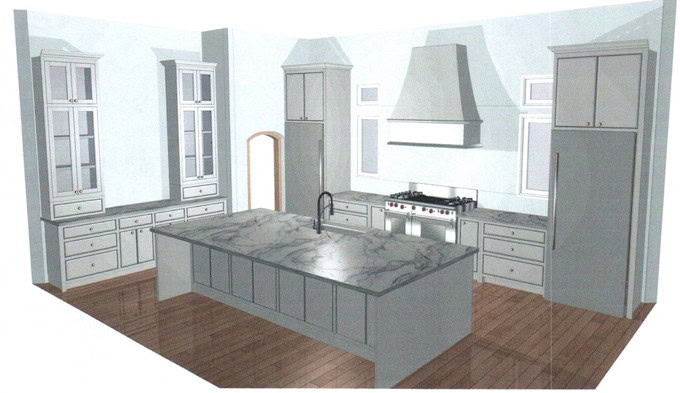
The wall on the left was originally designed by the builder to be open shelves on top with only the lower cabinets below. But, Kurtis and I both know we don’t do well with open shelving, so I found example after example of countertop towers that I loved and we worked to make an option that would look great here. I wanted it to look a bit more like built-in furniture rather than just standard upper cabinets. I’m really excited to see how it turns out! We’ll be storing all our everyday dishes and serving pieces in the glass cabinets since we don’t have any other uppers in the kitchen. I have it wired for a picture light to go in the middle of that open space and I’ll hang art or some fun oyster plates in the opening (more on that below).
On the range wall, we designed the drawers with flatware inserts, spice jar racks, sheet pan and cutting board dividers and more. That’s the area we always find to be the hardest working, so we were very intentional with where everything would go, and to have inserts designed to fit them properly. Our builder designed the house with a full-sized fridge and a full-sized freezer (on the left and the latter on the right) and we’re so thrilled with the idea. This means no more garage fridge/freezer like we’ve had in our last three houses.
The back of the island will have hidden storage cabinets, as well.
In the island, we’ll have a set of drawers followed by the trash pullout, sink, dishwasher and another set of drawers. This is very similar to our current island layout and we’re such creatures of habit that we wanted to keep it very similar. Despite the fact it will confuse all our friends when they’re over because Chris and Rachel’s layout is completely different. Ha!
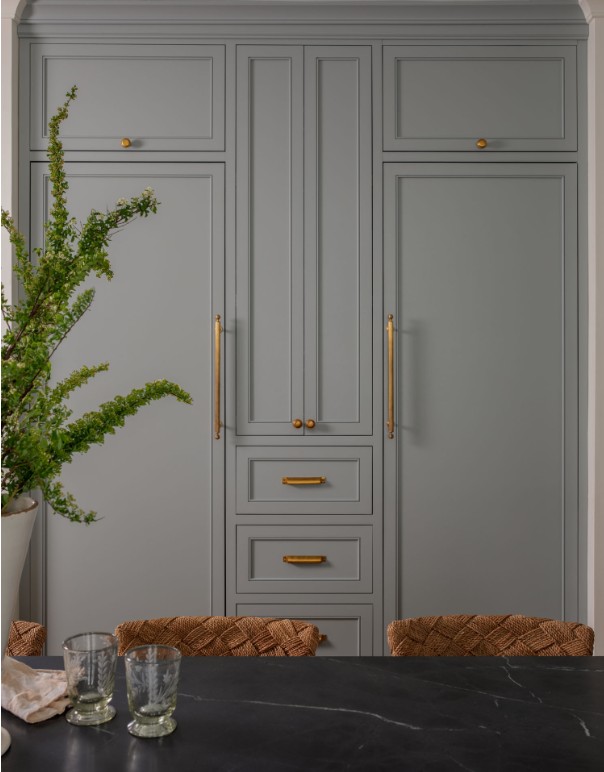
In the three areas I’m sharing today, all cabinet doors and drawers will be inset in a shaker style with inside beads on the door front. It was actually very difficult to find a visual example of how it will look when I was searching. The closest example I could find last night was this kitchen in Rue Mag. Here you can see the inset cabinet style, with the shaker door and drawer front with an inset bead. The inset bead was a last minute addition, but I think it will help elevate the cabinets a bit!
Butler’s Pantry Layout
The butler’s pantry is essentially a galley hallway with cased openings on either side that lead to the laundry room on the left and the kitchen on the right. It will hold a trash bin pullout, a sink, an ice maker, and a beverage fridge, along with a few drawers and two upper cabinets. We’re planning to use it as a beverage station, since the actual fridge will just be to the right through the opening in the kitchen. So our drinking glasses and wine/cocktail glasses will be stored in the upper cabinets and then wine/alcohol/sodas will be stored below.
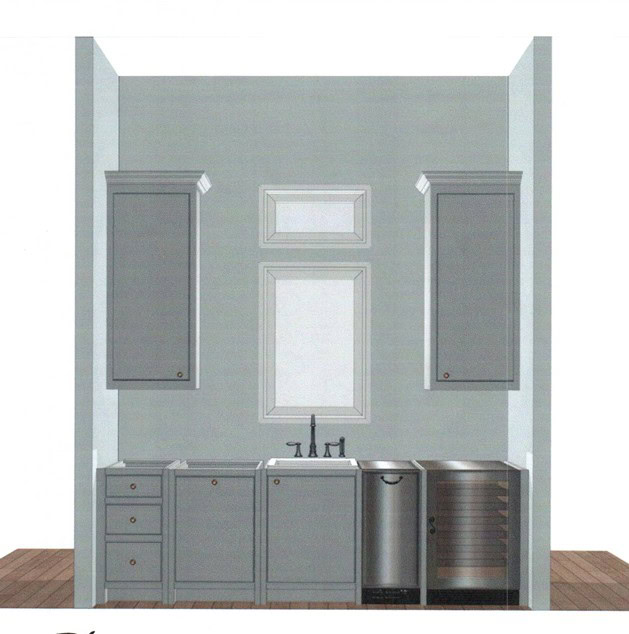
At some point we may tile or wallpaper the walls or add a fun fabric to the windows, but for now, we’ll be keeping it fairly simple!
Pantry Layout
Opposite the wall above, is an entrance to the pantry (we’ll have small double pocket doors that can be closed if we choose). The space is about 7 1/2′ wide and just under 9′ deep. Once you add the base cabinets to the footprint, that shrinks the open floor quite a bit. So the vertical storage is important.
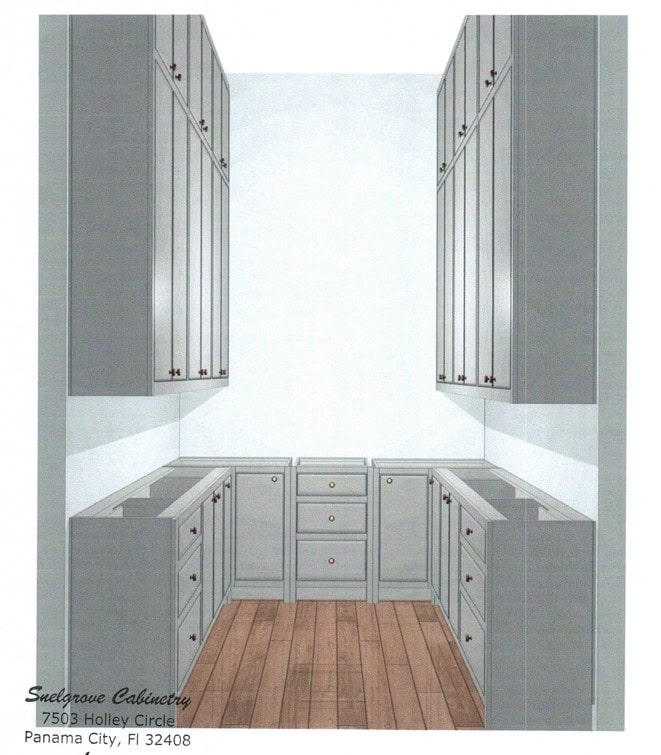
This room, like the others on our main floor, has 12′ ceilings. So, although the footprint is rather small, I wanted to extend the cabinets to the ceiling so it didn’t feel super choppy. I had come across the following image on Pinterest early on in the build process and it really stuck with me!
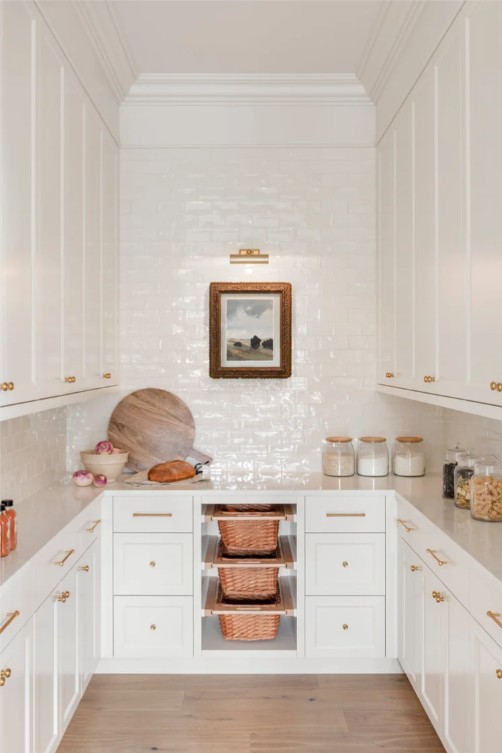
This was the exact general layout I had been envisioning. I really wanted the wall straight ahead to not have cabinets, so as to make the room feel a bit larger. I wanted the walls tiled (likely with this tile we have in a bathroom and already love) with a picture light, with full cabinetry to hide all the clutter (we preferred all closed storage unlike the inspiration photo with the baskets). We learned a lot from our Omaha kitchen renovation just how much we appreciated the added closed storage in the pantry!
We plan to store all our small appliances here, so lower doors are essential, but we also plan to store canned and dried foods in the upper cabinets. We’ll likely have small daily appliances out on the counter, like our coffee pot (which will have easy access to the sink and trash in the butler’s pantry). Likely a controversial decision: we are not doing a built-in microve in the kitchen. Instead we’ll be using this microwave/air fryer/convection oven in the pantry. We find we re-heat most items on the stove or in the oven these days, so we’ll use this option infrequently.
I was planning to use the same marble here as I was in the kitchen and butler’s pantry, but once I got the bid for the slabs, I quickly changed it over to a basic white quartz. I was literally in shock at what slabs cost these days, and I think quartz will actually be the more practical option for the space that’s a prep station and houses our coffee maker!
Current Status of Our New Kitchen
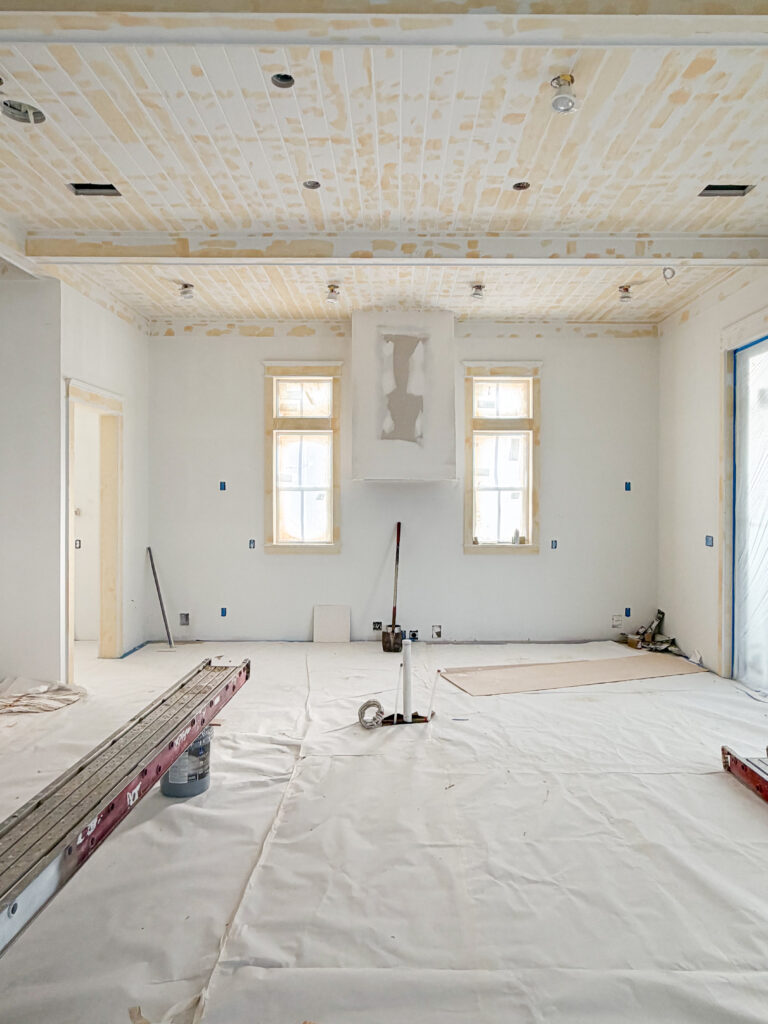
I think the next few weeks will prove to be very exciting for the kitchen, as well as much of the rest of the house. As of this past weekend, the hardwood floors have all been fully installed, and the interior of the house is fully prepped to have the doors and trimwork all painted!
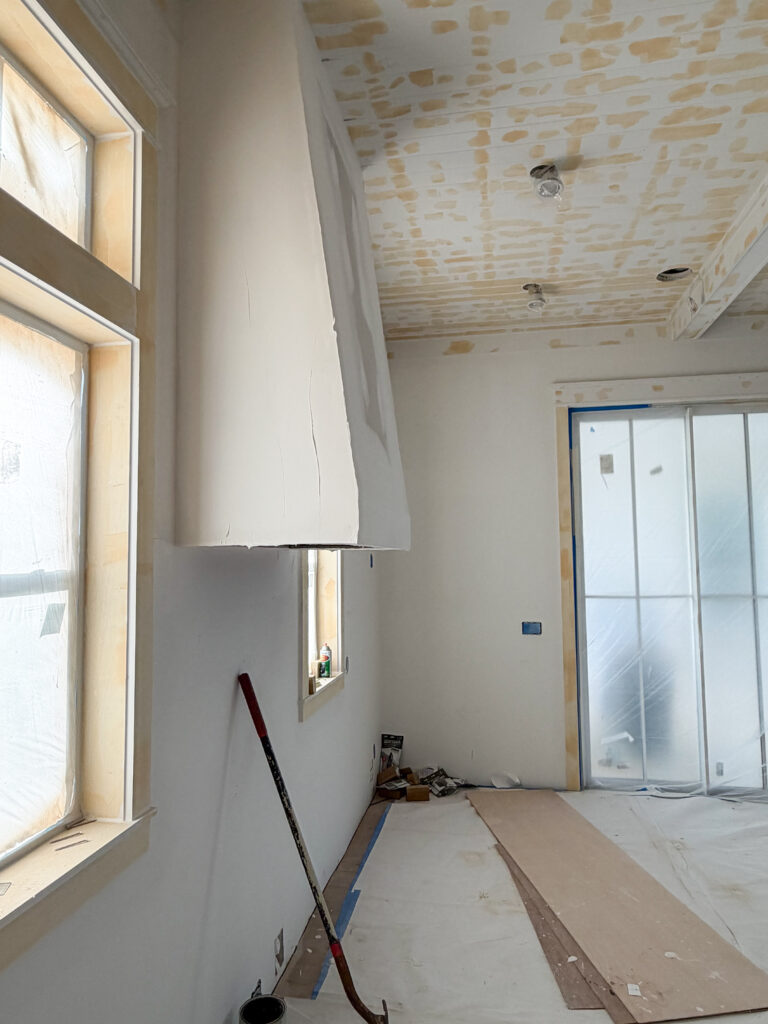
Here is a look at how the kitchen currently looks. You can see the range hood has also been framed out, and they’ll apply a white Venetian plaster to it once the painting is all done. With the 12′ ceilings, it’s difficult to see the scale of everything, but the range hood is about 50″ wide (we’ll have a 48″ range) and the counters and range will sit about 4-6 inches below the base of the window trim. The island is slightly less long than our current one, and will be about 11′ long.
Here is the profile of the range hood. It’s obviously still really roughly shaped with the first coat of mud on it. It essentially slopes down from the ceiling and then straightens the bottom 8″ or so. I’ll get a better picture when they’re further along in the process!
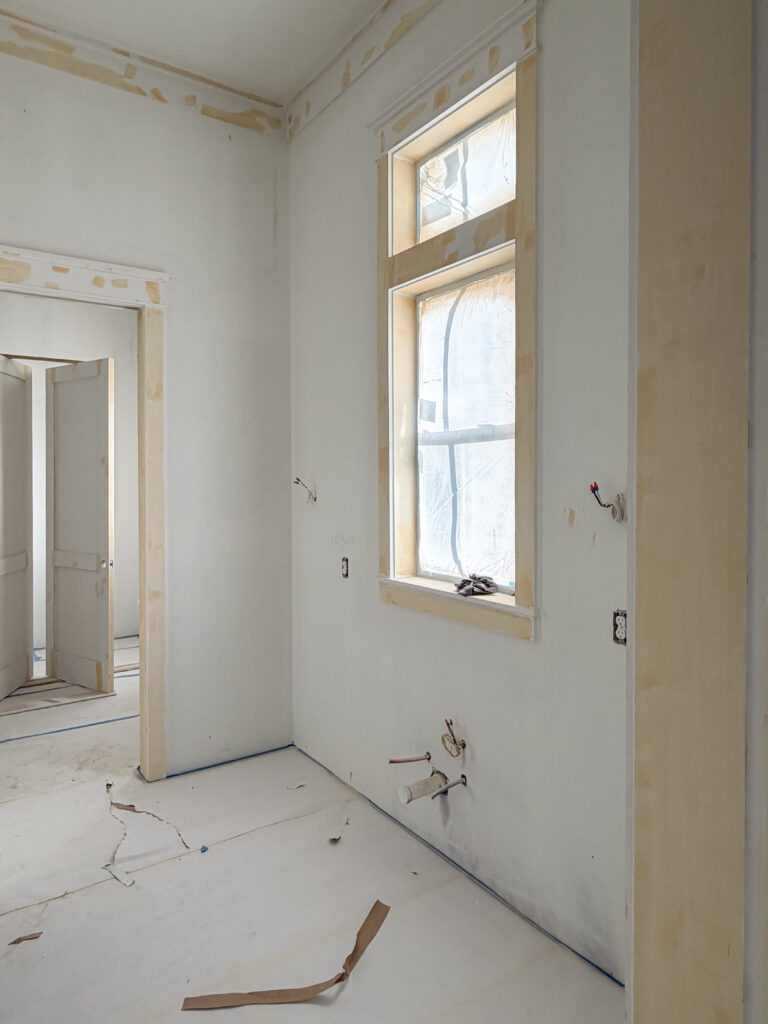
And here’s a peek into the butler’s pantry, with the laundry room beyond that. The pantry is currently filled with vanities and other items waiting to be installed!
Classic Coastal Kitchen Design Plans
Now that you’ve seen all the renderings, along with the current space, let’s jump into the design plans! When you see just the kitchen plans isolated, it can all look a bit white. But, since the kitchen is one big open space to our dining room and living room (which will have a lot of color) I think it will all work well together as a whole!
First and foremost, let’s talk cabinet paint color. I ultimately decided to go with an all-white kitchen, and I know that choice won’t be for everyone. But, since we plan to live in this next home for significantly longer (and we’ve already done colored cabinets several times) I’m taking it back to a classic white kitchen. Boring to some, but I’m really excited for the look! Our current kitchen is all white, which I thought I’d hate but felt was necessary because we have more of a peninsula than an island) and I actually really love it.
The cabinets (along with all trim and walls) will be painted Benjamin Moore Chantilly Lace. Despite the large sliders in the space, it’s not a super bright room and other shades of white looked a bit dingy. It also pairs really nicely with all the doors that will be painted Benjamin Moore Silver Gray.
Here’s a look at the design board from a week or two back (a bit has already changed). We wanted something timeless and classic with subtle coastal accents.
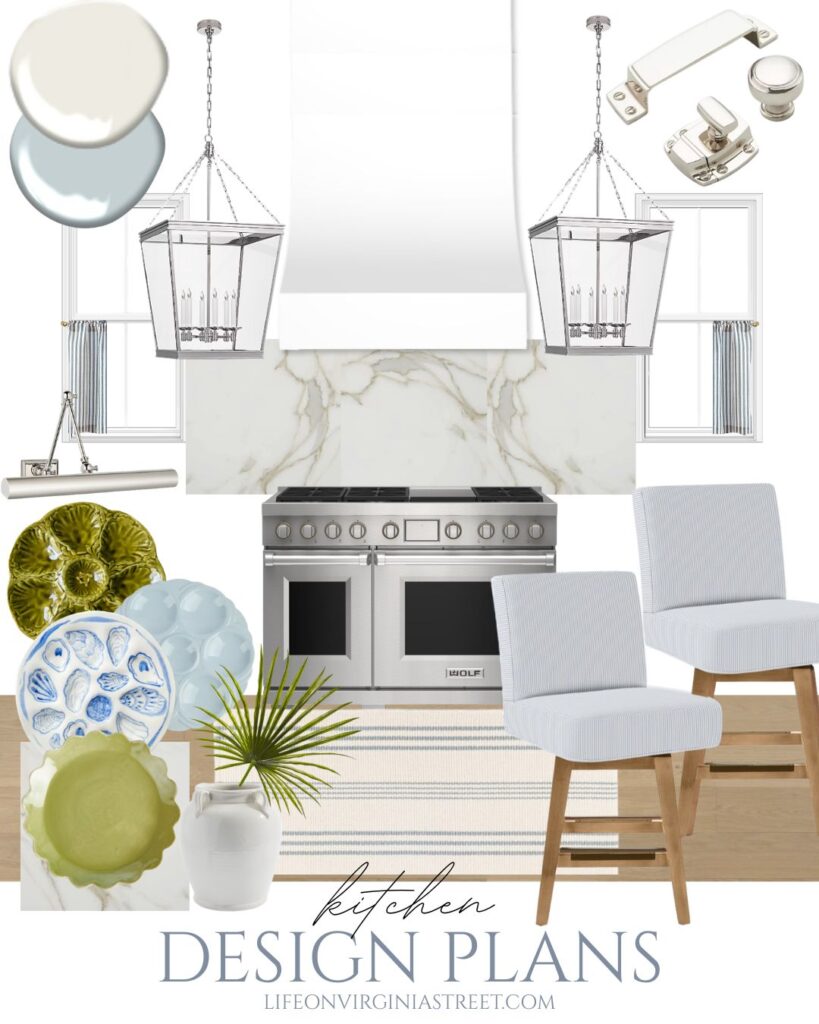
SOURCES: Lantern Pendant Lights | Pinstripe Swivel Counter Stool | Striped Runner Rug | Striped Cafe Curtains | Library Sconce | Green Oyster Plate | Light Blue Oyster Plate | Painted Oyster Plate | Scalloped Plate | Faux Fan Palm | Vase | Paint Colors: Benjamin Moore Chantilly Lace and Silver Gray
I realize there’s a lot going on there, so let’s talk through some of the details quickly. First and foremost, I grabbed the link for our kitchen lanterns and about died at the current price. I had ordered these over Black Friday when they were on major sale and they’ve also had a big price increase since, but holy cow! But I will say later I realized in ordering lights for several other rooms, the Open Box section is a total gem! It’s basically returned items but every single one I’ve ordered so far is in perfect condition. Well worth the additional savings! They also have two smaller sizes here and here that would likely be much more appropriate for kitchens with lower ceiling heights. I actually grabbed a Medium version in the Open Box section and it was such a great price.
For the counter stools, after doing all of my fabric tests, we’re going to go with these swivel stools in the Perennials Coastal Blue Pinstripe with the Driftwood legs. Ideally I’d love to grab them during a 25% off sale but I might be dreaming 😉
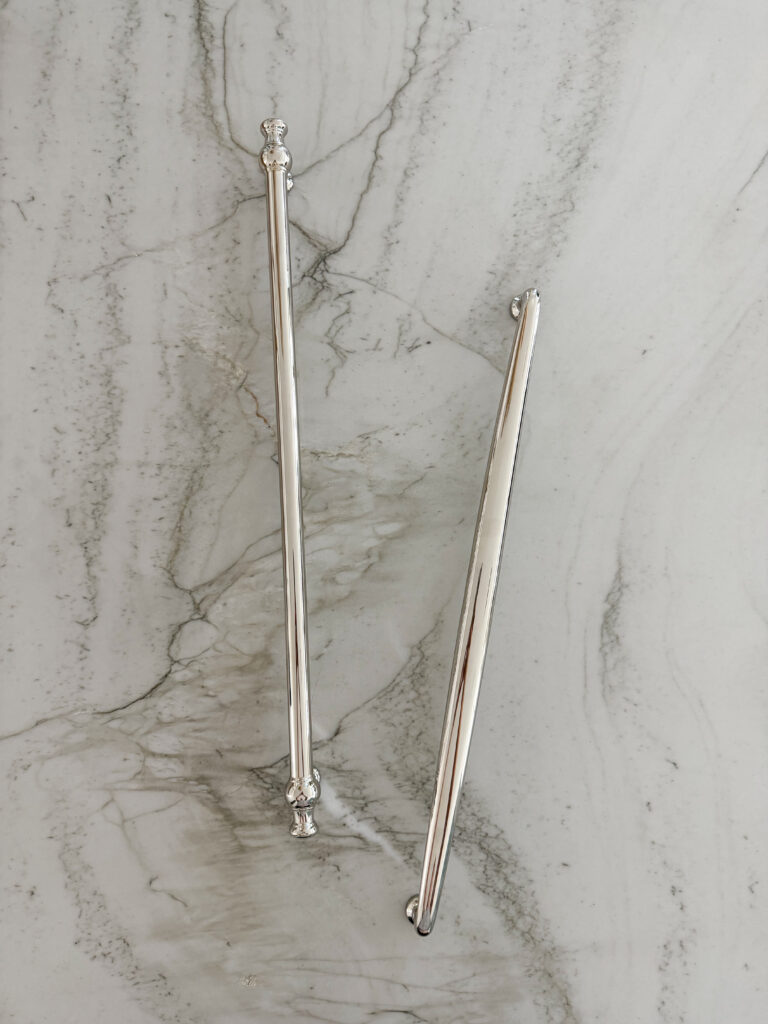
I’ve finalized the cabinet hardware for the most part and it has changed from the moodboard above. I will be using these ball knobs (our third time, but the first in polished nickel). We also know we’ll be using these bin pulls in the pantry on all the drawers. We keep going back and forth on appliance hardware. Kurtis prefers this style, which I also love, but I’m also strongly considering this style that’s a bit more simple. I ordered one of each so we could see them in person.
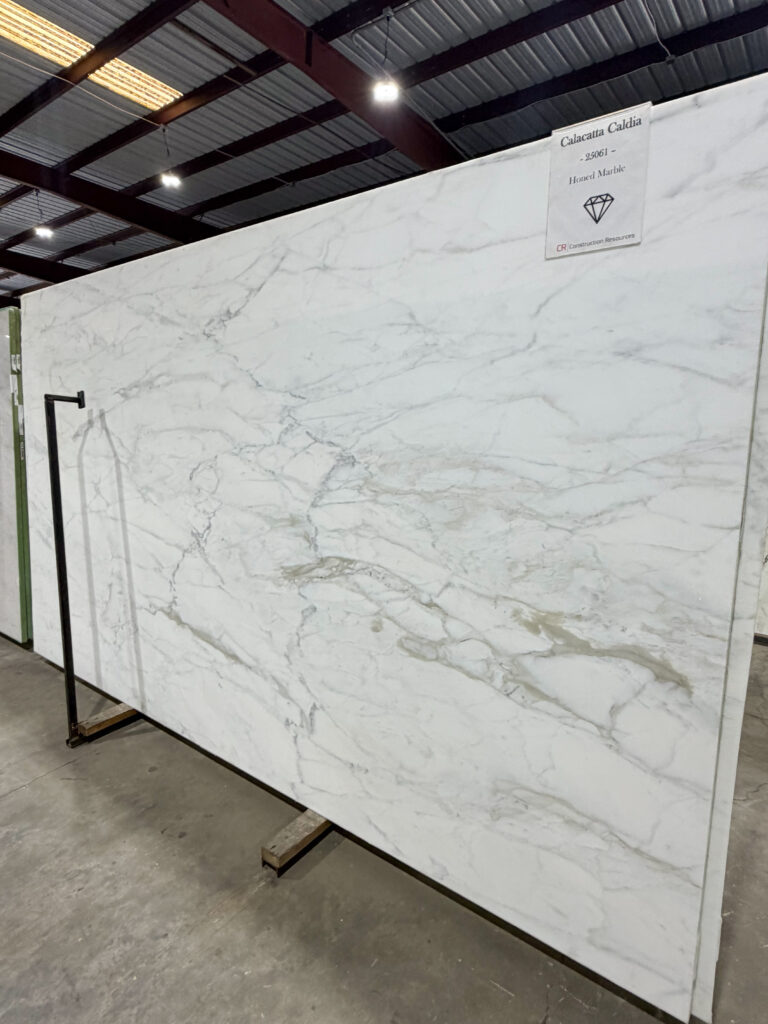
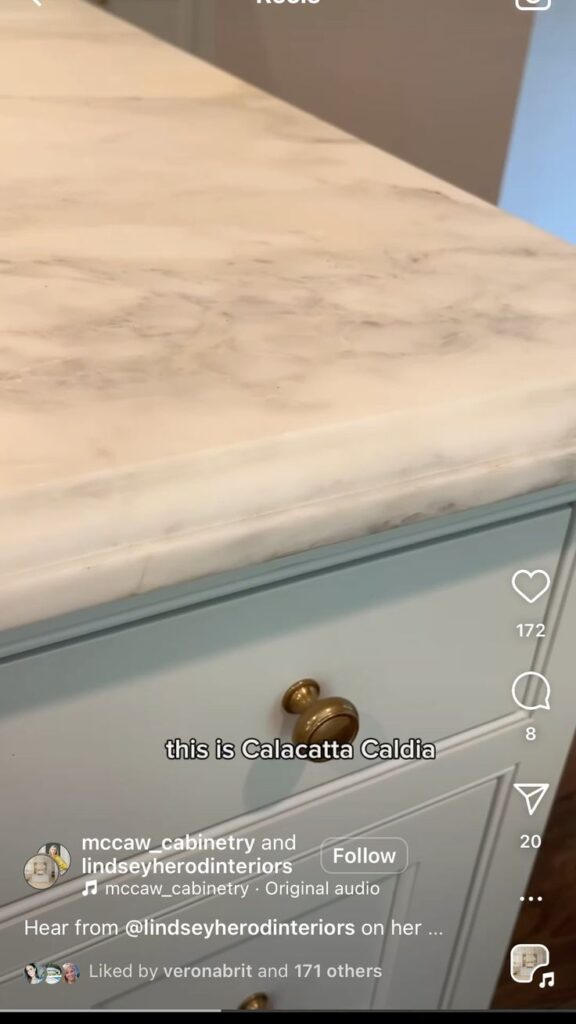
Lastly, we’re planning to use Calacatta Caldia marble in a honed finish in the kitchen area, including from the range up to the range hood. Here are the slabs we saw in person. It’s hard to tell under the warehouse lights, but it has a really pretty mix of gray and warm tones that I was looking for.
I also plan to do an Ogee edge on the island. I later realized I had the below image saved multiple times on my Pinterest board for the countertop profile. But it’s also the same marble as we’ll be using, so clearly I love the look!
Taking an actual photo of Rachel’s kitchen (which is the same layout from this angle) and then asking ChatGPT to merge it with my design plans (you can see my full tutorial on the process here), here is what it came up with, which feels pretty dang accurate! I just realized I forgot to have it include the kitchen faucet we selected! I wanted a bridge faucet but Kurtis hates they usually have a separate sprayer, so this one was a great compromise! We’ll also obviously have more stuff on the counters so it won’t feel quite as sterile in real life.

SOURCES: Lantern Pendant Lights | Pinstripe Swivel Counter Stool | Faux Fan Palm | Vase | Woven Roman Shades
Once I share the living room and dining room spaces adjoined to this layout, I think it will feel even more complete!
I then asked Chat to incorporate the cabinets on the side and things went a little haywire from there 😉 But it does help visualize a bit how it will look with the added height over there.
Alright, I think that wraps up all of the details on our future kitchen! Soon I’ll be sharing our living and dining spaces (I’ll do a combined post for that one) and then I have all of our carriage house designs ready to share, as well! Hopefully we’re less than three months out now from the big move!
If you would like to follow along on more of my home decor, DIY, lifestyle, travel and other posts, I’d love to have you join me on any of the below channels:
Beautiful post! So fun to see what’s coming up.
I love that you’re doing a white kitchen. We remodeled our kitchen 3 years ago-white. I still love it. Always looks clean and fresh. I love that you’ll have a separate fridge and freezer.. so convenient. I hate running out to the garage fridge for stuff. Looking forward to the next post!
Thanks Linda! I love all-white kitchens and know we won’t have any regrets there! It makes changing up decorative accent colors so much easier too 🙂
Looks beautiful! I have the full size fridge in my kitchen plus an additional full fridge and full freezer in my pantry. I’m so glad I did that, but I’m embarrassed to say that we sometimes could use a garage fridge too! Our daughter and son in law plus two teenage grandsons live nearby and are here frequently so the food keeps flowing! Especially during Gator games! You’re doing a great job with the design and the selections are perfect. There’s definitely a vibe when you live in Florida!
Thank you Janet! If we entertained more often I could definitely see the need for more cold space! So fun that your family lives so close. If we have a full house we’ll have a fridge in the carriage house so our guests will have to let us borrow it. 😉
Looks beautiful, Sarah
Thanks for sharing all of the details, you must be so excited to see your visions coming to life.
Thank you! We really are!
Your kitchen looks beautiful! Can you tell me what flooring you used and the color?
Thank you! Here’s the link to the floors. The color we went with is Lotus: https://dm-flooring.com/collections/silver-oak/#collection-character-grade. I will say it has a lot more knots in it throughout than we expected but we really like the stain!
Really pretty design board. I always love your choices! I also love an all white kitchen and installed one in 2004 before it became so popular. That house didn’t sell well in 2007 because of the white kitchen was the feedback we received. White cabinets with black countertops and I still think that’s classic. Crazy how fast kitchen trends come and go. We have ivory cabinets in our current home with an off white quartz and I love it just as much. My kitchen layout is almost identical to yours. Are your glass cabinet towers deep enough to hold dinner plates? They look shallow for plates but are probably fine for glasses.
Thank you! And I agree – white and ivory will always be timeless in my mind! And the glass tower cabinets are 14″ deep so should be able to hold our dinner plates.