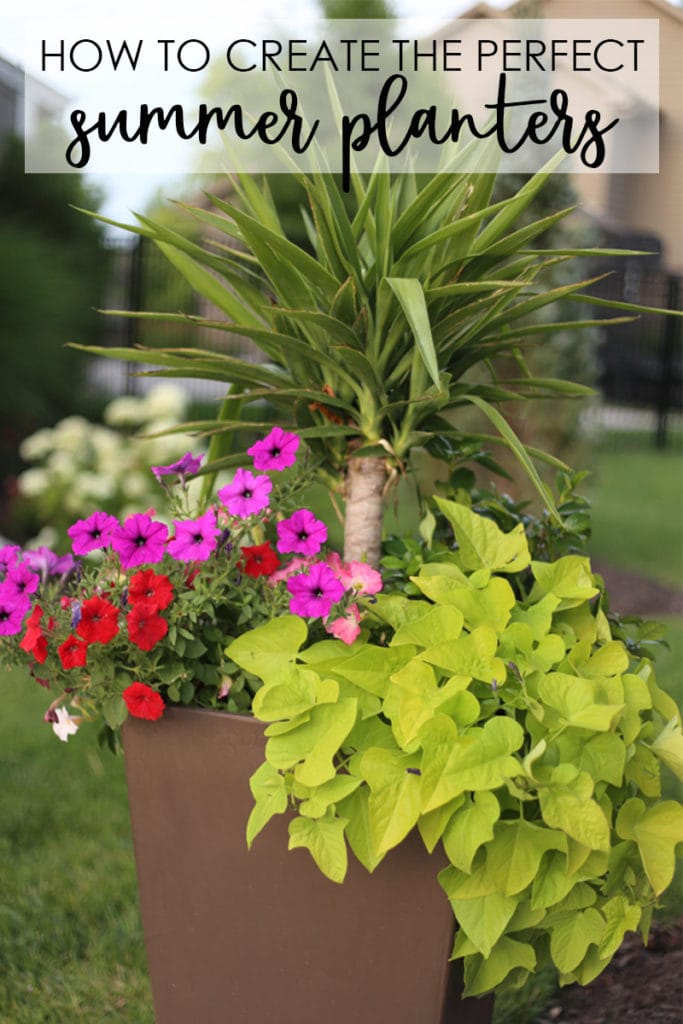
A step-by-step tutorial to teach you how to plant flowers in a pot. See inspiration for the types of flowers and plants that work best for container gardening. Also includes a shopping list for everything you’ll need to create the perfect planter!
A few weeks back, I shared some summer planter ideas to add color and personality to your yard. Several of you had detailed questions as to how I got about creating my planters. So, today I’m going to share how to plant flowers in a pot. Even better, I’ve teamed up with a group of bloggers to share even more outdoor plants and flower inspiration at the end of the post! And if you’re looking for even more inspiration, be sure to check out my front porch planter ideas!
This post contains affiliate links for your shopping convenience. You can read my full disclosure policy here.
From an early age, both of my parents showed me how to do gardening, planting, weeding and basic yard maintenance (#freelabor). I always have loved the summer months so much, and colorful flowers in pots throughout the yard make me love the summer months even more! For those that haven’t planted before, I want to assure you it’s worth trying and the effort involved. Planters can add so much personality to your outdoor spaces, and make you enjoy the outdoors even more. Following are my steps to creating the perfect planters!
Supplies Needed to Plant Flowers in a Pot
The supplies needed to plant flowers in a pot a fairly minimal.
- Potting Soil. You’ll need a bag of potting soil (or several, depending upon pot size). We usually just buy what’s on sale, but usually prefer the Miracle-Gro options. If you’re carrying your soil over from prior years (I leave mine in the pots all winter), I usually do a mix of old and new to ensure there are still nutrients available in the pot.
- Gardening Gloves. These aren’t necessary, but I always prefer them so I’m not cleaning soil out of my finger nails for days on end. I like lightweight options with a cloth/latex mix like this pair for working on my flower pots.
- A small shovel. Again, this isn’t necessary but can speed things along. I typically just use my hands though when working in pots and save the shovels for planting in the ground.
- Fertilizer. I’ve used this fertilizer for ages after my mom got me hooked (she’s the queen of flower planters).
- Water. You’ll want to water your plants in as soon as they’re planted (full tutorial below) but you’ll want to ensure you have easy access to a water pitcher or hose.
- Planters. I’ve collected mine over the years, as they can be quite the investment if you plan to have a lot in your yard and on your porch. These tall planters I got last year and two of my favorites as I feel they’re not only the perfect size, but they also have inserts that come with them so you don’t have to fill them all the way with dirt! With the wind in Nebraska, I prefer resin planters over ceramic, as it’s not uncommon for ours to occasionally blow over. If you’re looking for even more planter ideas, I have a post dedicated to outdoor planters. If you’re more of a DIYer, be sure to check out this DIY wood planter or this DIY planter pot table combo for the patio! Two great tutorials for DIY planters that will get your creative juices flowing!
How To Select the Right Flowers & Plants for a Planter
Prior to purchasing any flowers or plants, you’re going to want to ensure you know exactly where you’ll be placing your planters.
- Ensure you’re following the flower/plant guidelines closely on the enclosed tag or label. If your planter will be in the sun all day, be sure to select flowers that love 6+ hours of sun (you’ll see this on the label). If it’s a shaded area, again, select the flowers accordingly.
- Keep in mind that you’ll likely only find plants at your local nursery or gardening center that are appropriate for your region. Living in Nebraska, we can use a fairly wide variety of plants in our summer months (especially annuals for planters). But, what I use may not work (or be available) where you live. Just something to keep in mind when you’re out shopping for plants and flowers.
- Next, I love to follow the “Thriller, Filler, Spiller” method of planting.
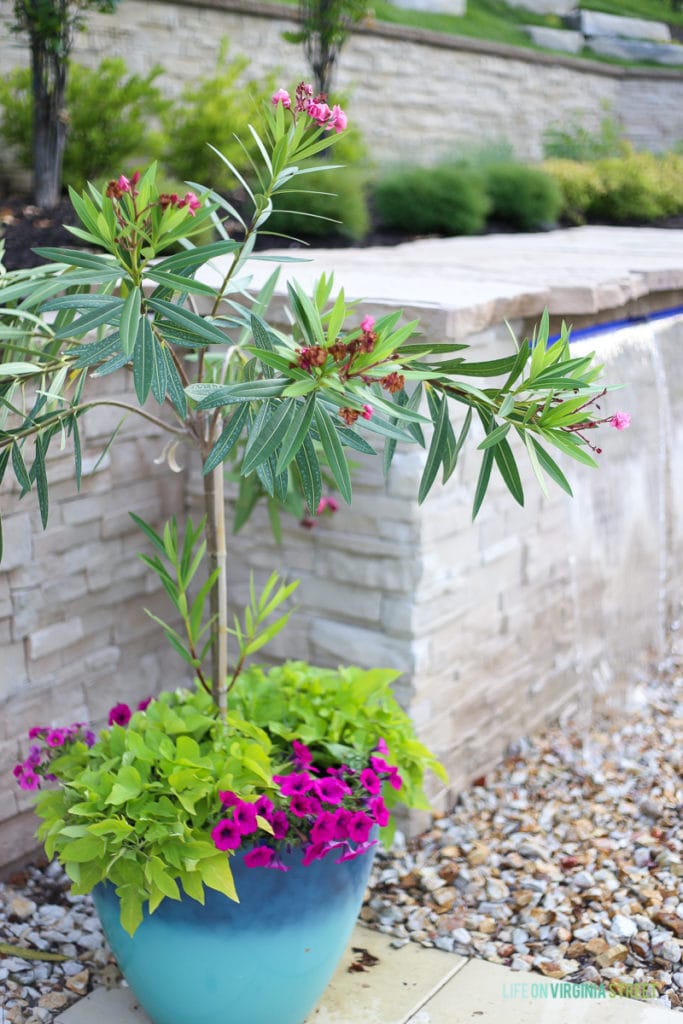
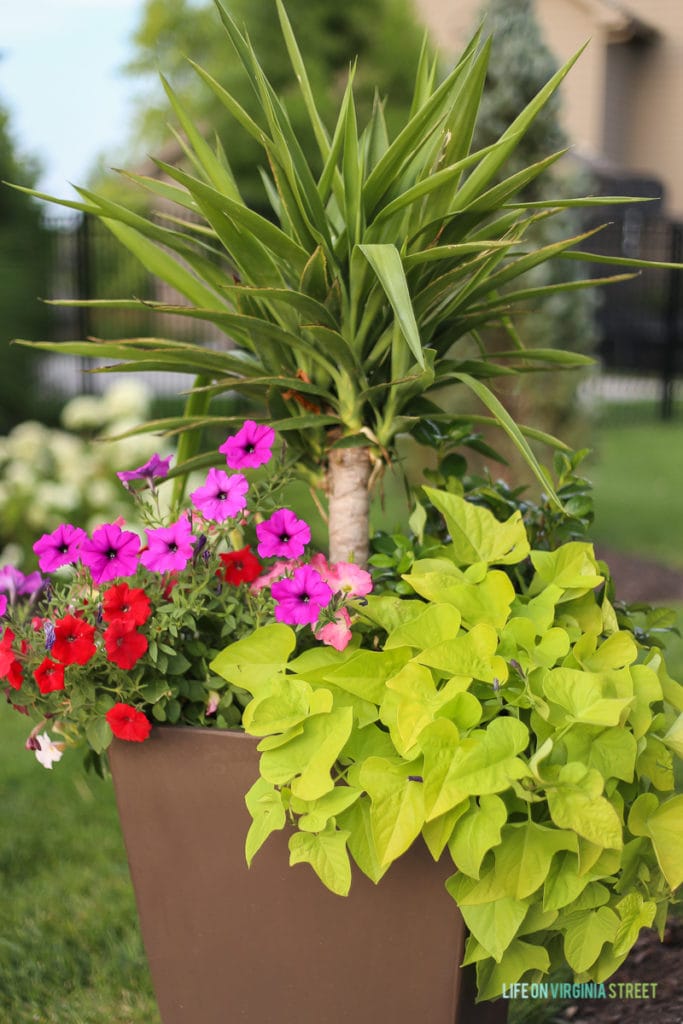
- Thriller Plants and Flowers: an upright superstar in the middle (I love palm trees or yucca plants for larger planters and small dracaena spikes for smaller planters)
- Filler Plants and Flowers: everything around the thriller and can include flowers or green foliage
- Spiller Plants and Flowers: plants that grow over the edges of the pot and downwards (I love sweet potato vines)
- I love a variety of colors and textures in my planters, so I buy accordingly. Some of my favorite flowers and plants to use in planters in include yucca, petunias (typically I go with the wave variety), sweet potato vines, impatiens, palms, etc. You can see examples of my past planters in this post.
- I actually prefer to buy smaller plants (if it’s fairly early in the season). I find that they do better when they are in large pots as they get bigger, rather than being constricted to nursery pots. And, as impatient as I am, I still try to buy flowers that haven’t bloomed yet (look for ones with lots of buds instead). This way, I can enjoy them as long as possible when they do bloom! They may look a little wimpy when you first plant them, but I feel like they take off much more quickly when they start small!
How to Plant Flowers in a Pot
Planting flowers in a pot is not a long process, if you come prepared and have followed the steps listed above. I’ve tried to include detailed photos below for those of you that haven’t tried this process on your own. Once you get the hang of it, you can have a planter completed in less than ten minutes!
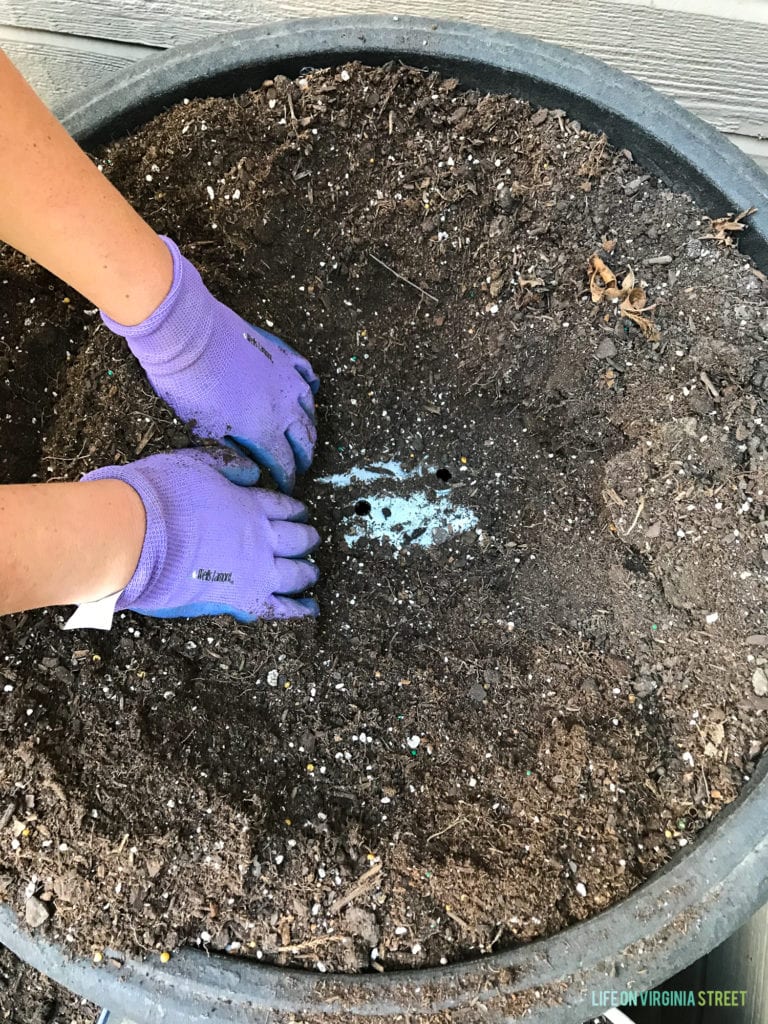
- Prepare your planter and the soil. When using really large pots, I like to flip an old bucket upside down in the planter before filling it with dirt. Dirt can get very heavy when you need a lot of it, so this helps save on soil and makes the planters a bit more mobile.
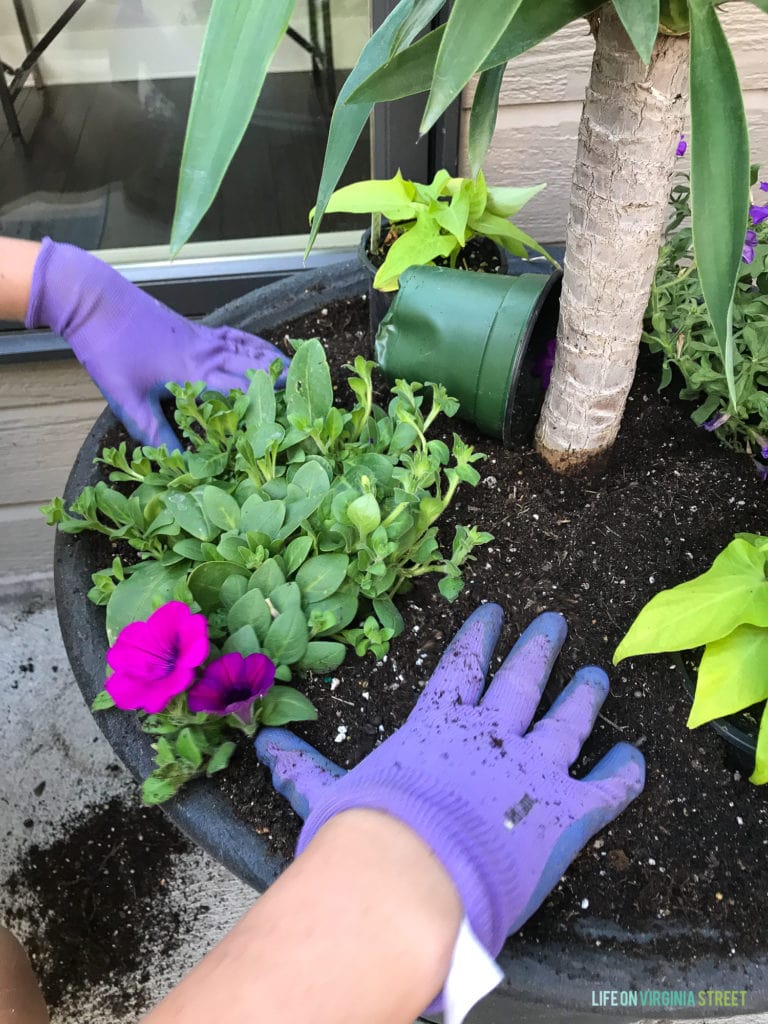
- Set plants and flowers in their containers in the pot to visualize placement and layout.
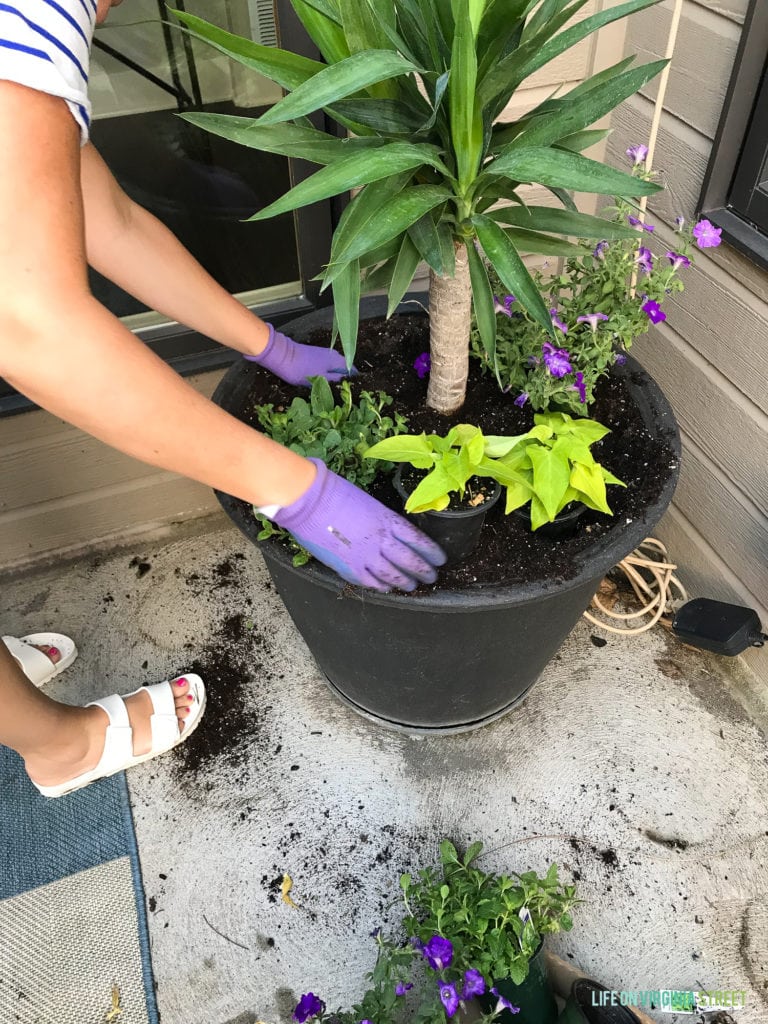
- Dig a hole for each of the plants. Ensure that that top of your plants’ soil is just slightly below the surface of the top of the dirt. Start in the center and work outwards. So, if you follow my method above, you’ll start with planting your thriller, then your fillers, then your spillers. So plants may fulfill more than one of these criteria, but the process is still the same.
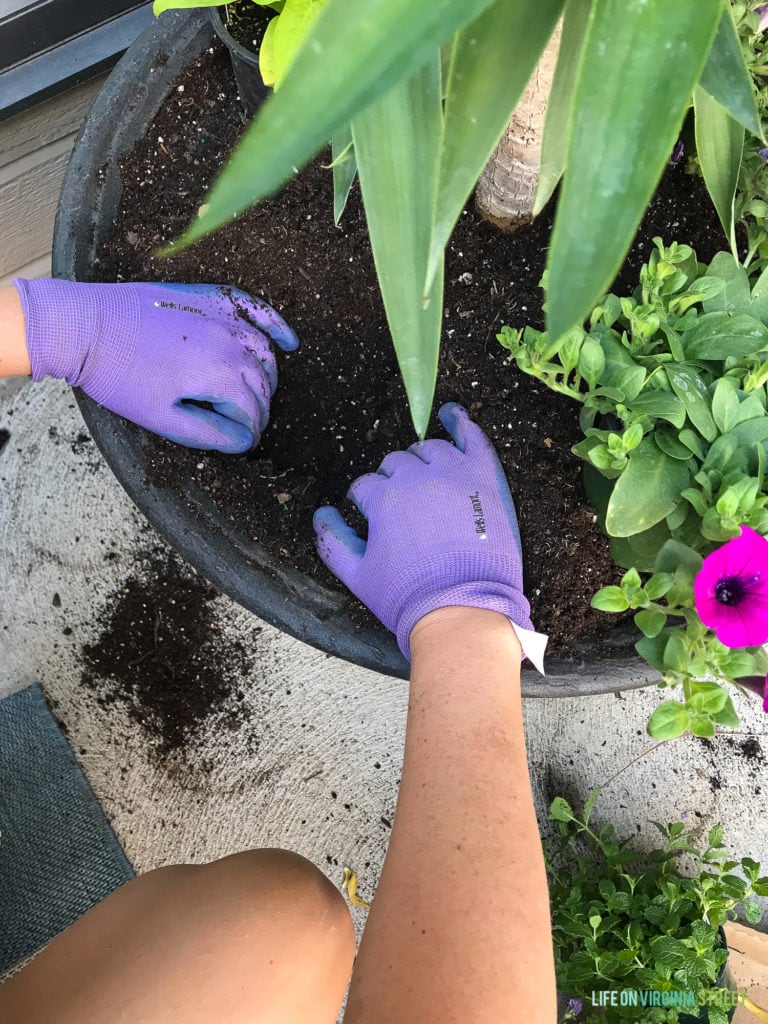
- Carefully loosen the roots/base of the plant with your hand. They tend to get pretty packed in their pots from the nursery, so you’ll just want to loosen it all up a bit so they can grow better in your new pot.
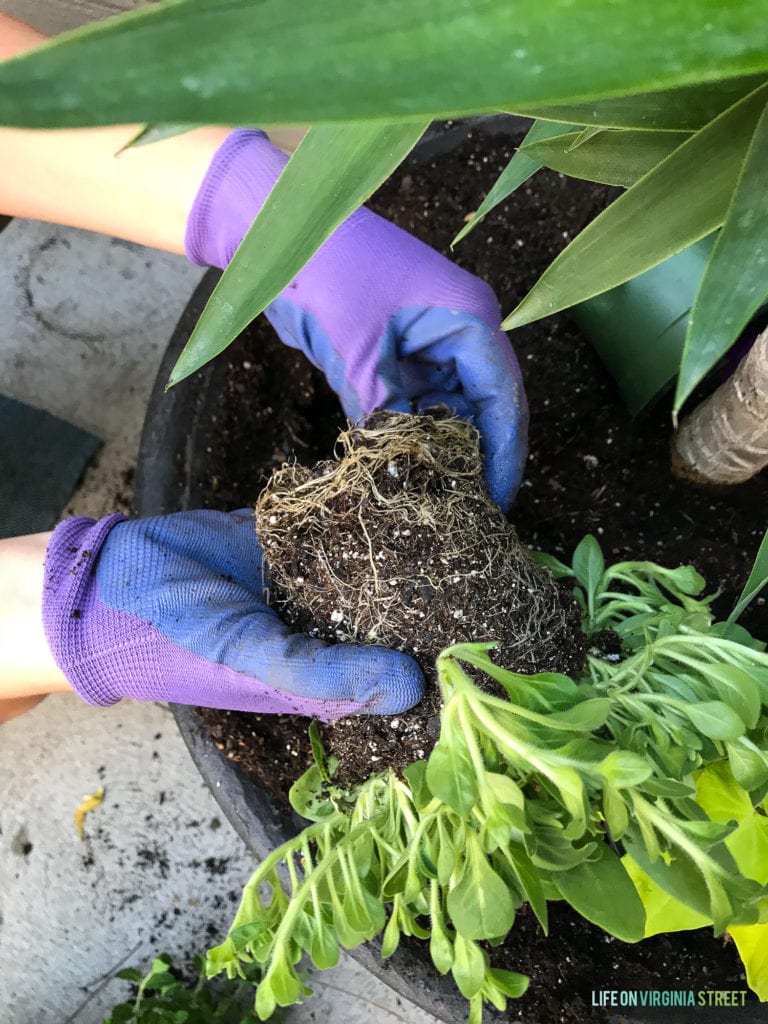
- Gently place the plant in the hole and cover with dirt, slightly pressing soil around it. You don’t want to leave air around the plant, but you also don’t want to pack it super tight. You may then need to add a bit more potting soil around the plant. Just ensure that the top of all of your dirt doesn’t sit above the pot, or water may run out.
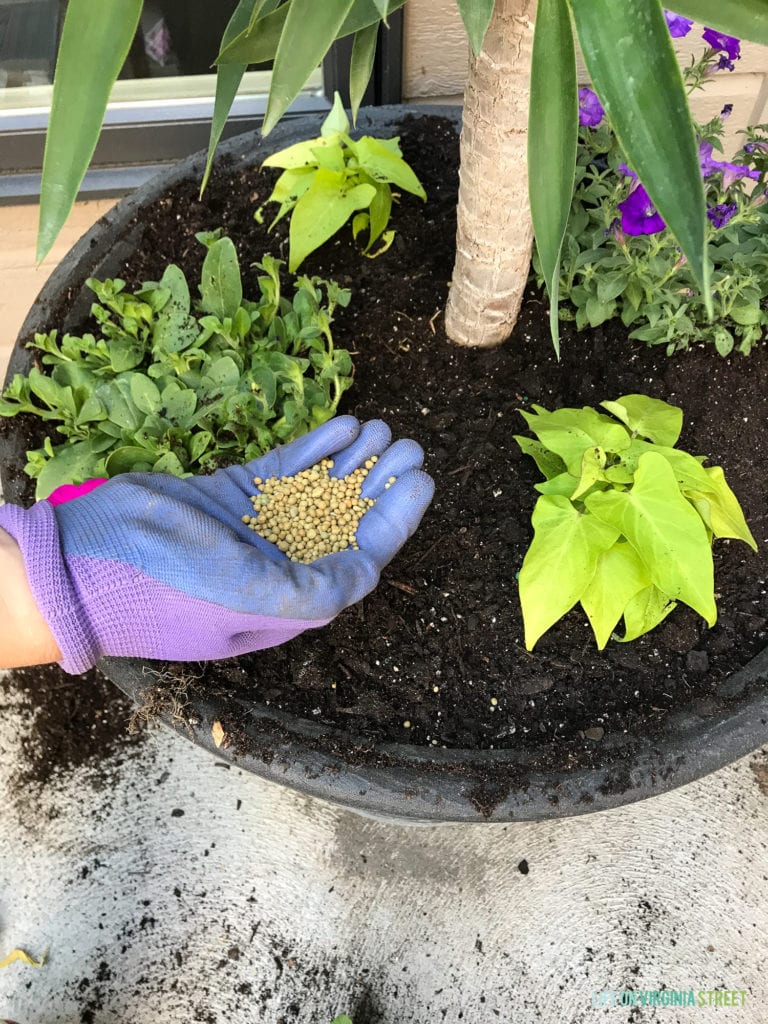
- Once all plants are planted, it’s time to fertilize! I add a few shakes of the fertilizer. If you buy the bag of the fertilizer, like I did this time around, I just take a small handful and sprinkle throughout the planter. If you buy the small version, which also acts as a shaker, you can just shake it a handful of times around the pot.
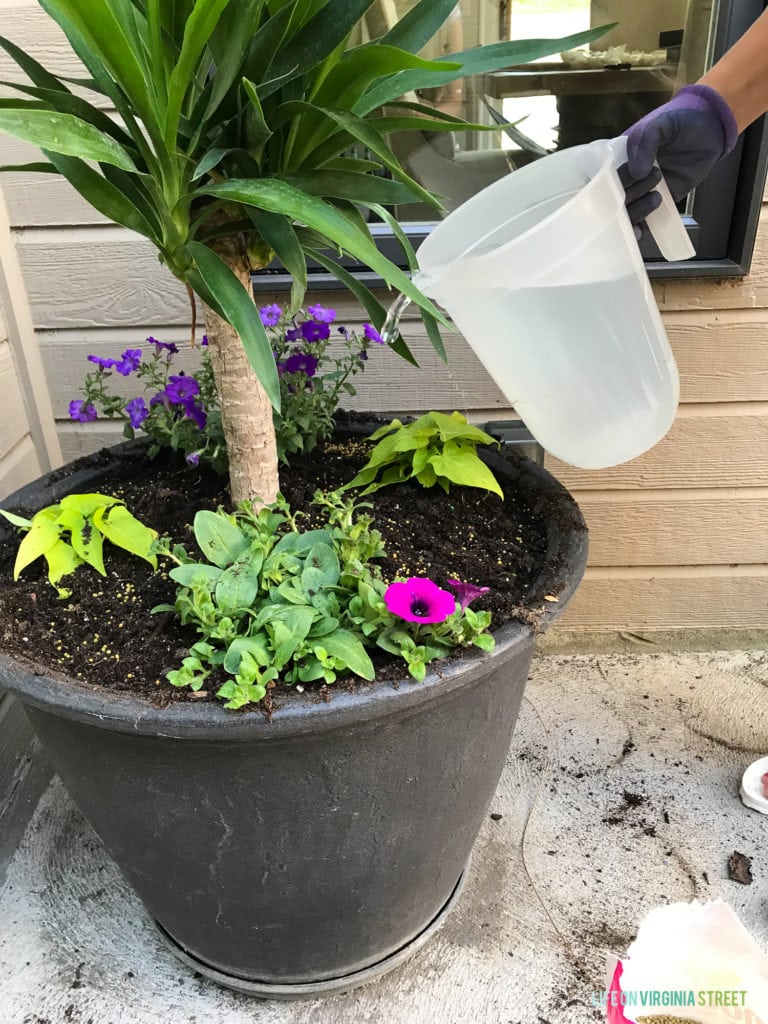
- Water everything in! At this point, the plants have probably started to dry out, so you’ll want to water them (and the fertilizer in). I like to give them a good soak. Then, they’re ready to grow!
Like I mentioned above, at first they’re going to look a bit wimpy, but you definitely want to leave room for them to grow! Within a week or two you’ll definitely notice a difference – especially if you take pics the day you plant and compare! With proper care, within 3-4 weeks or less, you probably won’t even see any dirt!
How to Maintain Flower Pots in Summer Months
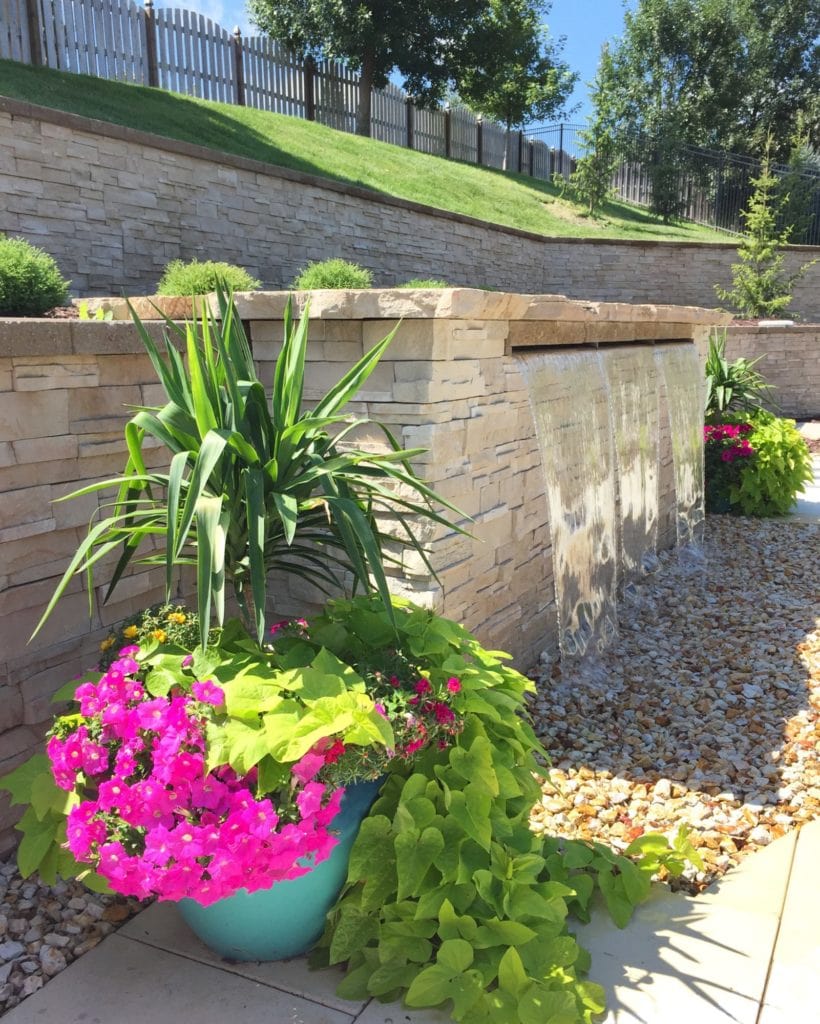
Now that you have your pots planted, let discuss how to maintain throughout the summer season! The photo below was taken about a month after I planted the petunias and potato vines, so you can see just how much they grow in a short amount of time!
Watering is key during the hot summer months. There are many weeks when I have to water my plants daily (if we don’t have much rainfall). But, again, this will be dependent upon your local climate. Most flowers and plants will start to get droopy pretty quickly if they aren’t watered enough, so if you see this occurring, be sure to water ASAP. I’ve found that in Omaha, the months even vary. We usually get a lot of rain in June so I can sometimes go 3-4 days or more without ever having to water. But in July and August I have to water much more regularly.
I also try to fertilize the planters ever 3-4 weeks, as well. Just a few shakes of the fertilizer, and it’s good to go for another few weeks! I try to buy fairly self-sufficient plants that don’t need much ongoing maintenance. However, I will try to dead-head plants and cut off broken leaves as needed. By August, my planters tend to be overflowing onto the ground in some areas!
And that’s about it! If I left anything out, feel free to leave a comment and I’ll get back to you with any questions! You can use the graphic below to pin to save for future reference!
More Outdoor Plants and Flowers Inspiration
Be sure to stop by all of the other stops on the tour for even more outdoor plants and flowers inspiration!
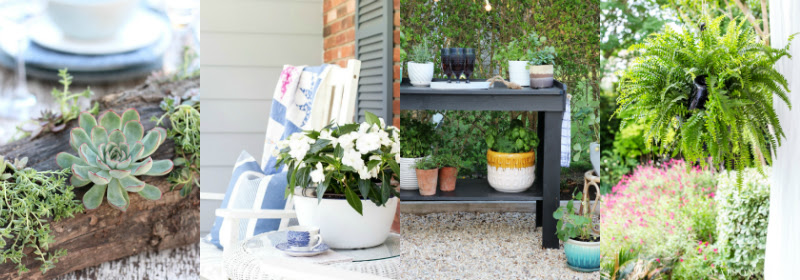
Satori Design for Living | On Sutton Place | City Farmhouse | Maison de Pax
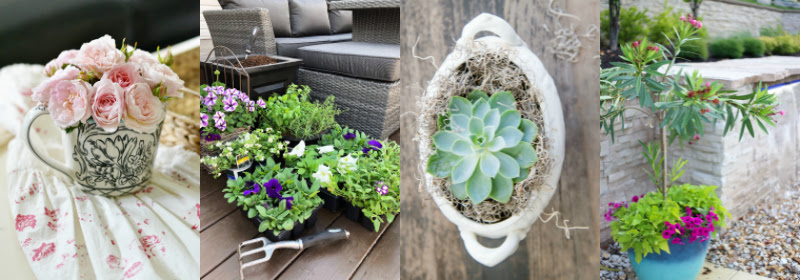
The DIY Mommy | A Pretty Life | Vinyet Etc. | Life On Virginia Street
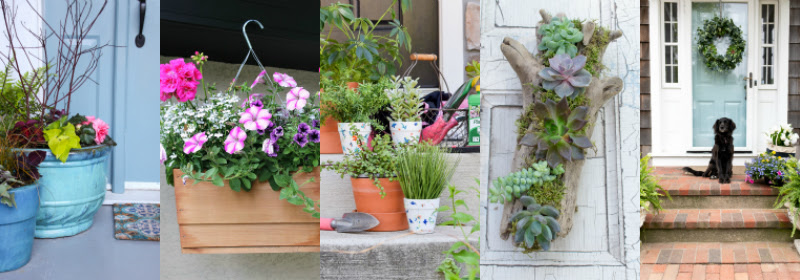
The Happy Housie | Clean and Scentsible | Casa Watkins Living | Postcards from the Ridge | Finding Silver Pennies
If you would like to follow along on more of my home decor, DIY, lifestyle, travel and other posts, I’d love to have you join me on any of the below channels:
Hi Sarah:
I have a question about the palm/yucca. Do they survive the cooler nighttime temperatures? And do you you bring them in the house at the end of the summer to be houseplants or are they pretty much dead by Sept?
Thanks! Love the look.
Wow, those planters from last summer are beautiful! We had a drought, so most of my planters were toast by the end of July (even with watering). It was a weird year. Hopefully it’s a good growing season this time around!
Wow! Your planters are gorgeous and I’m so jealous that your gardening is already thriving. It was a long winter here in New England. Simply beautiful. xx
These are beyond gorgeous and such amazing tips! I feel like I actually might be able to do this! The potato vine is simply the best, I just adore how it’s trailing on the ground – for sure putting that one on my list!
Such beautiful planters Sarah! Your yard and plants looks so gorgeous…I can’t wait until things start growing here, our trees still don’t have leaves!! It’s been a long winter!
Sarah this potted plant combination is stunning! love the vibrancy of the flowers mixed with the plants. Beautiful arrangement and great tutorial!
Hi Sarah,
I recently discovered your blog and am loving going through all your posts! This one is an informative post as I always am looking for ideas for my backyard. Could you please elaborate more on following ” I like to flip an old bucket upside down in the planter before filling it with dirt”? I couldn’t understand what you mean by that. Also do you not cover the holes in the planter? Look forward to hearing from you.
Thanks,
Hi there! So glad you found me! So I flip a bucket upside down inside larger planters so I don’t have to fill the entire planter with dirt. Not only does it get expensive if you’re buying planting soil, but it can get super heavy. If you use the upside down bucket, that will fill a large section of the planter. Also, I do not cover the holes in the bottom, as I want them to drain well. In several areas where I worry about run-off, I just buy a planter tray to set the planter inside of (many stores sell them next to the planters). This will help with the run-off. I hope that helps!
Thanks Sarah! Appreciate your prompt reply. It helps.
I’ve always heard that I should put gravel, rocks and sand in the bottom of planters, before dirt. Do you agree?
You can definitely do that if you are worried about drainage issues. It gets so hot here, I’d prefer to keep as much water in the pot at all times at possible. And I’ve never had an issue with it. But, if you get a lot of rain and/or not extreme heat, it may be worthwhile to do!
Love this Planters, kind of trying it out these month.
Thanks 🙂
What is the name of the plant that is laying on the floor the real green one and does it need sun light?
I believe the one you’re referring to is a petunia (it just doesn’t have blooms yet). And it prefers sunlight, but can do well without it too!
It’s potato vine
Hello, the part where you said to flip a bucket, I lost you. What else you can use to make sure you don’t need a lot of soil. I have a planter that is 24 inches tall . Thank u