This is a sponsored post written by me on behalf of FrogTape®. All opinions are 100% mine.
Striped walls have quickly become one of my favorite design elements in a space. You can achieve such a dramatic look with very little expense involved. I know this tutorial has been a long time coming, but today I’m going to share how I manage to get perfectly painted striped walls every time.
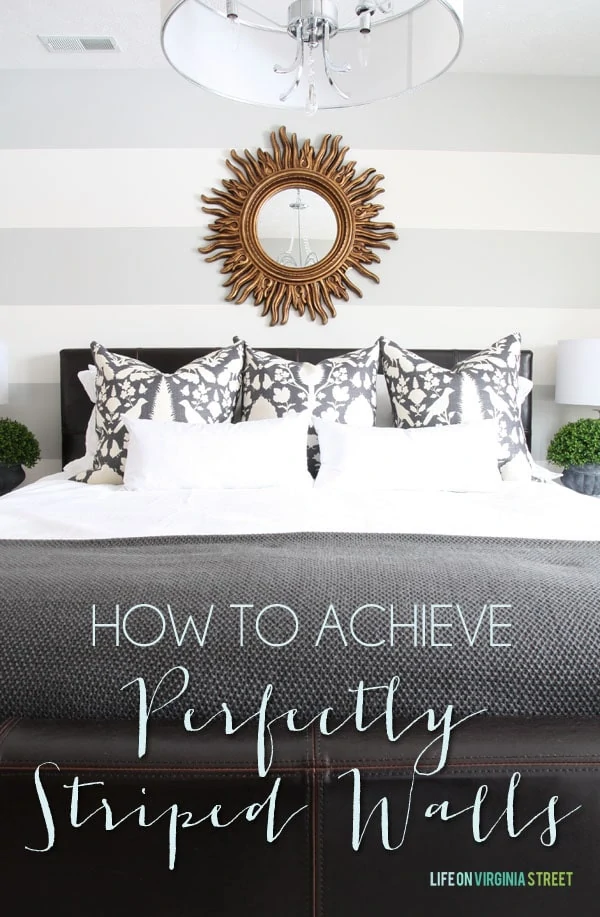
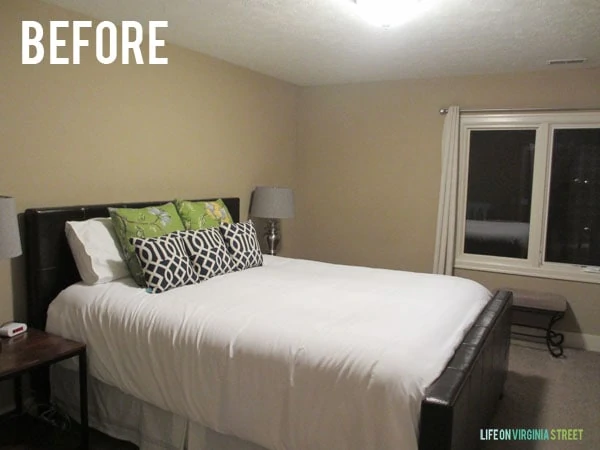
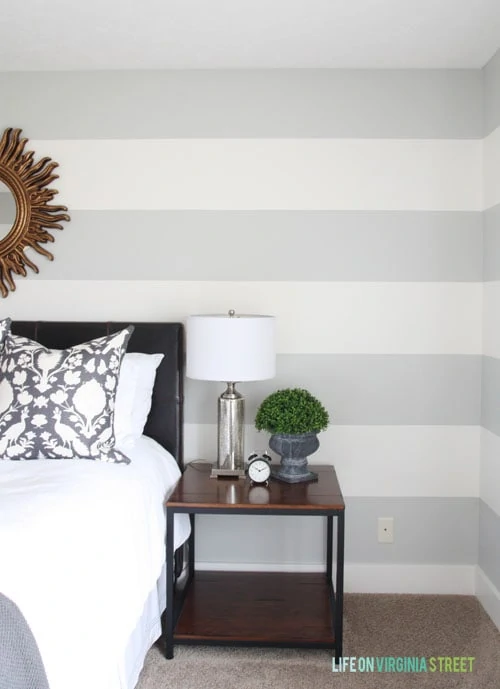
Perfectly striped walls are not hard to achieve – but it does take some time and effort to get a crisp, perfect look. In the end, I think you’ll agree that the time and effort required are well worth it! Here is the space I started with. Not a lot of personality, right?
Before we get to the actual dirty work, lets talk about the overall look you are trying to achieve. Do you want small stripes or wide stripes, an accent wall or a full room, contrasting colors or tonal or sheen differences? So many options!
For the look I was going for in our guest room, I preferred a wider stripe with only slightly contrasting colors. I ended up with four gray stripes and three white stripes, all the exact same height. Here’s how I calculated the stripe width so they were all equal. Measure the distance between your ceiling and the top of your baseboards, in inches. Next, determine the total number of stripes you want in your space (I had seven). You’ll take that number and subtract 1, to get the total number of tape lines you need to have on your wall. Your formula will be:
Total Inches on Wall/Total Number of Stripes You Want = Measuring Distance Between Tape Lines
My distance happened to be just short of 8 feet, but for simplicity in this example, we’ll go pretend it was 8. So I had 8 feet x 12 (to get total inches) = 96 inches from ceiling to top of the baseboard. I divided that by 7, the total number of stripes I wanted, to get 13.71″ as the full size of each stripe. Before painting I measure out this height to make sure that was close to size of stripe I was going for.
STEPS TO ACHIEVE A PERFECTLY STRIPED WALLS:
- Paint your entire wall with your base color (if you’re planning on changing it). In my case, I started with the gray paint – Behr Dolphin Fin in an eggshell finish. I completed the entire space in a weekend and then let it cure until the next weekend.
- Get your tools ready. In this case, I used a pencil, a three-foot level and FrogTape® brand painter’s tape (I used FrogTape® Multi-Surface, the regular green kind). If you didn’t have as much cure time between your base color coat and the stripe color, I would recommend FrogTape® Delicate Surface to ensure that your base paint doesn’t peel. I use FrogTape in virtually every paint project I’ve done in recent years and I consider it by far the best because it won’t bleed on virtually any surface type.
- Starting at the top of your room, measure down from your ceiling the appropriate size for your first stripe and make a tick mark with your pencil. You’ll continue down the wall adding tick marks every foot or so.
- Use your level to draw a solid line over the tick marks. Since not all ceiling lines are level (mine certainly weren’t), you’ll still want to use a long level to pencil in your tape lines. If I found that my measurements were off (because of the unlevel ceiling), I would go from tick mark to tick mark and split the difference to make the line as level as possible.
- Once you have the first line penciled on the wall, it’s time to start taping! I typically would tear off about a three foot piece of tape and would line it up as close as possible to my pencil line. Since my top stripe was gray, which was the color already on the wall, I placed the first piece of tape just above the pencil line, keeping the pencil area in the section that would be painted white so I didn’t have to erase it later. If you’re taping on your own without a partner like I was, using the pre-torn pieces is ideal. Just remember, when you add your next piece of tape, you slightly overlap the prior piece – making sure it is lined up as perfectly as possible.
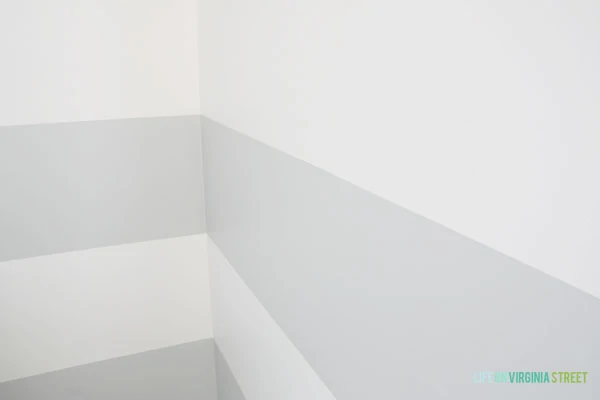
- Once the entire first line of tape is up, you repeat the steps above. To keep the white stripe the same size as the gray stripe, I used the same measurements as above, but started at the bottom of the tape line on the wall and then measured down. Draw your tick marks, level, and draw your lines like before. This time however, since you are taping off the painted area, you place your next piece of tape just below the pencil line. Visually, it will look a little off (it makes the gray area look smaller because you’re covering a lot of it with tape). See image below. See how the white stripes look a lot bigger?

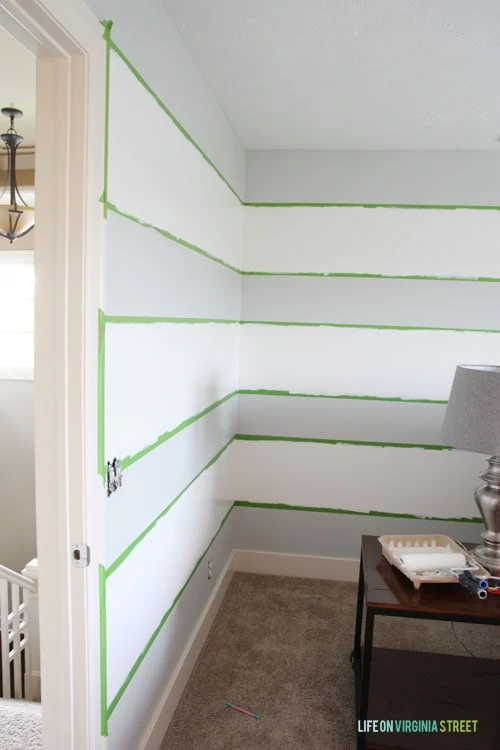
- As you can also see in the image above, I used natural breaks like doorways or windows to work in sections. Sometimes it felt like I was making better progress if I could paint an area and then move on to the next section.
- My next trick, especially when using FrogTape®, is to get a credit card out and drag it along the lines where the tape has been applied. Since the tape has PaintBlock® Technology, it is crazy just how well it blocks out any paint from bleeding (especially when properly pressed with the credit card). It is important to press all your lines with the card, especially the areas where your tape overlaps, to achieve a perfect line. **Something to note: I’ve seen other tutorials where people will paint a layer of the base color around all the tape lines to prevent bleeding, but personally I don’t feel it is necessary at all if you follow the steps above and use this tape. Plus, then you don’t have a “ledge” with excess paint (as you would have at least three layers following that method).
- Once everything is taped off and properly sealed (in a section, or your entire room), add your stripe paint color (I used Behr Swiss Coffee in eggshell). I used a small roller and applied two coats of paint, allowing an hour dry time between coats. I would apply the paint in as long of lines as possible to minimize roller marks.
- I then removed the tape immediately once the second coat was applied. You’ll be so impressed with how easily the tape removes and just how crisp your lines are!
- Stand back and stare at your gorgeous new walls!
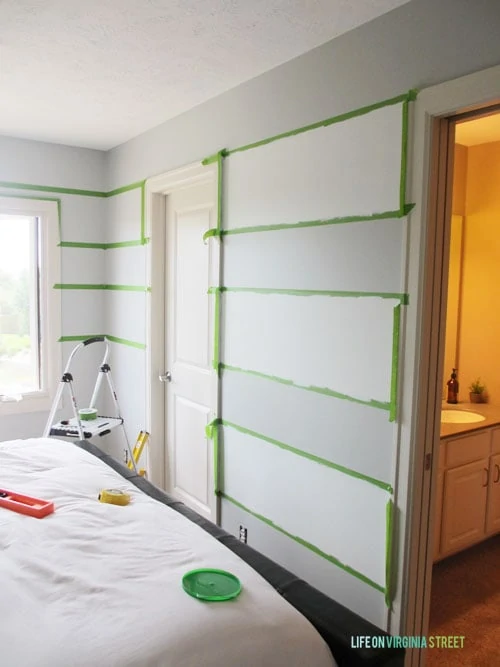
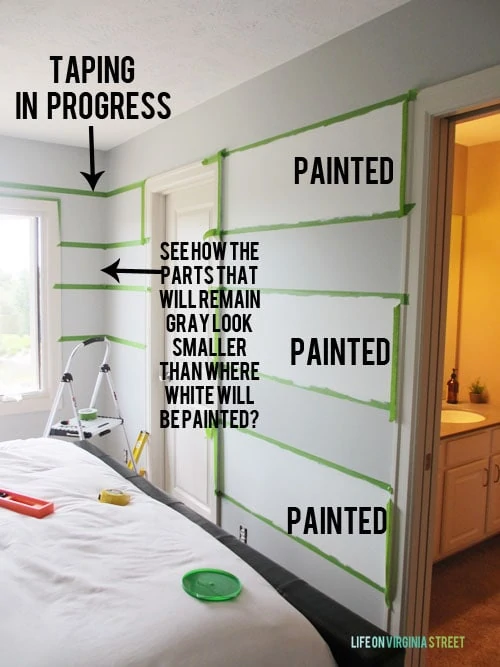
Here are a few more ‘in progress’ shots. You’ll notice I ran out of tape partway through and I accidentally bought a wider FrogTape but you can still see how it all works together. In the first image below, the ‘X’ denotes where the white paint would be applied: 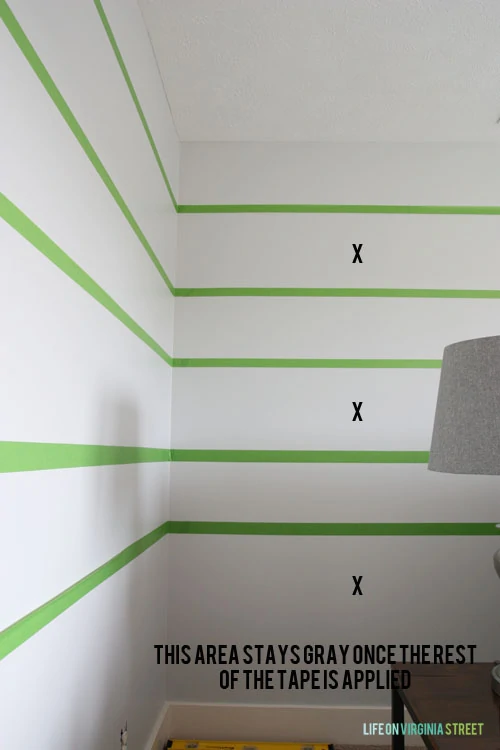
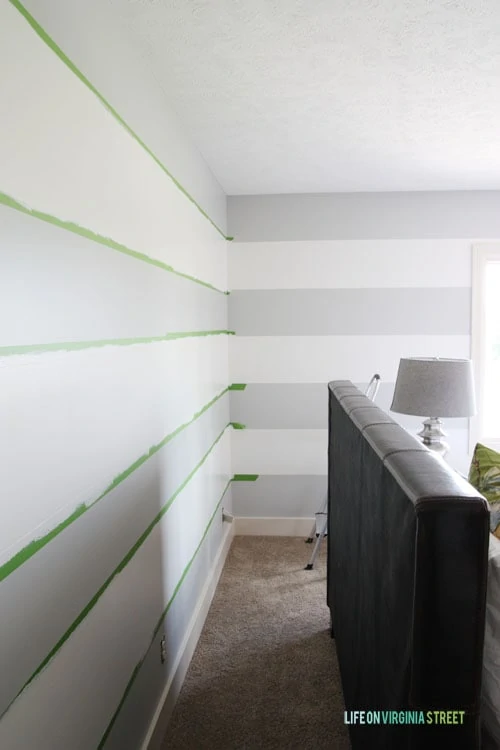
And now some ‘after’ shots from all the hard work. Like I said, being a little more meticulous in your prep work ultimately pays off in the long run when you get results like this. Perfectly even stripes and no paint bleed! 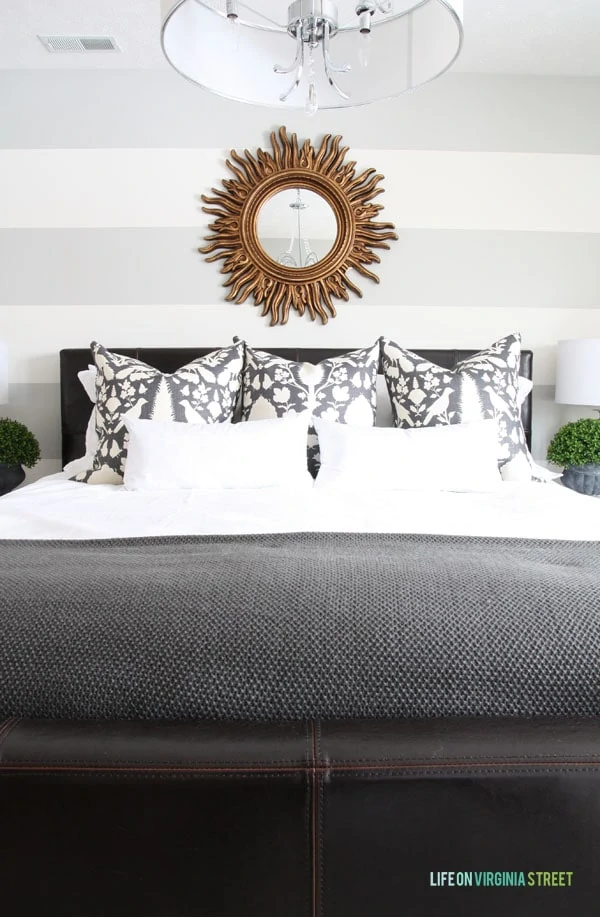


For a full source list of items in this room, be sure to check out this post.
Now, are you ready to tackle stripes (or other patterns) in your own home? Be sure to check out the Earn Your Stripes Room Makeover Contest, where you can enter your project and possibly win $5,000! Here’s how:
- To enter readers must re-do a room with the help of FrogTape and submit their photos to the FrogTape contest site
- Visit the FrogTape site to check out all official contest details
- The winner will receive a $5,000 prize!
You can visit the FrogTape® painting inspiration page to learn more about their products and check out their inspiration gallery. Or, you can also visit and follow their Twitter (@FrogTape), Instagram (@FrogTape), Facebook, and Pinterest pages for more information and inspiration. So many amazing looks can be achieved!
A big thank you to FrogTape for sponsoring this post. I hope it has motivated you to tackle a paint project of your own! If you would like to follow along on more of my home decor, DIY, lifestyle and other posts, I’d love to have you follow me on any of the following:
Pinterest / Instagram / Facebook / Twitter / Bloglovin’ / Google
![]()
WOW Sarah, you make that look way too easy! The stripes look fantastic (as does the entire room). I love that credit card trick for getting the perfectly crisp lines!
Sarah! The stripes are gorgeous! I love the simple gray and white combo!
I’ve really loved your striped walls since I saw it. I would love to do this in our guest bedroom but our walls are not flat but have texture. I’m afraid the paint will bleed through the tapes and we will not get that perfect straight line. Do you have any suggestions for walls that are textured? The other question I have is what color to choose. My accent colors in the room is lime/light green and aqua. The furniture are all white. Currently, the wall color is soft linen, called Light Antique CW049W. Would you add a green stripe with the current wall color, or a white? I love gray so would a gray stripe be a better choice? Sorry for all the questions, but choosing the colors is tough for me since I’m afraid of making a bad choice.
That looks SO good!! I wish I had the patience to do it myself 😉
How gorgeous!! Your room looks incredible!!
The stripes are gorgeous. I LOVE Frog Tape – used a ton of it when I redid the boys’ bedroom. I used the delicate surface since I had just repainted the walls and didn’t want it to tear off the new paint. Great tip about the credit card – I didn’t know that!! Thanks:)
Wow, amazing, Sarah! You looks perfect as always 😉
Hugs, Jamie
Wow! What a change to the bedroom – a change for the better. I love what you did with the stripes! Can’t believe how straight those lines are – great job!!
Such a stunning result, Sarah! And thanks for the tips!! Adding Frog Tape to the shopping list! 🙂
~Abby =)
You make it look so easy! And that room is GORGEOUS! xx
In our bedroom we have squares. I used a yellow colored pencil to draw in the lines, and painted. My oldest son’s room has street lines on his wall. We used a chalk string like they use on fields. It worked pretty well. I recently did a review for paint chalk. That stuff dissolves as soon as water hits it. I imagine it would work well for making lines. So many options.
I love the stripes!!!