
Now that the construction and touch-up phase of our new build is mostly wrapped up, it’s time to get to the fun decorating stage! I’m having to slow my brain down a bit to not try and handle every space at once, but rather focus on small projects that will make a big impact right away. The first of which is the plate wall I want to install in our pantry!
This post contains affiliate links for your shopping convenience. You can read my full disclosure policy here.
The Current State of Our Pantry
One of the favorite features of the floorplan of our new build was the size of the pantry. I originally had planned to carry the marble counters from the kitchen into here, but when I saw the price I quickly vetoed it. So, I used the affordable white quartz we used in our laundry room and secondary bathrooms. It actually has worked out perfectly because we can use this as almost a prep kitchen – particularly with items we worry could stain the marble.
We used this small subway tile in the upstairs bathroom that has a tub, and we loved it so much we decided to use it again here! It’s amazing how well it reflects light from the window on the other side of the entrance, helping make the room not feel so dark!
Since this picture was taken in early July, we’ve also added our coffee pot to the room and a microwave (I didn’t want one built-in to our island). We love that it has two small pocket doors we can close, so if we’re entertaining nobody has to look into this space.
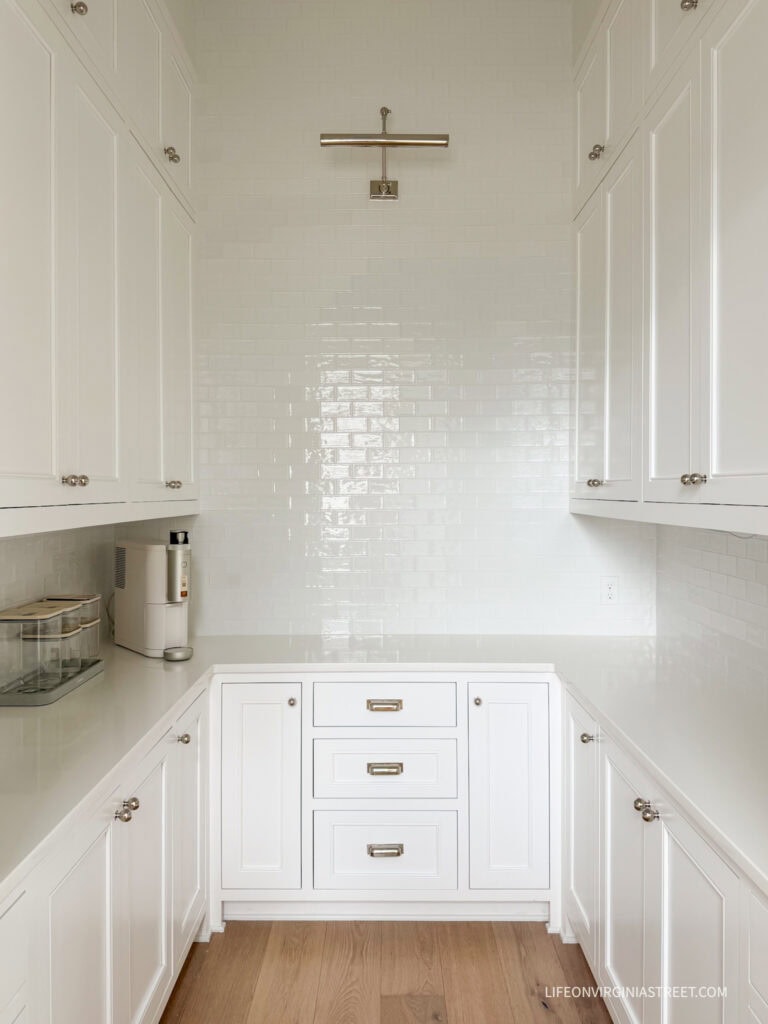
PANTRY SOURCES: Cabinet Knobs | Cabinet Bin Pulls | Picture Light | Subway Tile | Cabinet Color: Benjamin Moore Chantilly Lace
The pantry was designed to have lower cabinets and then open shelves for the uppers on either side of the space. But we know we’re not open shelf people, so we had them add upper cabinets. With that, I always knew I wanted either some art or a plate wall straight ahead on the open wall so I had the electrician wire for a picture light.
I’ve ultimately decided the plate wall is the route I want to go. I know plate walls aren’t for everyone (I’ve had people tell me on Instagram to please not do a plate wall), and maybe it’s just a Southern thing? Maybe this is a sign I’ve been living in the South long enough to start loving some of the trends here? But I really love them!
Green & Blue Plate Wall Design Plans
I played around a bit on Canva to come up with color ratios that I loved for the plate wall – obviously all in green/blue/white tones. Here was the final rendition I made last time I was playing with it.
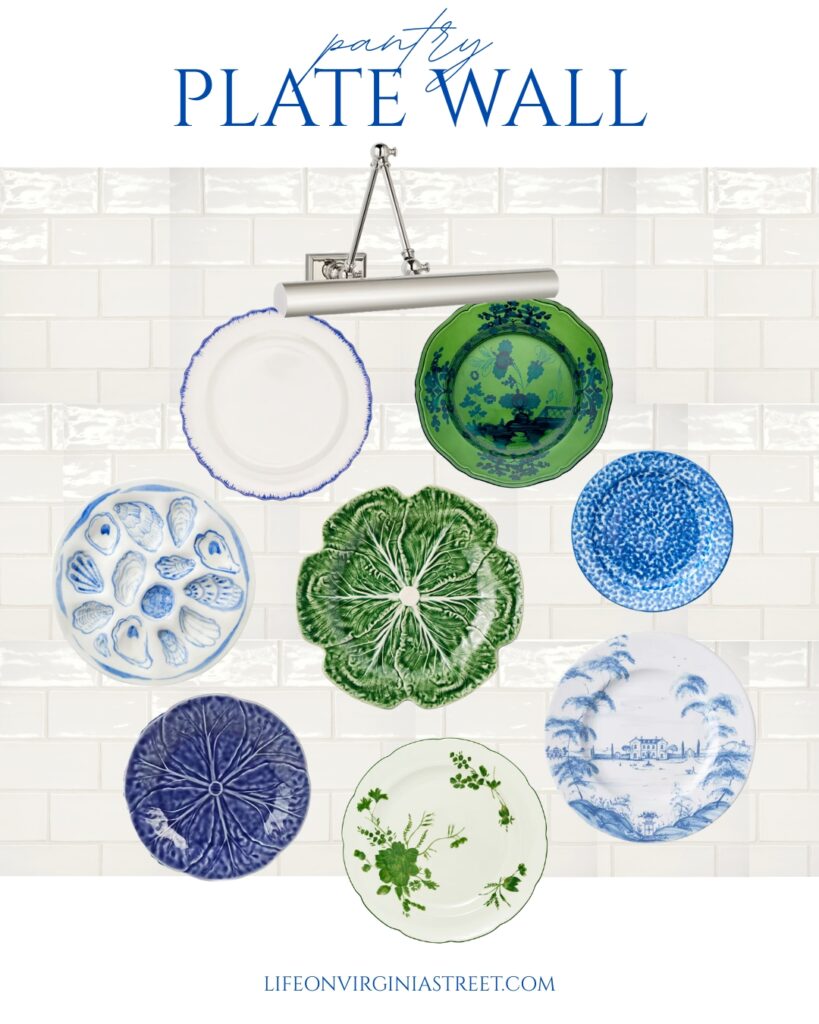
SOURCES: Picture Light | Subway Tile | White with Blue Rim Plate | Green & Navy Blue Ginori Plate | Blue Splatter Plate | Blue & White Country Estate Plate | Green Floral Plate | Blue Cabbage Plate | Oyster Shell Plate | Green Cabbage Plate
I shared a few other fun options in this post if you are looking for some more variety! I also have some plate wall inspiration pictures saved here if you’re interested.
I ordered a few of the plates above but others I decided to hold out on just to keep the expense minimal. A few are only sold in pairs so I may use some duplicates as well and then swap out down the road as I collect new favorites. But I love that I can also use them for unique serving pieces when we’re hosting!
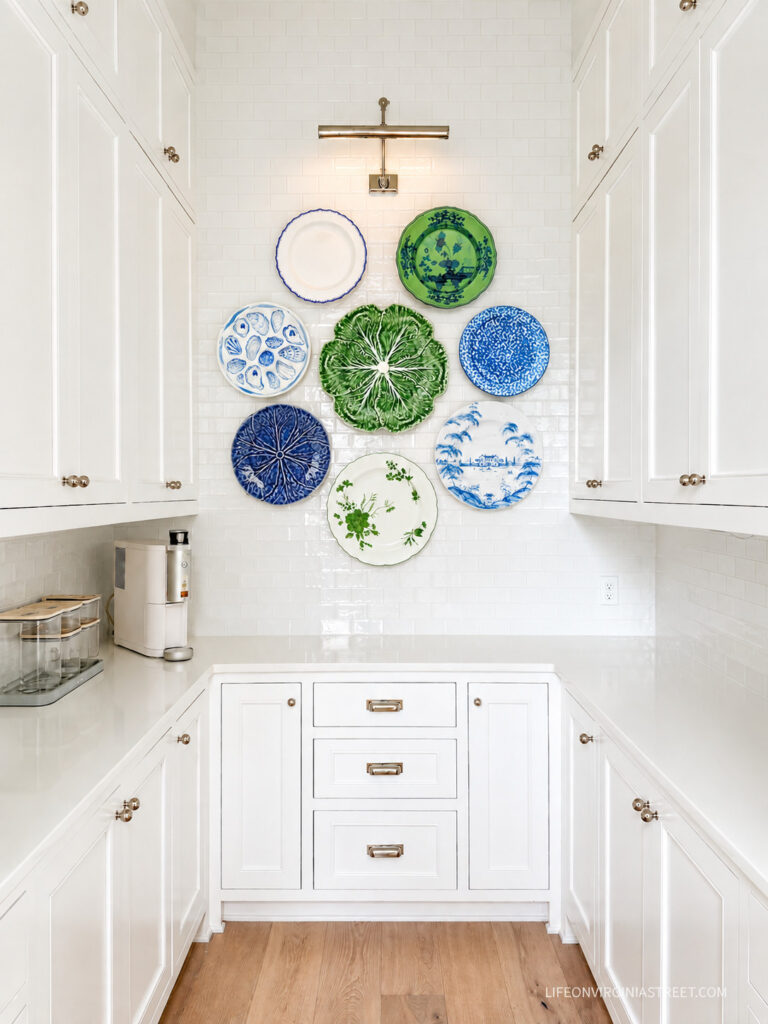
I am a bit freaked out by AI in many capacities, but it can be helpful to envision a design before you jump fully into it. I have a tutorial here if you’re interested. I asked ChatGPT to merge my pantry photo with the plate design and here is how it looks. I didn’t make the plates to scale on the design so I know that will alter things a bit. But here’s how it came out. It helped me to realize I may want a bit more white space in the overall design.
Best Hanging Solutions?
Here’s where the tricky part comes in. Kurtis really doesn’t want me drilling into the grout to hang the plates. So I need to find a viable adhesive option that will actually hold. I’m less concerned about a plate falling and breaking (although I don’t want that either) but more about preserving our countertops if one were to fall. I’m hoping some of you have tried this before and have some tips you can share! In the meantime, here is what ChatGPT is recommending as the best option:
How to Hang Plates on Tile Without Drilling
Although they shared a much more detailed description, I asked ChatGPT to simplify the order into a list to share:
- Clean the tile first with isopropyl alcohol and allow it to dry completely. This helps the adhesive bond properly.
- Attach an adhesive disc plate hanger to the back of each plate. These are nearly invisible from the front and give the plate a secure hanging loop. This was the recommended brand (available in multiple sizes).
- Use a heavy-duty Command hook/adhesive mounting point on the tile to hang the plate. Choose one rated for several times the actual weight of the plate. They very plainly stated that cheap knock-offs on Amazon aren’t a great idea and to stick with the 3M Command brand.
- Add a hidden safety tether. Attach thin clear-coated picture wire or strong clear line from the plate hanger to a second, independent adhesive anchor hidden behind the plate.
- Follow all adhesive curing/wait times before putting any weight on the hooks. Don’t rush this step!
- Test your heaviest plate first and leave it hanging for several days before installing the entire gallery.
- For maximum security: If you’re comfortable making tiny holes in the grout (not the tile), use small mechanical hooks/anchors in the grout instead of adhesive hooks. The holes can later be patched with matching grout.
- Avoid relying solely on museum putty, suction cups, generic mounting tape, hot glue, or inexpensive adhesive hooks—especially when plates are hanging above a stone countertop.
So here’s where I’m at. I think I’m going to try the adhesive method and hang a couple of my melamine (shatterproof) dishes first to test the adhesion. I’ll try to find my heaviest ones to mimic the weight of the plates I want to use. It’s not a perfect test, but if those fall, I think I’m going to have to pivot and hang the plates somewhere else where I can nail into drywall.
I’d love any tips or ideas y’all may have too! Can’t wait to share this project wherever it ends up!
If you would like to follow along on more of my home decor, DIY, lifestyle, travel and other posts, I’d love to have you join me on any of the below channels:
Sometimes trying new things is good but this feels like a lot of extra work for something you’ll probably always have a background worry about. Well, I would anyway. Save the plates for drywall and use this as a place for one picture hanger so you can have seasonal art.
I mean, you could print a canvas with an image of the plate design for summer!
If I were you it would kill me for it to go wrong and damage brand new walls, counters and plates in one go.
I love the plate wall, so pretty and would be so cheerful to walk in and see it every morning. I have used command hooks for heavy picture frames with glass and never had a casualty. Brilliant idea putting a second safety hook with string on each plate.
Just my take on the plate wall. To me the large green plate centered on the wall would make a much bigger statement without adding the remaining plates. To me the full plate wall screams “grandma”. And bear in mind I am 76 so I am a grandma! 😆. But maybe that is the look you are after. Although your past homes have never trended “grandma” imho.
Hi Sarah!
I love the idea of a plate wall to bring in color! You can never go wrong with using Command hooks/adhesive. I used Command velcro to hang family pictures in our motorhome and even with all the bouncing around on rough roads, the pictures are still secure on the wall. Go for it!
Hung a 30″ diameter mirror with 3M command strips -used two of the kind with the metal plate with faux nail kind. I would not worry about it at all unless there is a film or weird finish that makes the adhesive not stick, but you can easily test that out. I would use this style 3M and a normal picture hanger.
I love this!!! Clean and classic!!! Love the blue and green together. Turned out so beautiful!
Love the plate wall and the color combination, but would suggest doing this somewhere that can be admired and enjoyed more often. Have it hidden away in the pantry and sticking hooks to that beautiful new wall does not seem like the best idea for such a beautiful collection.
I love plate walls. Yes, I’m from the south and I think its a wonderful tradition. I also have used silver trays and as they tarnish a bit, they are beautiful. I always had people not only compliment, but stand there forever taking them in. You should use what makes you happy. That is what makes a home.
Ahhhhh, I love the plate wall so much and the punch of color it provides! Everything you do is spot on and I so enjoy your weekly emails in my inbox. I keep all of yours to refer back to.
The plates will be stunning! Definitely use to scale dimensions for the plates and wall area to be used. I love chat GPT and have used it for many decor ideas. I have used the exact same plate hanging discs for years. They work so good!
Plates are a classic design style and Definitely a Southern thing! Although, most true Southerners don’t include Florida in the list of Southern states lol! 😏