• Skip to primary navigation
  • Skip to main content
  • Skip to primary sidebar
  • Skip to footer
  • About
  • Home Tours
  • Read By Category
  • Sources
    • Life On Virginia Street Paint Colors
    • Shop Our Home
  • Contact
  • Nav Social Menu

    • Amazon
    • Facebook
    • Instagram
    • Pinterest
    • Twitter
  • HOME DECOR
    • Decorating Ideas, Tips and Trends
    • Home Tours
    • Look for Less
    • Outdoor Spaces
    • Room Makeovers + Design Plans
  • DIY Projects
    • Cleaning and Organization Tips
    • Crafts
    • Paint Projects
    • Rental Properties
    • Room Makeovers
    • Tutorials
  • TRAVEL
    • 30A Florida
    • Cruises
    • European Travel
    • Mexico & The Caribbean
    • U.S. Travel
    • Packing Ideas
  • Fashion & Beauty
    • Fashion Posts
    • Hair & Beauty Posts
    • Recent Outfit Ideas
  • Entertaining
    • Entertaining and Party Ideas
    • Food & Drink Recipes
    • Tablescapes
  • Shop
    • Shop Our Home
    • Shop My Instagram Feed
    • Gift Guides
    • My Amazon Storefront
    • Sale Alerts
    • Wednesday Watch List
Life On Virginia Street

Life On Virginia Street

DIY . Home Decor . Travel . Style . Life

Winter Wreath Made From Clearance Garland

DIY Projects

908 shares
  • Share
  • Tweet

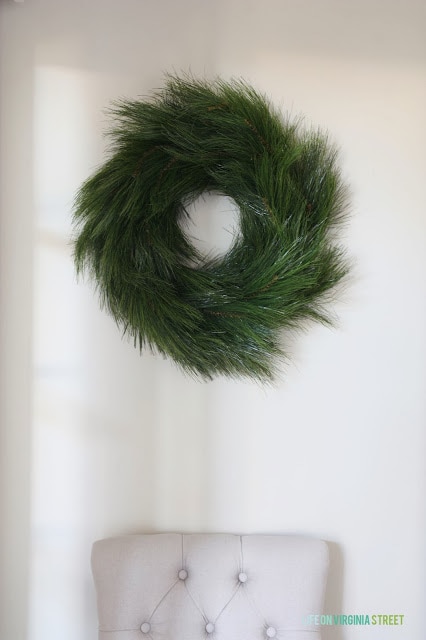
This simple winter wreath is made from clearance garland!

Winter Wreath made from Clearance Garland poster.

I don’t know about you, but I prefer to buy all of my Christmas decorations on clearance after Christmas if at all possible. Luckily, our JoAnn fabric store marked all of their decor items down to 70% off prior to Christmas. I loaded up on garland, ribbon, and more. I then stumbled upon this tutorial from The Wood Grain Cottage and knew I had to create my own winter wreath made from clearance garland.
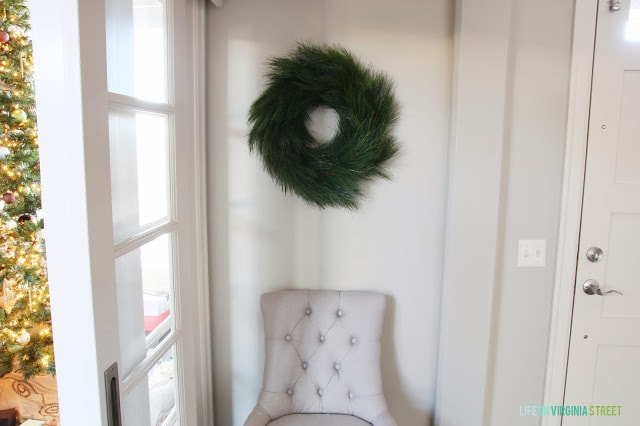
Green wreath hanging in room with large window and a chair underneath it.

Since the garland I got from JoAnn’s was already earmarked for our railings {and I bought every last one they had in stock}, I ran to Hobby Lobby and snagged some there at 50% off last weekend (this will likely be the most affordable way to make this wreath). Essentially, all you need to create this beautiful winter wreath is the following (the items are clickable for your shopping ease):
  • Foam craft wreath
  • Garland of your choosing
  • Hot glue gun
  • Glue sticks

Winter Wreath Tutorial

Since Shayna was the brains and inspiration behind this wreath, I’ll refer you to her blog for the full tutorial. But in case you’re curious, here is the garland/swag from Hobby Lobby that I used – I chose it simply based upon which pine needles I liked best. I had to use tin snips to cut the greenery off the garland because the wire attaching it was so thick. I ended up using about one and a half swags and a 16″ foam wreath. Other than that, I followed her directions explicitly.

Wreath material with pine cones and red berries.

I decided to keep mine as simple as possible so that I could use my wreath throughout January as well. But, I can’t wait to use it next year with one of my Christmas chalkboards {seen here and here}. I love that the greens look fresh, natural and that it is so much fuller than those you can purchase in the stores.

Large green wreath hanging on white wall.
DIY Winter Wreath made from Clearance Garland with a white chair underneath it.

Happy crafting! And, in case you missed my earlier announcement about 2014’s Fabric Fridays, be sure to check it out here!

If you would like to follow along on more of my home decor, DIY, lifestyle, travel and other posts, I’d love to have you follow me on any of the following:

Pinterest / Instagram / Facebook / Twitter / Bloglovin’ / Google

disclosure: affiliate links used

908 shares
  • Share
  • Tweet

December 27, 2013 · 3 Comments

free email course!

5 Secrets to Re-Designing a Room You Love

Learn my foolproof system for designing a room you’ll love that you can enjoy for many years to come!

Previous Post: « Merry Christmas!
Next Post: A Few Updates »

Reader Interactions

Leave a Reply Cancel reply

Your email address will not be published. Required fields are marked *

Recipe Rating


Comments

  1. Krista thehappyhousie says

    December 28, 2013 at 4:43 pm

    So simple yet so pretty Sarah – I love that you can keep it up through January. The hit of green is so fresh and wintery – love it:)

    Reply
  2. Shelly Dolen says

    January 8, 2014 at 6:55 am

    Oh I love how fresh this looks! It’s just what January calls for after a decked out December!

    Reply
  3. Bonita says

    December 2, 2014 at 9:24 pm

    Love the simplicity and the way the green looks against the wall.

    Reply

Primary Sidebar

Welcome To Life On Virginia Street!

Let’s Get Social!

  • Amazon
  • Facebook
  • Instagram
  • Pinterest
  • Twitter

Subscribe By Email

Receive an email each time a new post goes live on Life On Virginia Street!

Tour Our Home

Footer

Disclosures + Photo Usage Policies
Privacy Policy

Copyright © 2026 · Farmhouse Theme by Restored 316

This website uses cookies to improve your experience. We'll assume you're ok with this, but you can opt-out if you wish.Accept Read More
Privacy & Cookies Policy

Privacy Overview

This website uses cookies to improve your experience while you navigate through the website. Out of these cookies, the cookies that are categorized as necessary are stored on your browser as they are as essential for the working of basic functionalities of the website. We also use third-party cookies that help us analyze and understand how you use this website. These cookies will be stored in your browser only with your consent. You also have the option to opt-out of these cookies. But opting out of some of these cookies may have an effect on your browsing experience.
Necessary
Always Enabled
Necessary cookies are absolutely essential for the website to function properly. This category only includes cookies that ensures basic functionalities and security features of the website. These cookies do not store any personal information.
SAVE & ACCEPT