We leave for Hawaii today, and the day after we get back, our home will be photographed for the listing photos! Two days later, our home will officially be on the market, as we prepare to move into our new build. So hard to believe! With that, we’ve been busy behind the scenes prepping our home to sell, which has included a lot of purging, donating, organizing, etc. Today I’m sharing a super quick bedroom makeover in a room you’ve likely never seen before (or only very briefly). Isn’t it funny how, when you prep to move, you tackle all those little projects you had been meaning to do for years?!
This post contains affiliate links for your shopping convenience. You can read my full disclosure policy here.
We have one guest bedroom that had previously never been decorated before. We used it for some furniture we were storing and it’s attached to the bathroom where we keep the cat litter boxes. We basically called it the cat bedroom for simplicity, although I’m not sure they’ve ever actually slept in there. Ha!
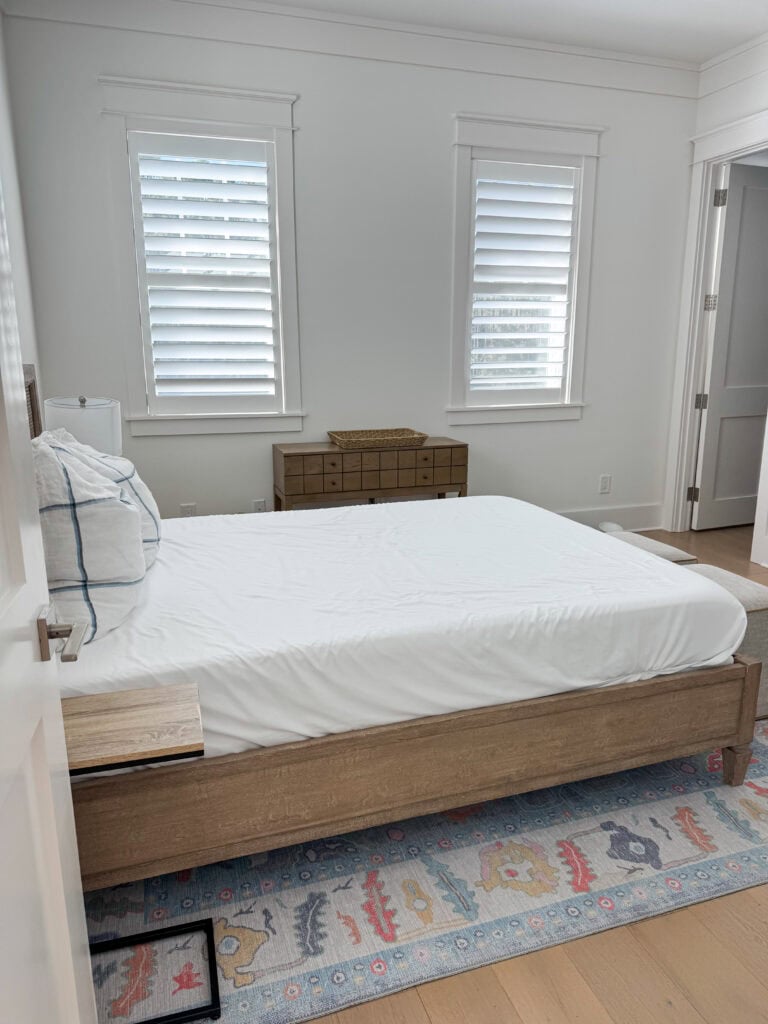
Here’s how the space looked a few short months ago. The layout was a mess but worked with what we needed to store in there. Definitely not up to par with the rest of our home, stylistically, as we prepare to sell. So, I wanted to do a mini makeover with some budget-friendly items to make it flow better with the rest of our house and feel more finished.
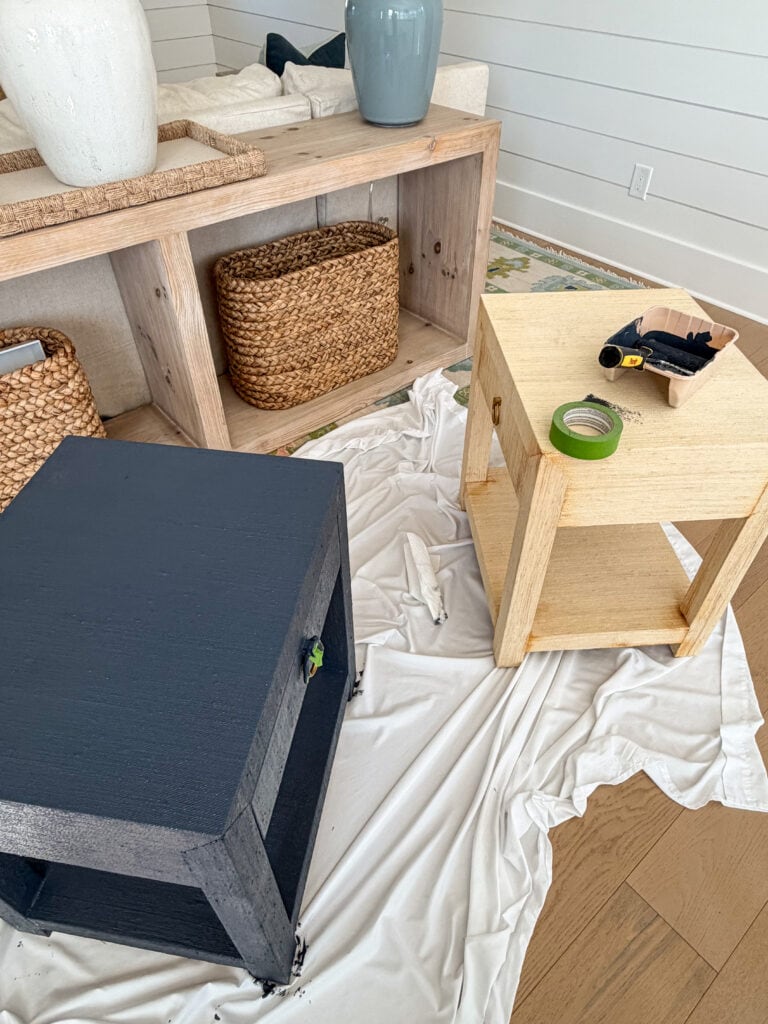
We’ve had these discontinued Serena & Lily raffia nightstands for ages (one was on the opposite side of the bed above), and they came along with us from Omaha. I thought we’d use them in a rental but never did and since we still had them on hand, I decided to put them to use.
Over the years, the glue had started to turn incredibly orange. They were at the stage they looked awful, even though structurally they were perfectly fine! So, I figured I had nothing to lose by painting them. Since the vanity in the adjoining guest bedroom is navy blue, I decided to paint them a similar color. I also essentially wanted to mimic the new version of the nightstands that is from the same line as the console table, bookcase and the carriage house coffee table in the lighter blue color we own and love (which have more of a coated finish rather than a raw raffia).

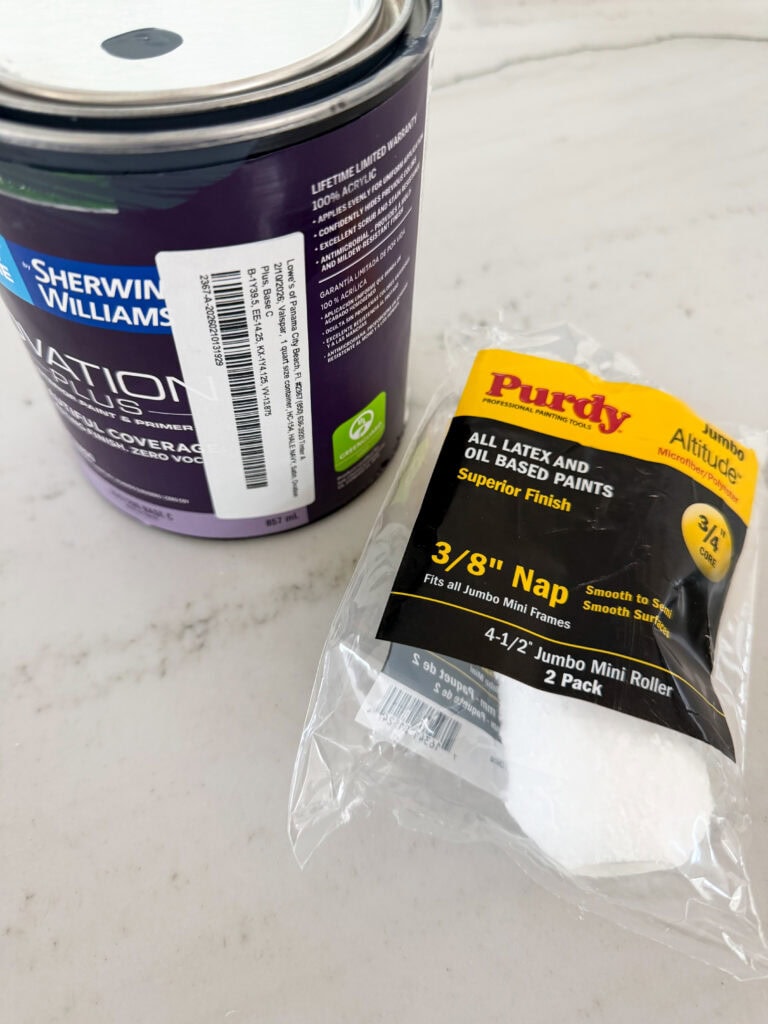
So, I opted to paint them navy blue! We were in Panama City Beach a few weeks back for a pool appointment, and I swung into Lowe’s which was nearby and had them color match Benjamin Moore Hale Navy. Here are the exact two items I used, including the colormatch formula (but I just told them to match Hale Navy and they did the rest). I went with a satin finish so it would be a bit more durable. I then just had a sponge tip brush and this 3/8″ nap roller and rolled it on. I used the brush to get in the crevices I couldn’t reach otherwise. I bought a small quart of the paint and only used about 2/3 of it, so there is plenty left for touch-ups if I ever need it down the road. It only took one coat and then I just spot touched-up areas that seemed to absorb the paint more and needed a thicker layer.
I couldn’t see a way to remove the hardware on these particular nightstands so I just wrapped them with some Frogtape. Below you can see one in progress while it was still drying and then the other shows a wet and a semi-dry version. The painting process was rather quick and took me maybe 40 minutes or so to finish both nightstands.
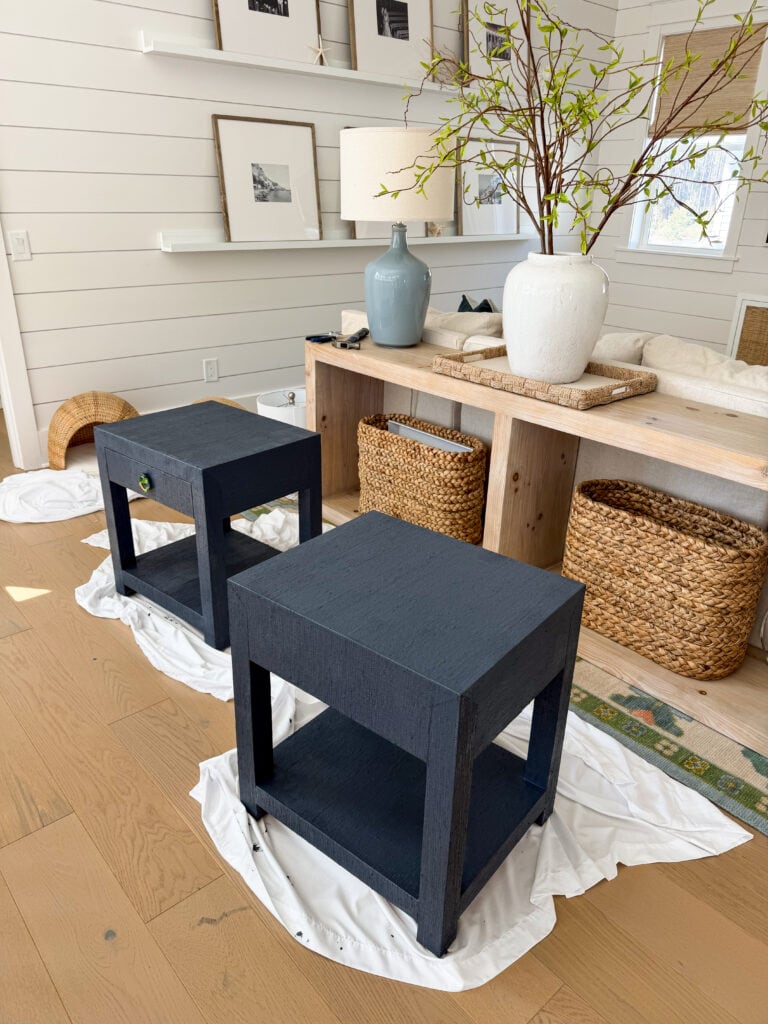
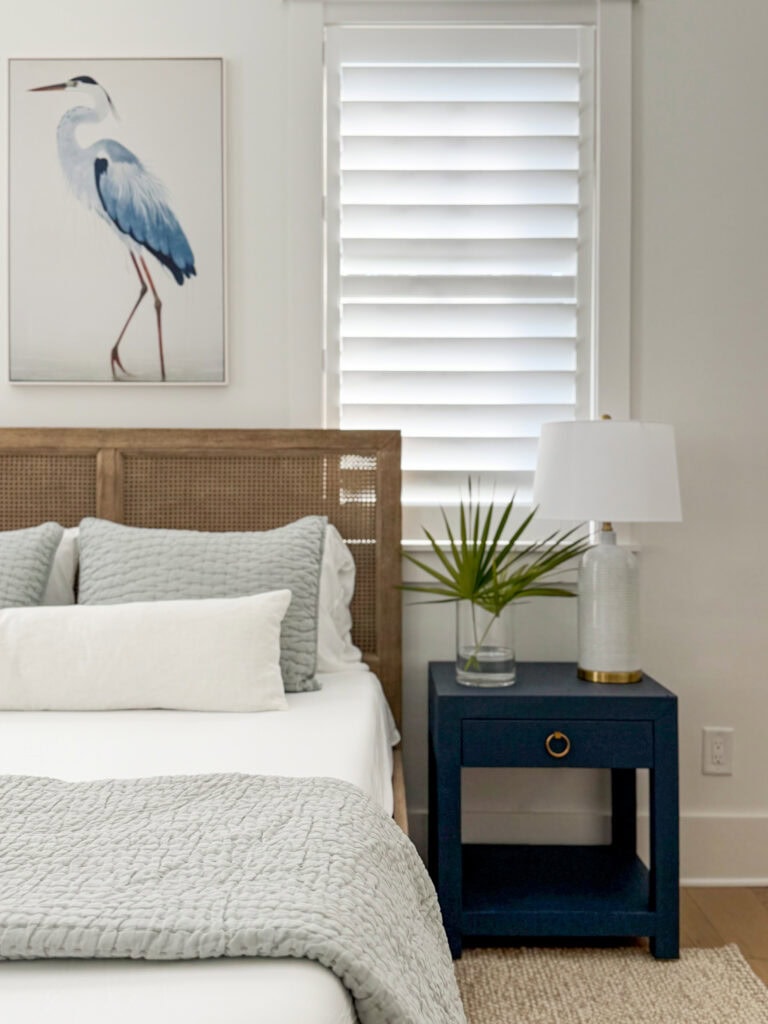
And, here they are in the space once we got all the other accessories in place! We officially now have Quince bedding on all four of the beds between our house and carriage house. I used this European Quilted Coverlet and the 100% organic bamboo sheets our guests always request the link for. I shared this rope chandelier a week or two back and I think it looks so great in here! We also swapped the rug to this wool option and then added these lamps, to coordinate with the other spaces in our home. Lastly, we added this blue heron artwork because the view out the two windows below is the pond across the street where all my heron and egret friends live!
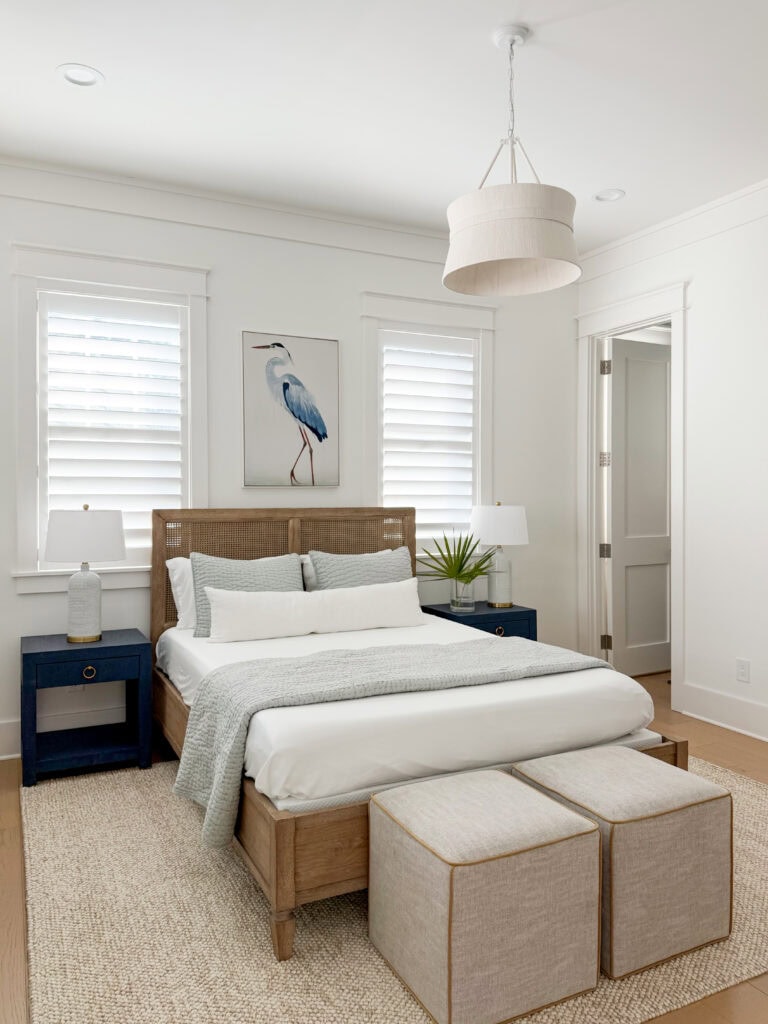
SOURCES: Cane Bed | Similar Nightstands | Lamps | Blue Heron Art | Rope Chandelier | Quilted Coverlet Set | Bamboo Sheets | Linen Lumbar Pillow | Wool Rug | Ottoman Cubes
I only took a few pics with my iPhone and turns out this one was a little blurry because it focused on the coverlet. But really there’s not much else to show 😉
SOURCES: Cane Bed | Similar Nightstands | Lamps | Blue Heron Art | Rope Chandelier | Quilted Coverlet Set | Bamboo Sheets | Linen Lumbar Pillow | Wool Rug | Ottoman Cubes
That wraps up this quick and easy room makeover! We really love how it turned out for a quick weekend makeover!
If you would like to follow along on more of my home decor, DIY, lifestyle, travel and other posts, I’d love to have you join me on any of the below channels:
The painted night stands really look great Sarah. But to me what helped was moving the bed between the windows and replacing the rug.
Have a terrific time in Hawaii.
Thank you Sharon! And yes, the new layout was a huge improvement and made the room feel much larger!
You did a beautiful job painting the night stands!
Thank you Karen!
I love how the nightstands turned out. Brilliant!
Thank you so much!
Your guest room looks amazing!!! The nightstands look fabulous! I cannot wait to see your new home all decorated…you just have such an eye for design.
We are flying home from Kona today! We are here twice a year and just love it! Enjoy and aloha!!!
Thank you Michelle! And no way! We arrived after dark to the hotel so I’m very excited to explore today. We’ve heard nothing but great things!
Great job on those end tables, can’t believe you guys are gonna be moving so soon!
Thanks Jessica! It is pretty hard to believe!
As you know I love how these turned out. I had read about the issues with this furniture and am glad you could repurpose them because I’m sure they are good quality aside from this glue issue. I think they look fabulous!
Yes, they’re such great quality otherwise so I didn’t want them to go to waste! Thank you so much!
Very good idea done very nicely!
Thank you Betty!
That is a perfect fix love it!
Thank you Karen!