If you have ever wanted to tackle a stencil project then this tutorial is perfect for you!
!
Today is the first update in our Year of Change project! If you don’t recall the full details of the project, you can read that past post, but essentially, I teamed up with a group of four other talented bloggers {Commona My House, Suburban Bitches and Rosa Beltran Design} to give you small DIY projects that you can accomplish on a monthly basis. These projects can make BIG changes in your home over a one year period. We hope to inspire you all to tackle those little home projects you have been avoiding so that by year end, you’ll have made some big changes throughout your home.
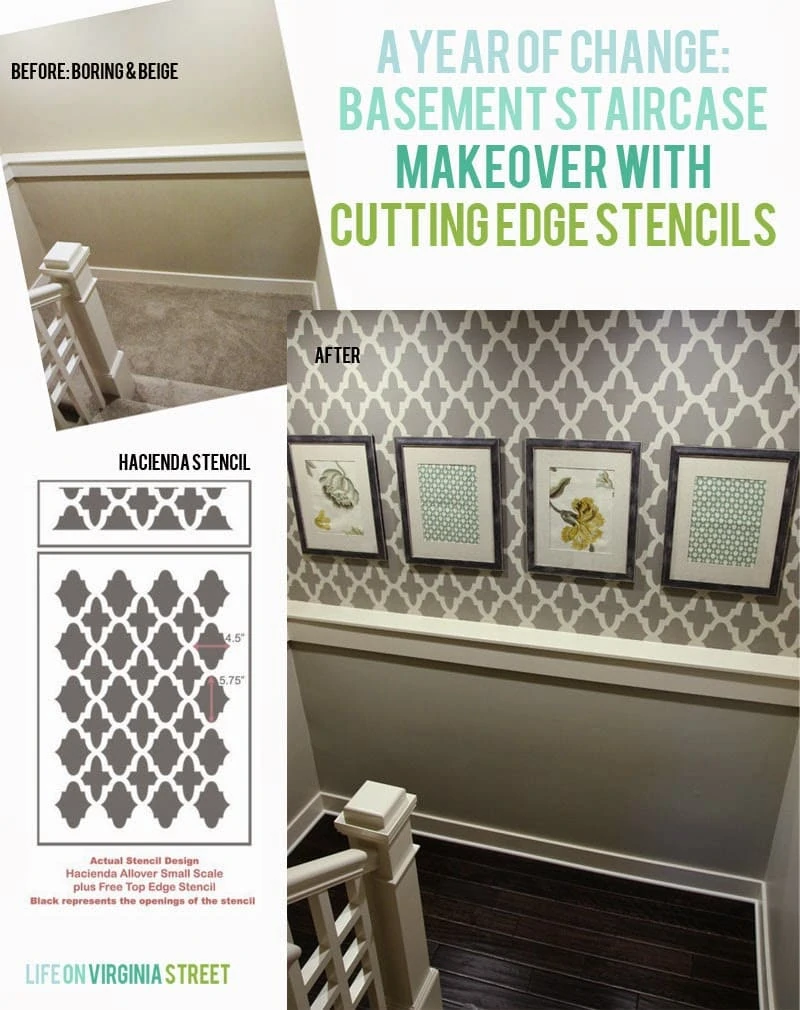
This month’s project was sponsored by Cutting Edge Stencils. Each of us selected a different stencil and completed a stencilled wall that we felt could ultimately make a big impact in our home over the upcoming year.
So, where did I choose to use my stencil? Well, if you recall, a few weekends back, I painted the staircase to our basement in Behr Castle Path. The fresh coat of paint was perfect, but I felt the area lacked any personality. As I mentioned, we use this staircase multiple times a day even though our basement isn’t finished {our cats’ bedroom is in the basement}.
Choosing A Stencil
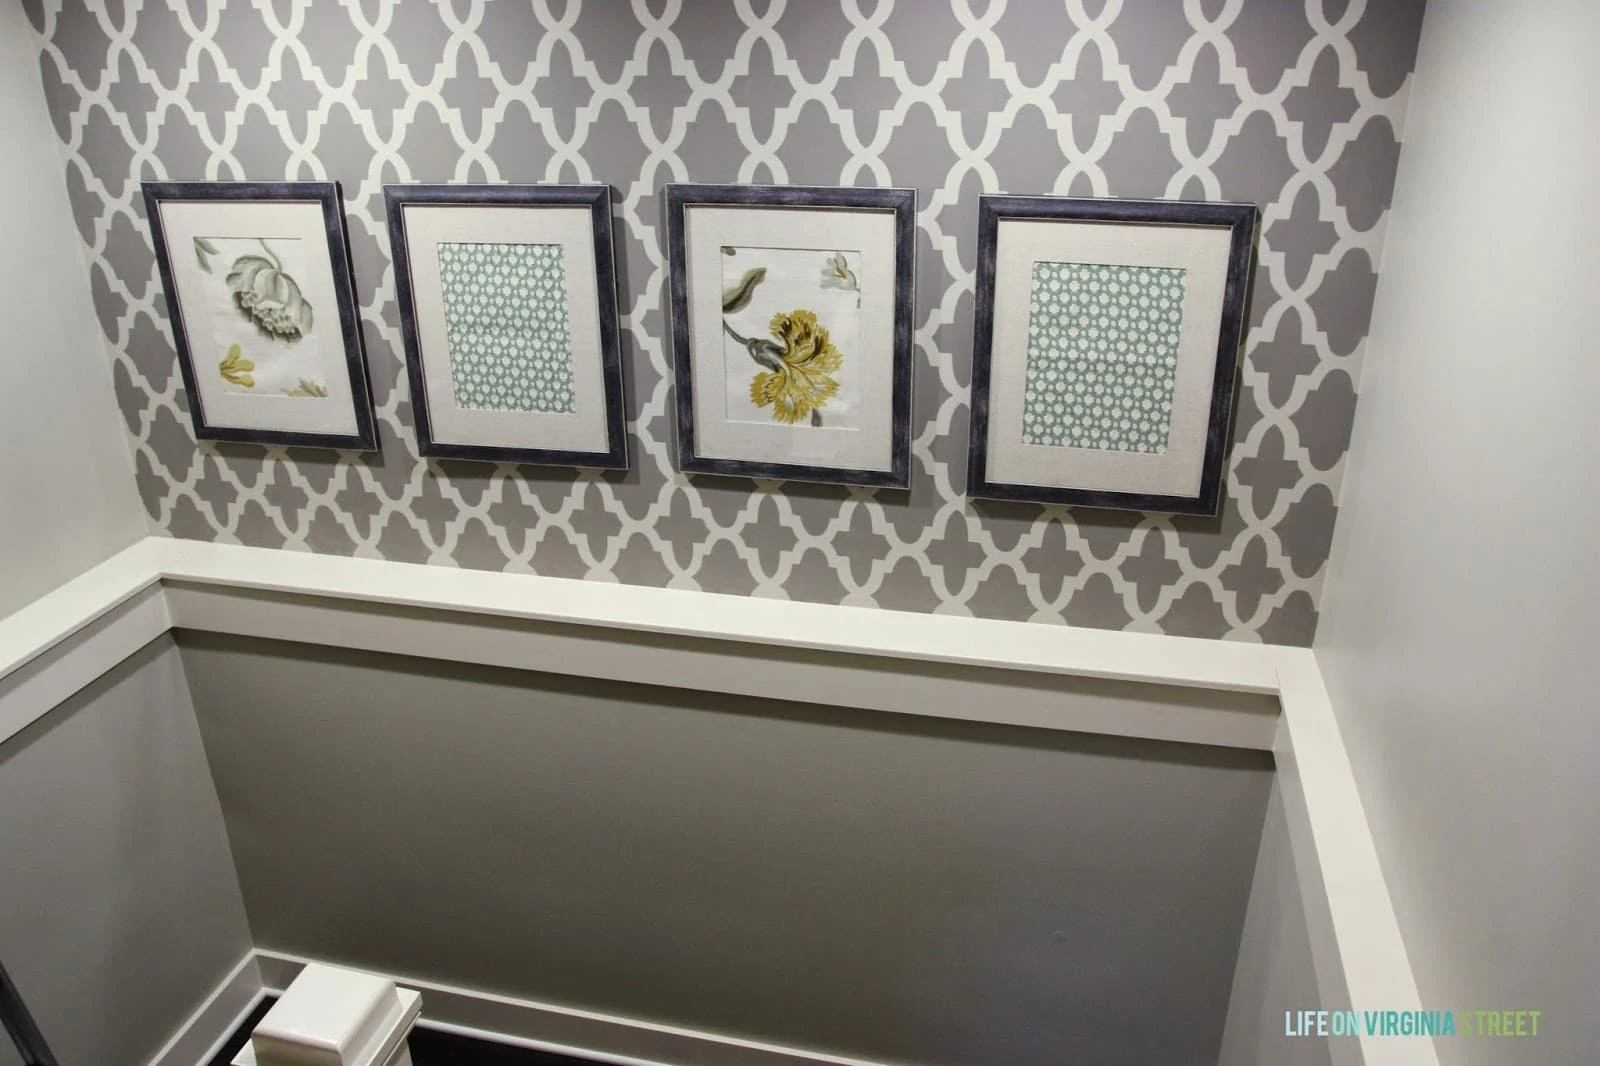
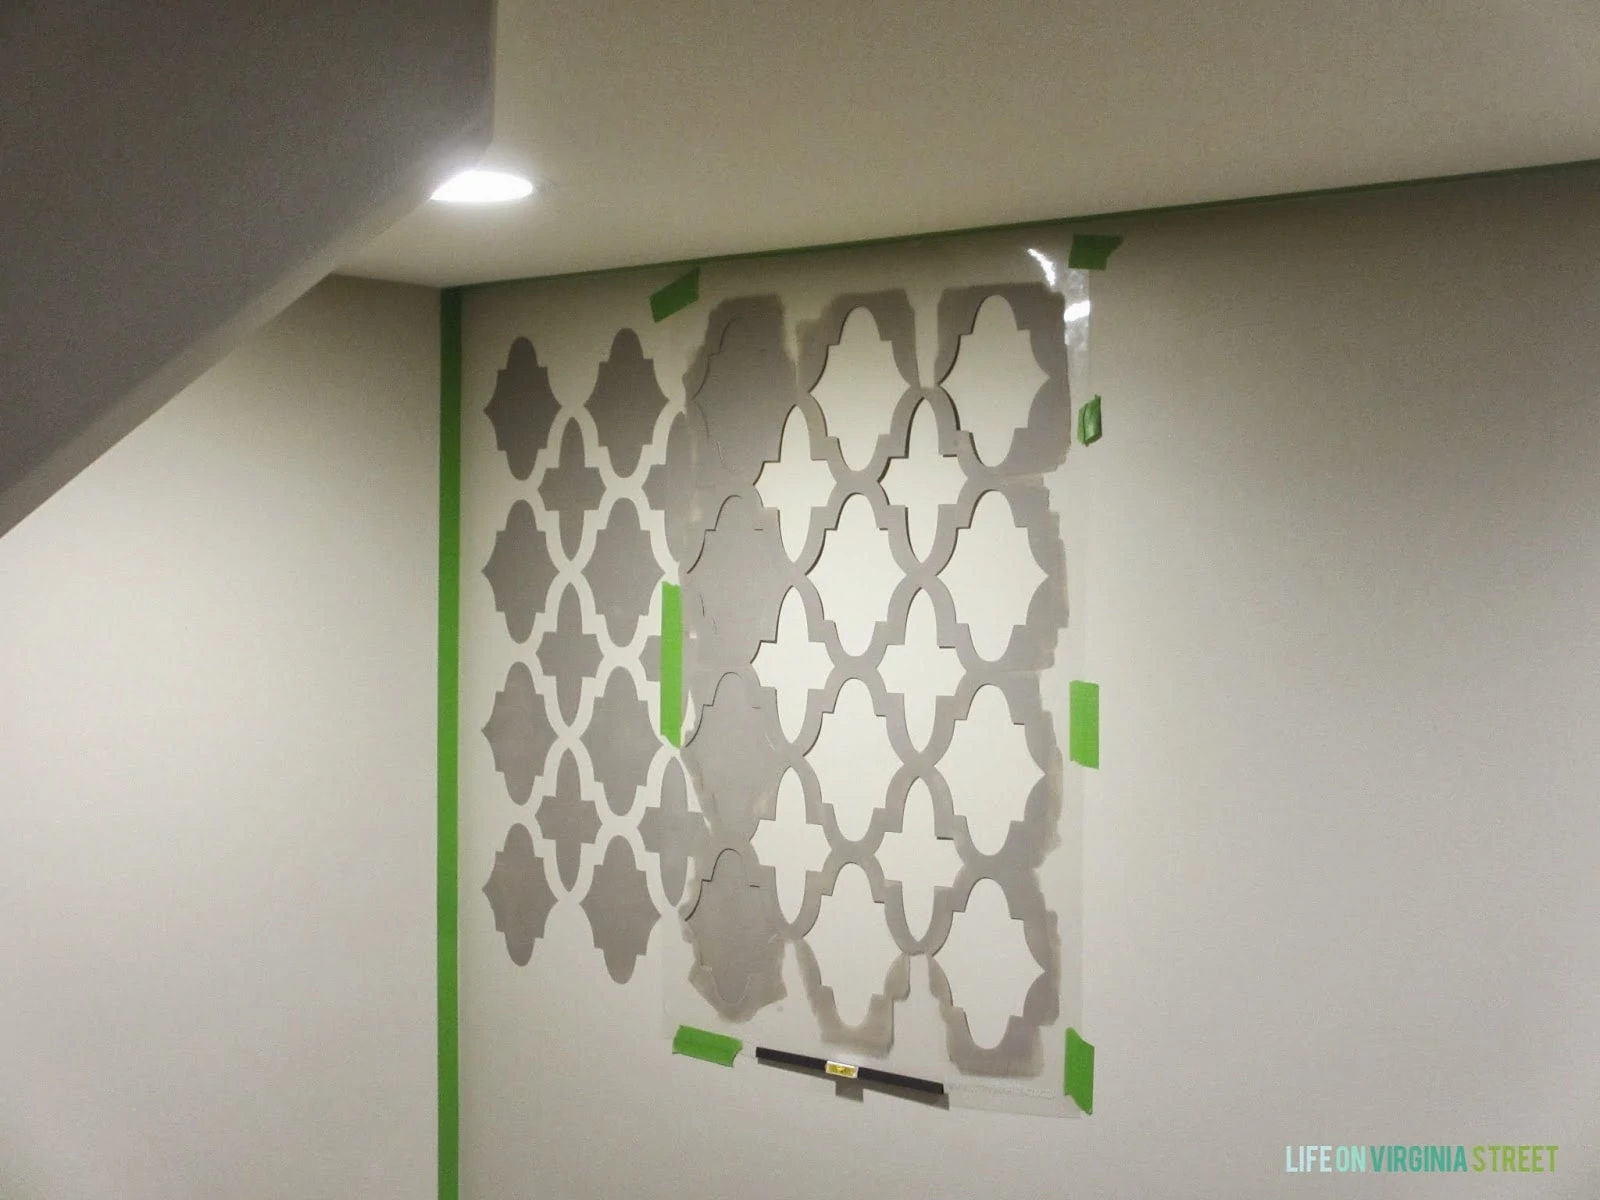
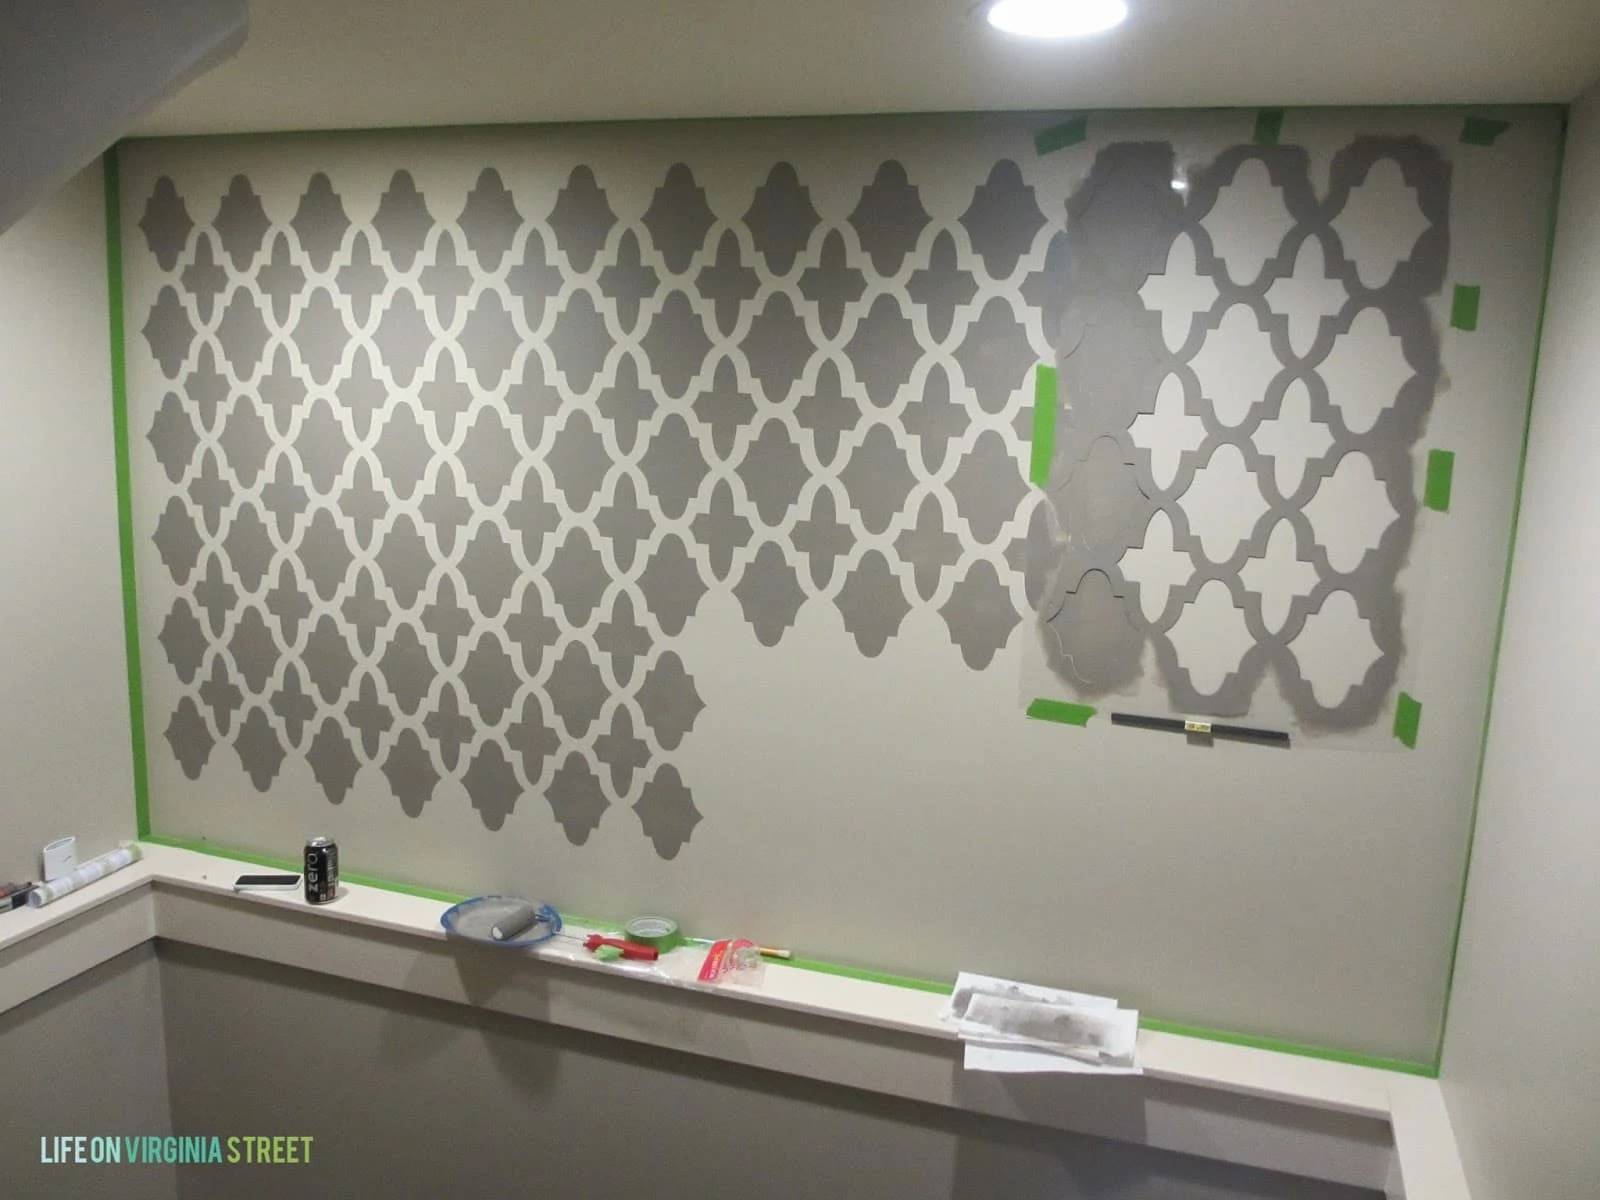
Enter the Hacienda stencil from Cutting Edge Stencils. A huge impact for an area of our home that was previously so hard to style. I always got nervous placing items on the ledge for fear the cats would knock any knick-knacks off. Which left me with little options for adding the personality I was looking for. Here’s how the updated space looks today. I definitely picked the darkest and most difficult location to photograph to use for this project!
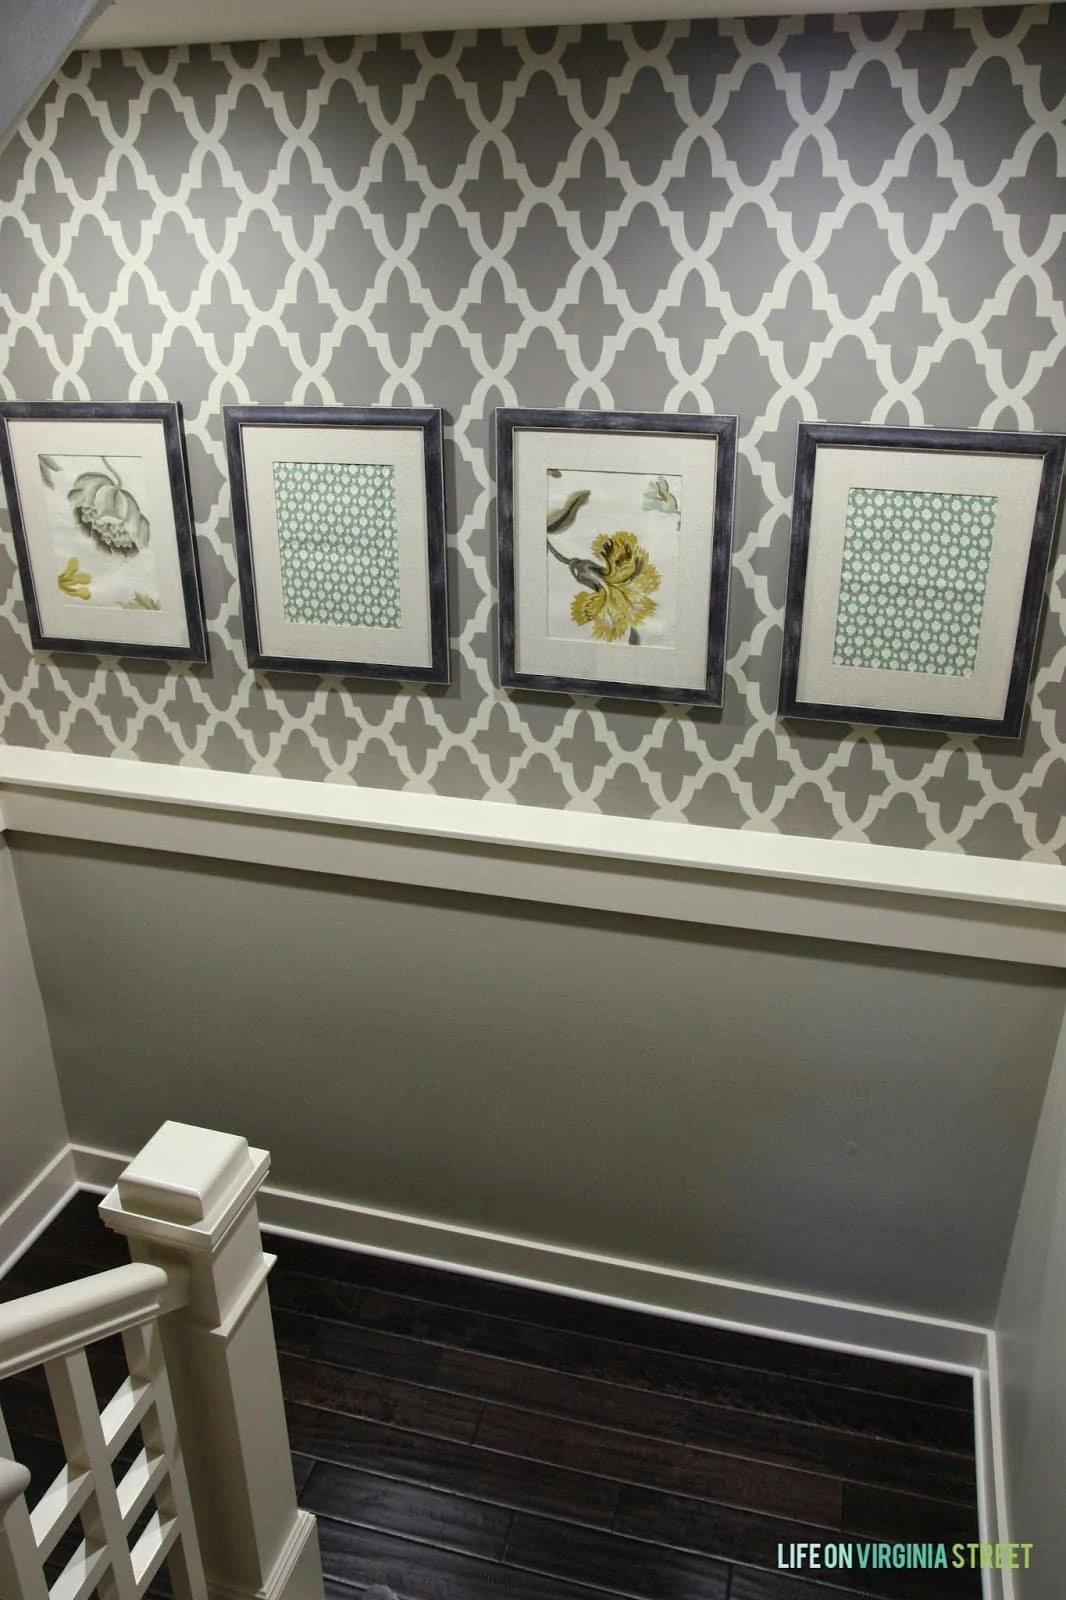
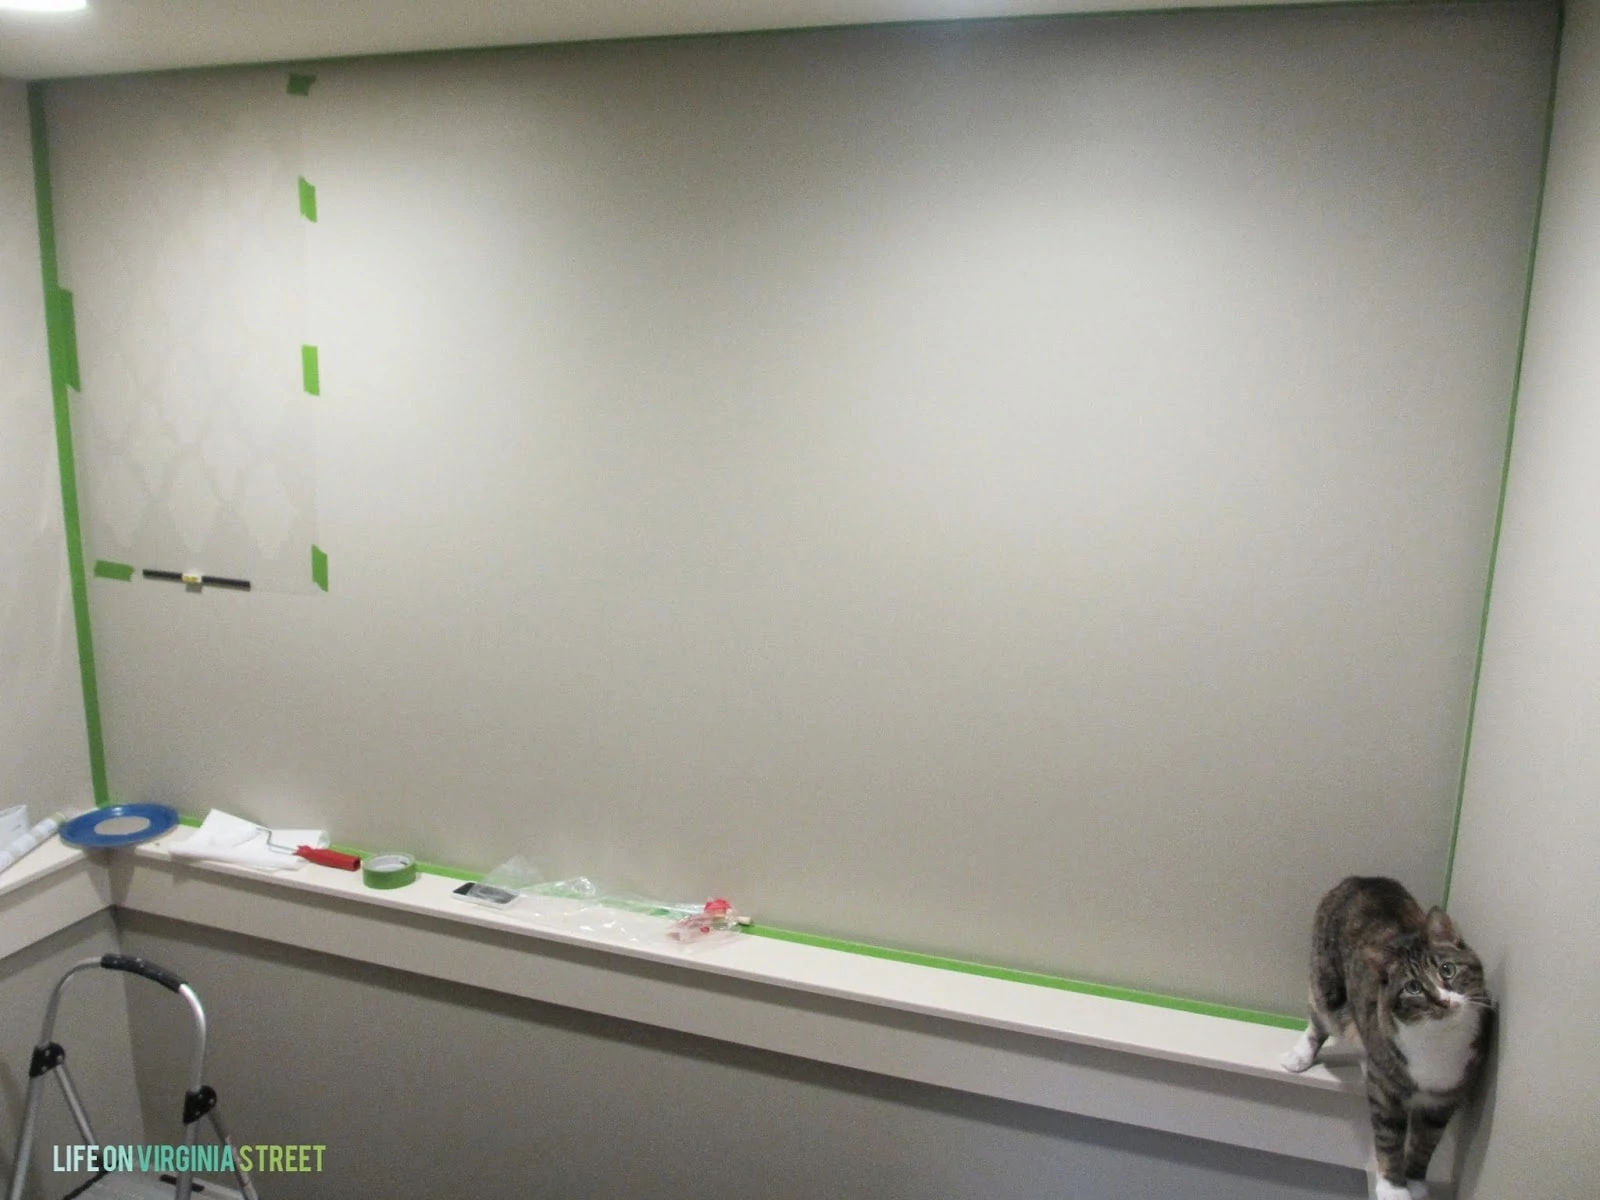
I’m not gonna lie. I struggled with the stencil. Not so much with managing it, getting it level, etc. More so with applying the paint. And the fact that I was coming off an exhaustive Las Vegas trip when I decided to use it 😉 I will give an A++++ {maybe more pluses} to Cutting Edge Stencils for the genius little level you can buy to attach to your stencil. This was life saving and made the project go much more quickly. Once I learned that “very little paint” truly meant very little paint {imagine that?} I really started to master the painting project. With such contrasting colors though, I had to do three or four very light coats to ensure the application didn’t bleed, but to ensure the paint color was fully saturate. The toughest part for me was the corners. Up close you can see in places that the lines aren’t perfect. However, in the end, I think the print looks amazing on this wall and adds so much character to this space!
Here’s a little more of the “action” shots and a close-up of the detail. Notice my cute assistant/supervisor Henley. Again, the reason I can’t decorate the ledge.
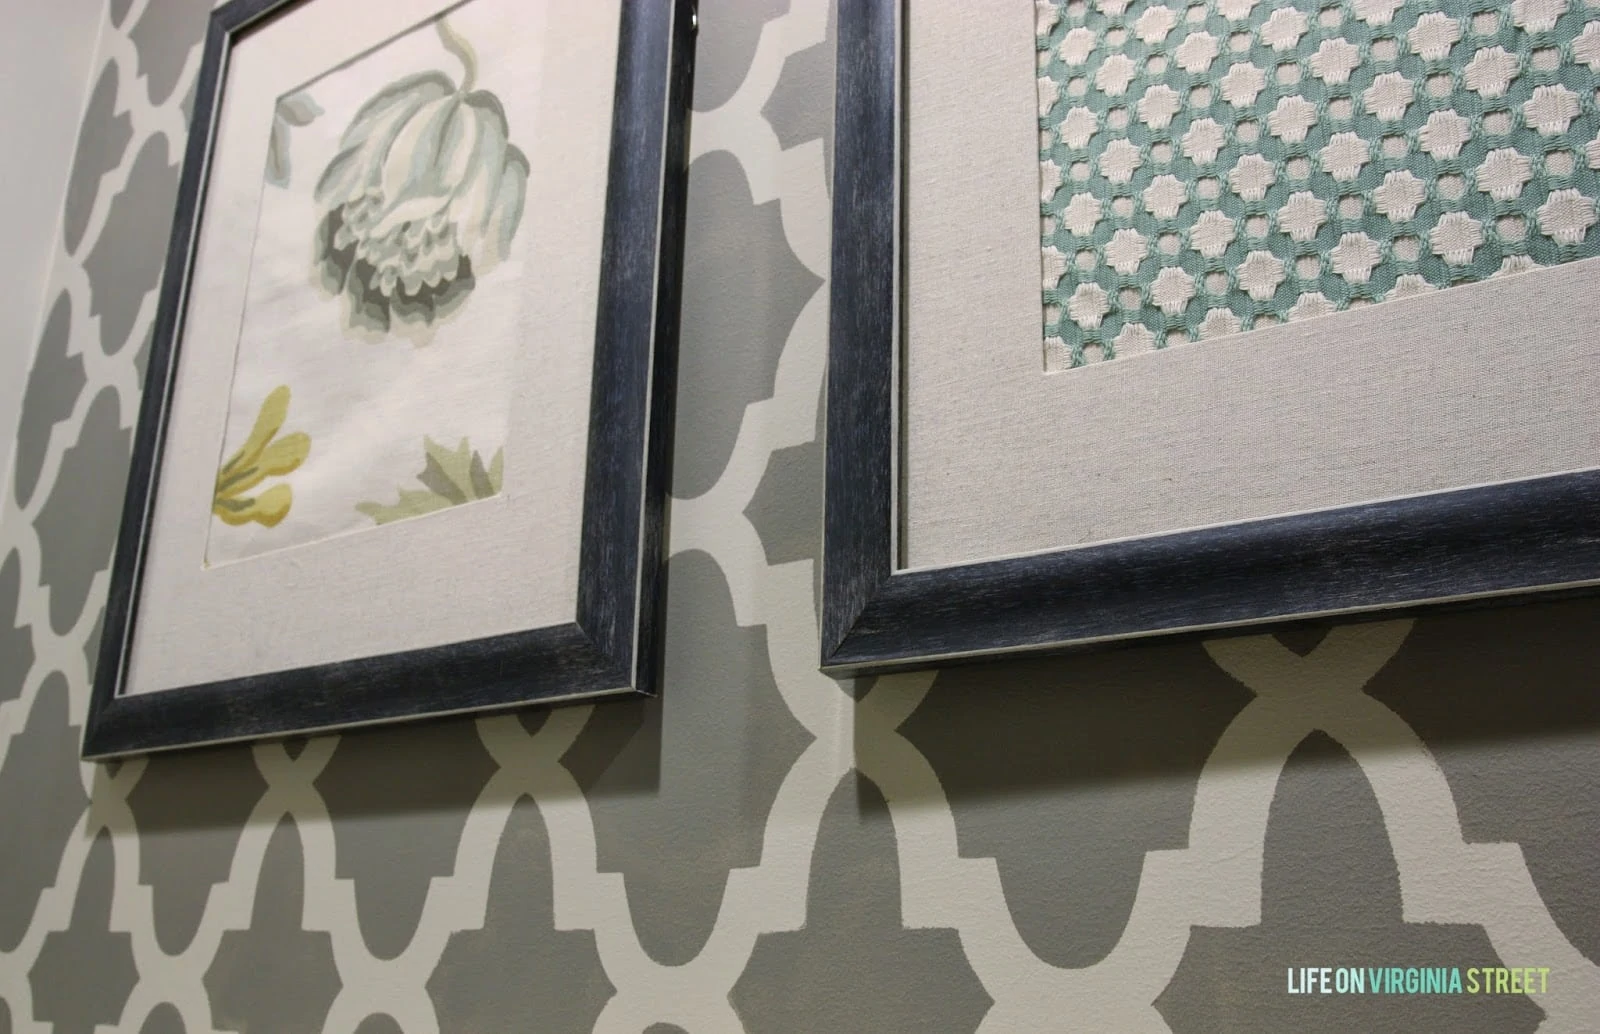
As I thought about styling the wall, I thought it would be fun to use other fabrics along with the Hacienda stencil, because the stencil reminded me so much of the Windsor Smith Pelagos fabric I love so much. Thinking along those lines got me thinking about my old office design board. Although I didn’t end up using the Schumacher Avebury Floral Vine there, I had the fabric on hand and thought it would be a fun addition to the wall. I also had some Water Betwixt leftover from our living room and decided it would be the perfect compliment.
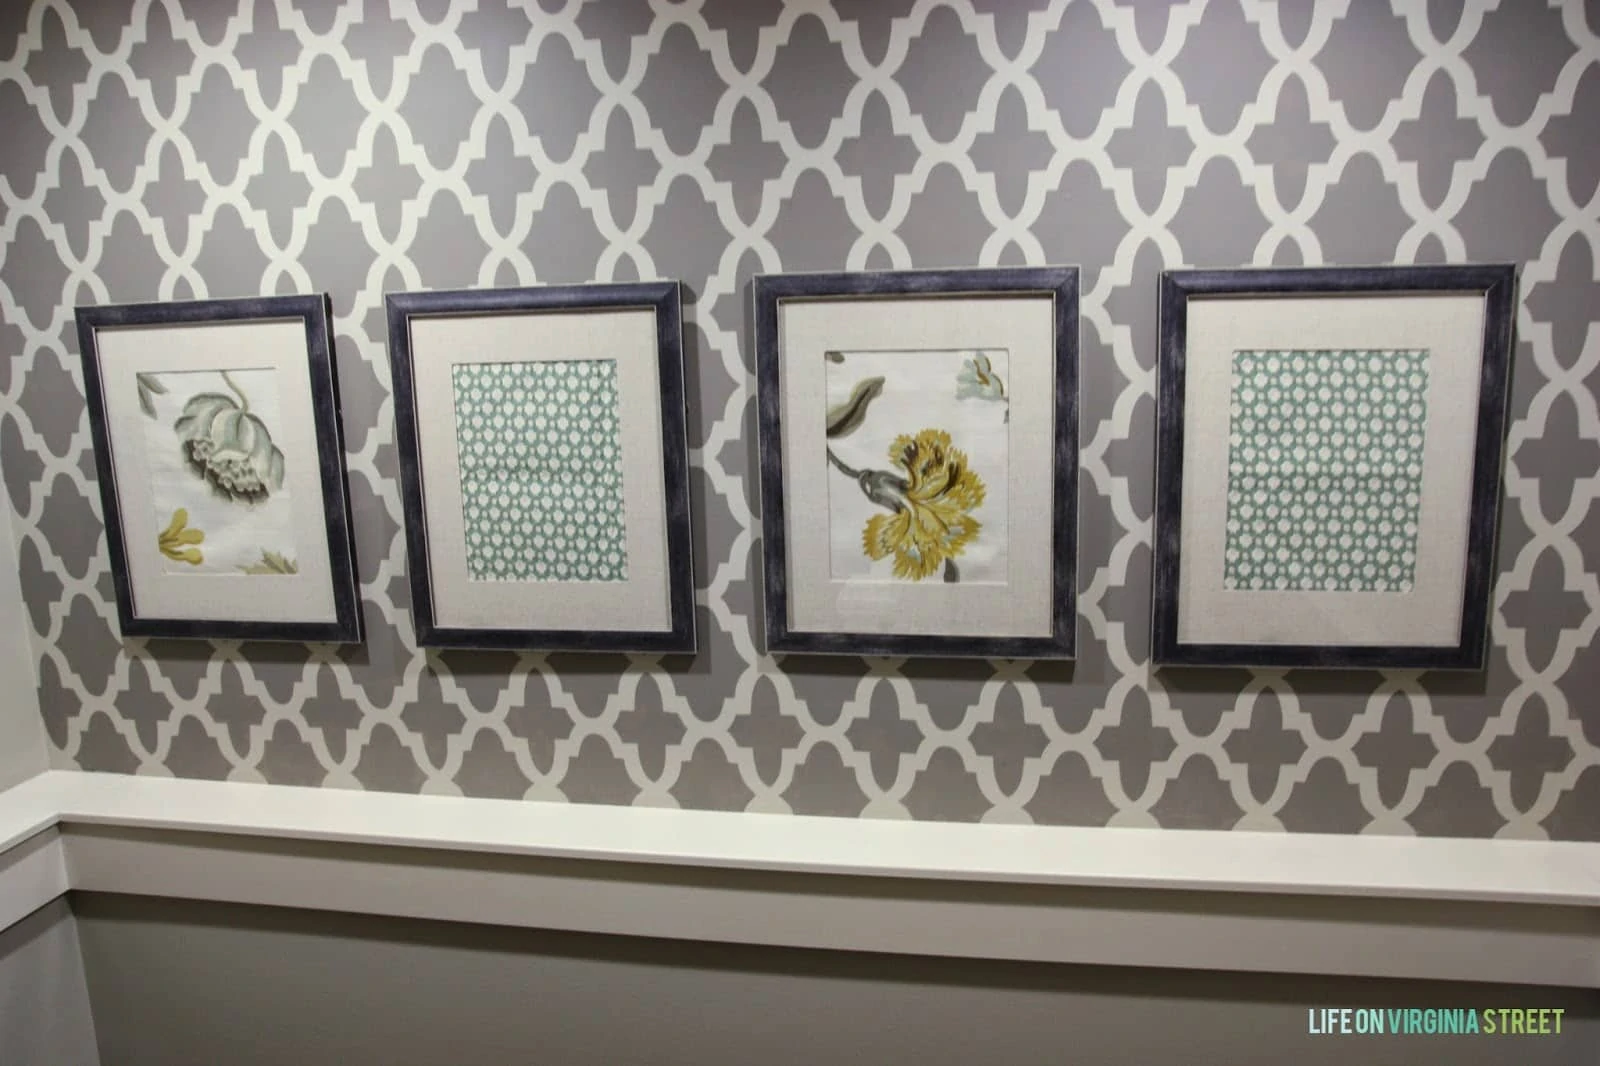
In my mind, I knew this was the direction I was going for the last week. However, I didn’t actually get around to cutting the fabric and hanging it until this morning. I ironed and ironed and ironed, but with this heavy of fabric, it is stubborn. I’m hoping the fold lines {especially on the Betwixt} will work themselves out, but if not, I’m going to have to take it all down and re-iron. But I do love how this “art” pairs with the stencil pattern!
A big thank you to Cutting Edge Stencils for sponsoring this month of change and a big thanks to this wonderful group of ladies for including me in the Year of Change project! Be sure to stop by and check out the other stencil projects at: Commona My House, Suburban Bitches and Rosa Beltran Design – there’s an amazing mix of leapord, retro, otami and tribal in the mix. Have a wonderful weekend!
P.S. The ladies over at Suburban Bitches are giving away a chance for a Cutting Edge Stencil of your choice. Be sure to stop by!

WOW this looks AMAZING!! That stencil pattern is stunning and adds so much to your landing! I love your little assistant Henley too:)
xo, amy
Sarah it looks beautiful! You’d never know that you had any issues at all with it. What a great space to stencil! I absolutely love the fabric you framed with it too!
I can’t wait to see what you create for next month’s challenge!
Tricia // Suburban BItches
This is GORGEOUS! Your efforts were well worth it! 🙂 Love the pictures hanging in front of the stenciled wall too!
I love this!! I have a CE stencil sitting in the shopping cart just waiting for me to buy it. I think I may have to now
oh my goodness! perfect!!!! you did pick a hard area to photograph but you totally were able to show us what it looks like! i don’t know how i missed the year of change post… going to read it! 🙂
It looks beautiful!! I love the pattern you chose, and that “art” is the perfect compliment! Have a wonderful weekend!
~Abby =)
Wow, girl! This looks GORGEOUS! Huge impact! And I love that you guys are doing this series – very cool!
LOVE LOVE LOVE this stencil pattern Sarah!! It looks so amazing! I have been thinking of doing a stencil behind my bed- now I am even more inspired!!
This looks amazing! I want to do something like this in my master bathroom… Inspired!
Love the pattern you chose and the location, a perfect place for an accent! Well done!
That looks incredibly beautiful and classy!! Thanks for the inspiration!
Totally makes a huge impact! Looks great Sarah – and I love both the fabrics that you framed, they work great with the stencil and wall color!!
This is stunning! I love that you did just one wall and the fabrics you used are perfection.
I LOVE IT ! The floral art and the stencil are perfect together too! Pinning to the Monday Funday board! Thanks for linking!
What an awesome looking wall! Thanks for sharing it at my Nifty Thrifty Tuesday party. It is being featured at my party today.
Blessings,
Linda
How did you finish the edges? What were the specific problems that you had? I am interested in doing this project on my staircase as well. Did you frame that shelf yourself?
On the edges, you just have to bend the stencil to work the paint in the corner, which can certainly get a little tricky. There were areas I had to touch-up by hand to get full coverage. As far as problems, the biggest issue I had was in terms of paint bleeding (I felt like I used a small amount, but it must not have always been light enough). I like a perfect line, and I had a hard time getting it to be perfect. But overall, if you aren’t up close inspecting it, it isn’t apparent. I hope that helps!