Today I am sharing my beachy guest bedroom refresh plans, including the full design plans and sources used!
As I mentioned in my Weekend Recap this week, I made some serious headway in terms of design plans for our main guest bedroom. You may recall that last fall, I painted over the striped walls because I felt at times, they definitely stifled my decorating options. But, once that was done, I really didn’t make much progress. Kurtis was out of town most of last week, so I felt like I had a bit more time to peruse magazines, look at Pinterest, etc. and all of a sudden I felt so much more inspired and knew the direction I wanted to go. Today I’m sharing my very rough beachy guest bedroom refresh plans!
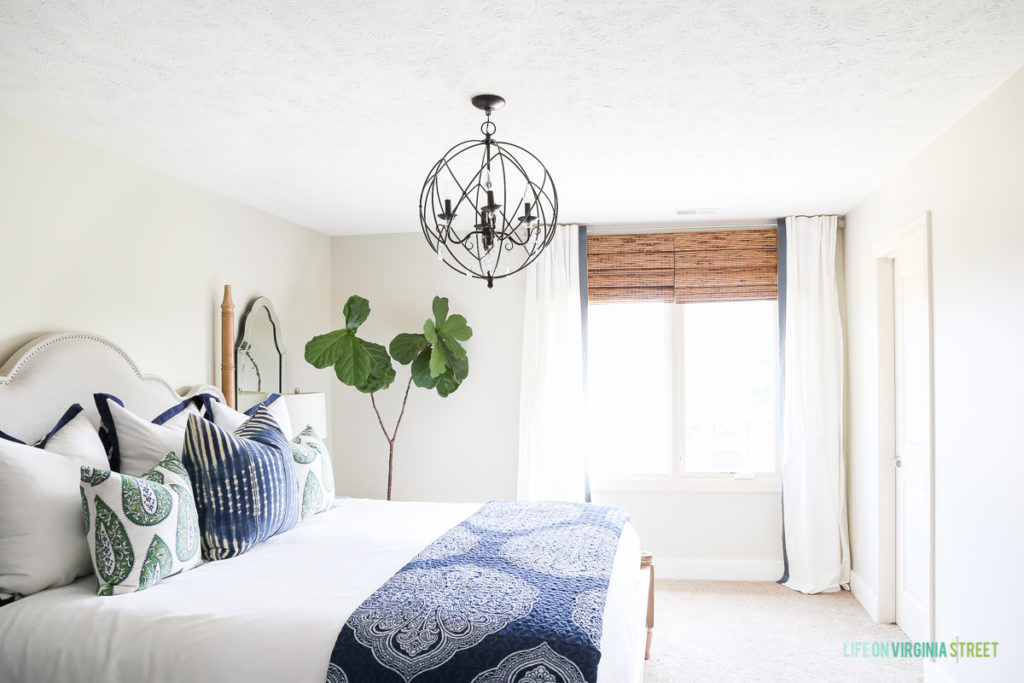
There was nothing wrong with our guest bedroom as it stood. But, it started to no longer feel like it was my style. But, I knew I could change the look pretty dramatically with a few simple changes.
This post contains affiliate links for your shopping convenience. You can read my full disclosure policy here.
Here is how the space looks now.


I actually opened Photoshop right away (where I make all of my design boards) and started dragging and dropping in products. If it looked good, I added them to a list. If they didn’t I moved on and kept searching. Within a few hours, I had a basic mood board compiled. It’s in no way complete, but it gave me a better idea of the direction I wanted to go.
We rarely have visitors in the cold months (thanks, Nebraska). With that in mind, I wanted our guest bedroom to reflect the feeling of why people visit. Outside of our parents, it’s because of the pool 😉 So, I wanted the room to reflect the summery beachy light and bright vibe that would be outside when our visitors were here. I wanted to keep the color palette fairly serene and relaxing, but without feeling too stuffy or formal.
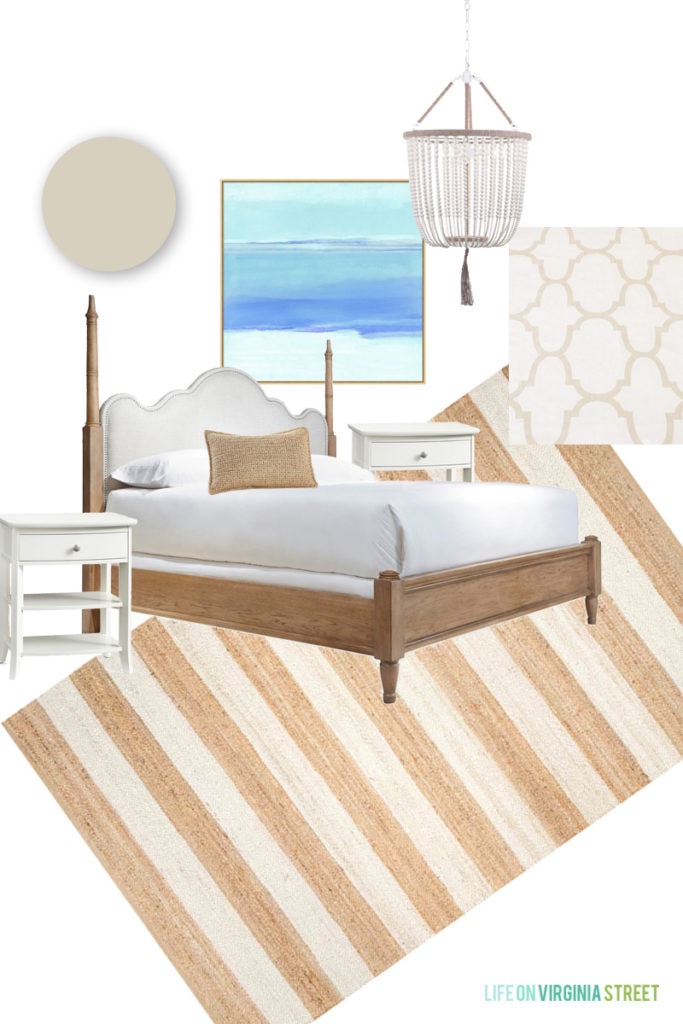
The plan is still a bit of a work-in-progress, but seeing everything laid out helps motivate me to start looking for similar items and get this wrapped up! So, I thought it would be fun to pop in today and share my tentative plans. Most of these options were the more budget-friendly versions of items I found that fit my needs.
I’ll likely make curtains out of this fabric because I have it on hand (it’s a lighter version of the curtains we had in our office), and I think it works well with a lot of other patterns. I’m continuing my goal of covering all of our buckling carpets with a rugs, and because I need a 9×12 for this space, cost was definitely an issue. I ultimately settled on this striped rug. I’m hoping it looks a bit more like the pictures in the reviews and the styled shots than the actual stock photo 🙂
I found tons of gorgeous bead chandeliers that would fit what I was looking for, but this one is the most affordable. Unfortunately it’s back-ordered until the end of the month (and hopefully not longer). But it reminds me of much more expensive Serena & Lily and other versions. The nightstands arrived yesterday and are a bit more ivory than I expected, but they look great in the space. I still can’t believe we’ve never bought nightstands for this room (or even in our last house)!
The icing on the cake will be this gorgeous blue canvas artwork I ordered. I’ve had my eyes on it for years and finally bought it on the last buy more, save more sale so it was 25% off. I haven’t finalized my lovely pillow fabrics, so that part is looking a bit bare, but obviously there will be some blues and this textured pillow. The current wall color is Dutch Boy Existence and that will stay the same.
Again, these are all pretty rough plans, but I’d love to have everything finalized by the end of April! I’ll keep you posted on progress. Like I mentioned, I spent a lot of time searching for affordable rugs, lights, and nightstands, so my plan over the coming weeks will be to share with you all the great options I found!
If you would like to follow along on more of my home decor, DIY, lifestyle, travel and other posts, I’d love to have you follow me on any of the following:
Love your inspiration for this room. We have carpet in our bedrooms and I dislike it. How does a rug work when putting it over a carpeted area.
Thank you Pam! It actually works fine to layer the rug on carpet, as long as the rug isn’t too thin. There were a lot I LOVED that were more of a mat style, but they wouldn’t work with the bed on it (I think it would pucker too much). So, I try to stick with thicker rugs in this situation. I hope that helps!
Love this room inspiration! So much that I already bought the rug for one of my guest rooms! 🙂 Are you going to keep the bedding the same then?
Hi there. Can you tell me where your bed is from? It’s just what i am looking for.
Sure! You can currently get it here for the lowest price I’ve found: https://rstyle.me/n/c3fc6y75re.