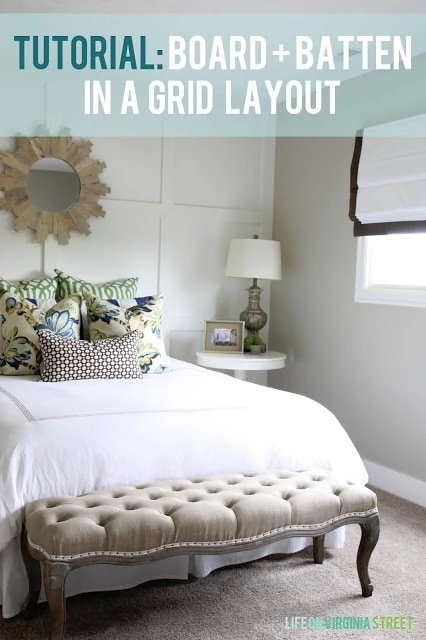
Sharing our full tutorial on how to make a board and batten grid wall! It’s the perfect molding to add personality to any room in your home!
I have had a few requests for a tutorial on the board and batten we completed in our queen guest bedroom. So, today I’ll be sharing the tutorial for board and batten grid walls – and I think you’ll find it is rather simple!
It’s been several months since we completed this project so the details are a little rusty, but hopefully this will provide you with some solid advice if you decide to try this project at some point. We had to wing it along the way because I wasn’t able to find any tutorials for this type of layout. Hopefully this will help those of you that are interested!

Planning A Board & Batten Grid Wall
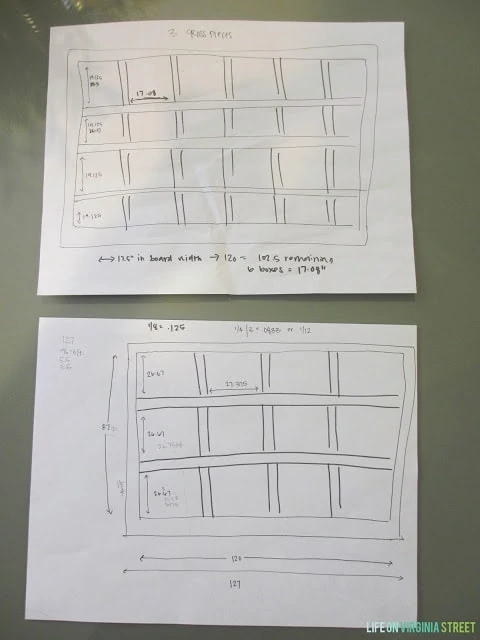
To plan your wall, I recommend grabbing a few sheets of plain paper and a pencil or pen. You’ll want to measure both the height and width of your wall in inches (this will make the math easier later). I prefer the “framed” look, meaning a full board running around the “frame” of the entire wall. That included our existing baseboards, plus the addition of a top board, and then a board on each end. From there, I measured the interior space that remained.
Depending upon the supplies you purchase and how wide your boards are, you will then need to play with the dimensions of the interior space. For example, I knew the boards we would be using were 3″ (see the specifics in the next section). Since I wanted the wall to include square more than rectangles, I sketched out a few possible plans for the overall look. It then came down to simple math (which is actually the most difficult part of the project).
Once you pick the number of squares you think look best, you’ll then simply add up how many interior board that is, subtract it from your interior measurement and then divide that number by how many squares there are, to find how big each box should be. You’ll have to do this for each direction (vertical and horizontal). Note that, depending on the size of your wall, you’re likely not going to end up with identical numbers horizontally as you will vertically. As long as the numbers aren’t too drastically different, you’re eye won’t notice they aren’t exact!
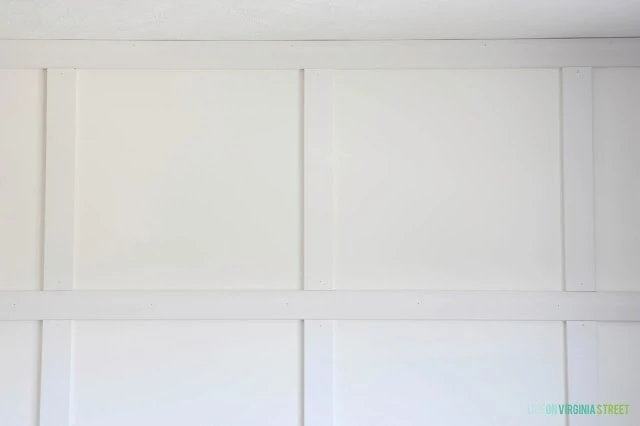
So, for example, initially in my design phase, I wasn’t sure how many “squares” I wanted in my grid format. I’m very much a visual person so I drew out maps for a few options. After measuring the dimensions of our wall (which was 96″ high and 127″ wide), I started to draw out my plans which you can see below. I created two options and did the math on both.
I initially thought more was better, but I could quickly see in the top map below, that it was much too busy. So, I settled on two middle cross pieces (horizontally).
Board & Batten Grid Wall Supplies
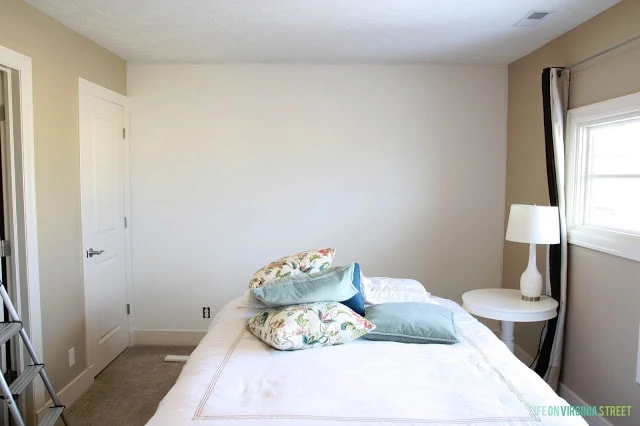
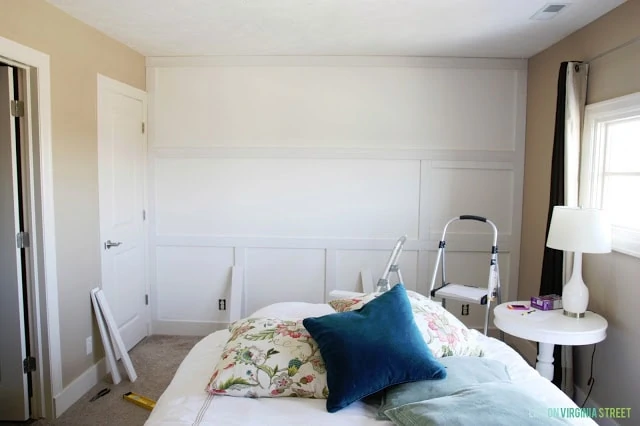
Once I had the layout planned, my husband and I headed to Lowe’s to buy the wood. Keep in mind our baseboards were already the exact style needed for this project – 5.5″ tall rectangular pieces. There is no scrollwork like many baseboards (so we didn’t have to remove the baseboards like we did in our last house). We used the same pre-primed 3″ MDF boards like last time and they are a breeze to work with. Here is the before:
I think it helped a TON for me to paint the walls with two coats of the paint color I was using for the project – Behr’s Swiss Coffee in Eggshell finish. Since the boards were pre-primed, they didn’t need nearly as many coats as the wall, so it seemed to go much more quickly with the wall virtually completed.
Now, I shouldn’t go much further without commending the real hero in this project (second only to my husband). He purchased this Bostitch air compressor and nail gun with some Lowe’s gift cards he had been saving up. It was a MAJOR time saver and made this project go off without a hitch. We were definitely wishing we had had it for the huge board and batten project in our last house!

However, as we know from the prior project, an old fashioned hammer and nail set work just as well – it may just take a little longer. We knew we would use this air compressor {along with the nail gun, brad gun and staple gun} for many more projects – in fact, we already used it again for the trim on the office desk makeover.
How To Install A Board & Batten Grid Wall
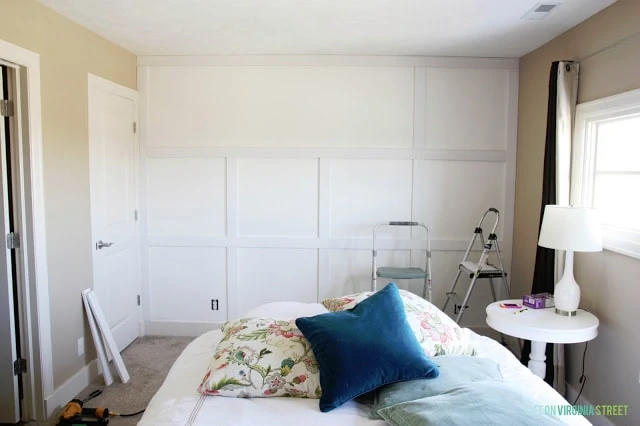
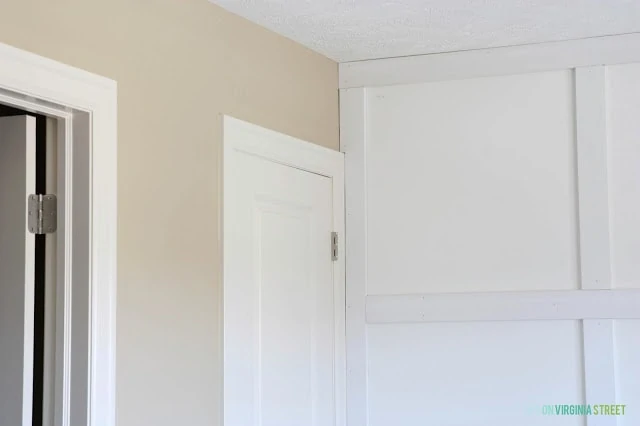
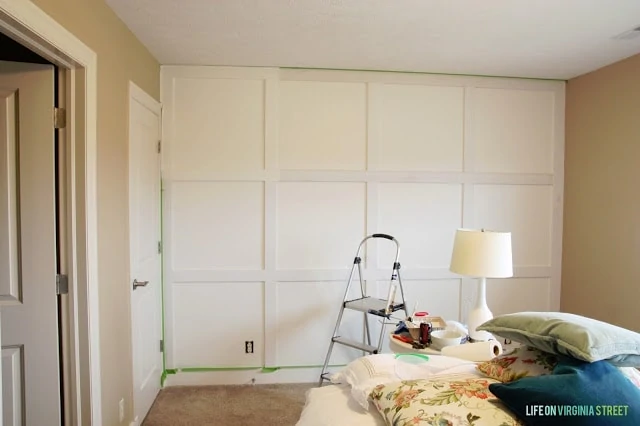
First up, we nail gunned in the border pieces to form a square (so the piece along the ceiling as well as the two side pieces). Unfortunately, the piece on the left had to be notched out to fit the door trim for the closet door that butted up next to it. My husband will quickly admit that it looked pretty terrible until I got some caulk on it. So, if you have any notches to make, don’t work if there are awkward gaps and it isn’t the smoothest cut. The beauty of white (or any non-wood colored) projects is that you can caulk and then paint to match. Next up, we placed the horizontal pieces. This was because my husband wanted to ensure the large pieces were all connected to studs in several places.
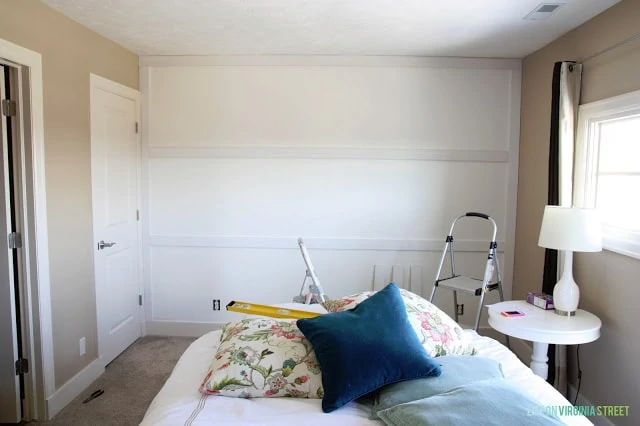
At this point, we could tell our vertical pieces were not going to hit studs, and my husband didn’t want them to fall on any unassuming guests’ heads. Valid point. So, we cut them to fit super tight (to the point we had to hammer them in). We then still attached them with a nail. Once they were caulked and painted, I’m pretty sure they weren’t going to go anywhere.
You can see here that we made little spacers to help with distances. You can see these in the middle right-hand square. We also still measured to ensure we were creating equal “squares” all the way around, but the spacers were definitely helpful. If you saw above on my drawing, these aren’t actually perfect squares but are close enough to the eye for the dimensions we had. You’ll also note that we relied on delicious Girl Scout cookies to get us through this project. Sustenance is key!
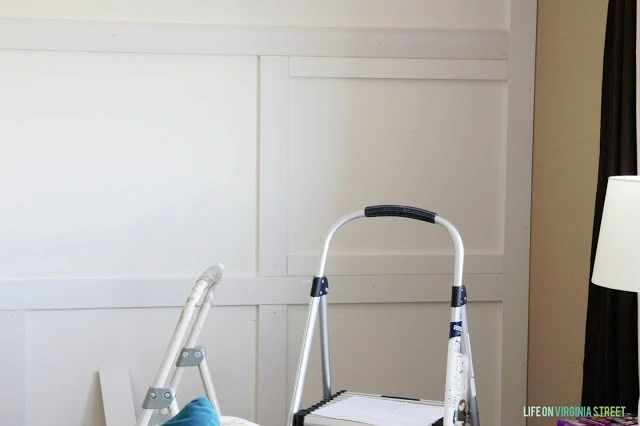
We continued to add cross-pieces until we were done.
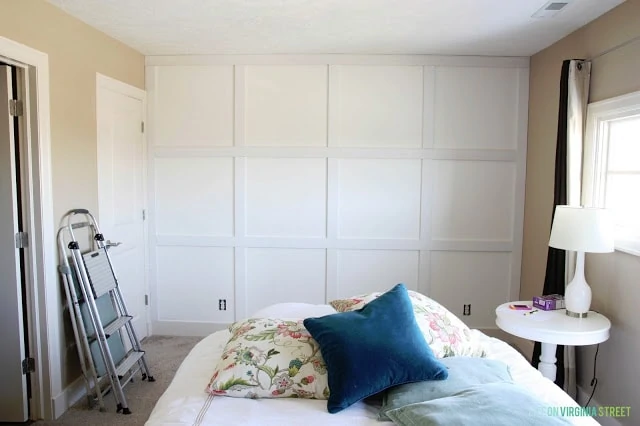
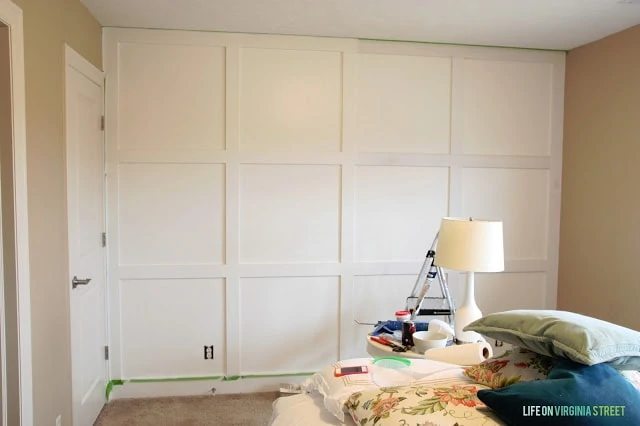
This is where my husband exited – he doesn’t “do” what he refers to as finish work. See the gaps and nail holes that need to be filled, as well as the additional layers of paints that need to be added? That’s what he is referring to. I’m only showing these pictures so you don’t panic when you finished and are left with gaps and holes. It’s normal.
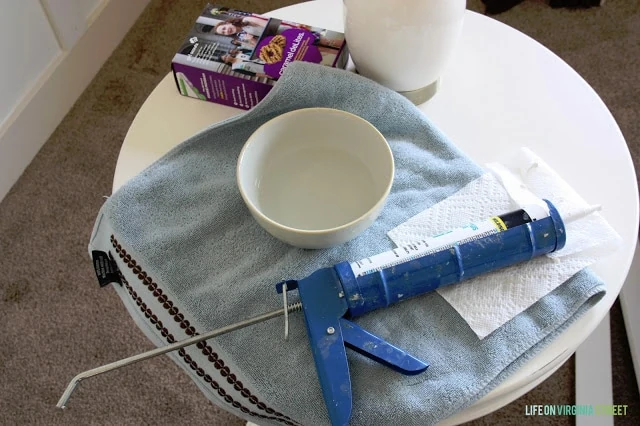
Next up: caulking. Here’s my tools. A caulk gun, a tube of DAP and a bowl of water and paper towels. And some Girl Scout cookies again for sustenance. Obviously this project was done right after they were delivered – or we wouldn’t have had any left. What’s missing from this photo is a giant roll of paper towels. Basically, I run a bead of caulk down one small section. Then I dip my index finger in the water and run it along the bead. This is where the paper towels come handy {as your finger becomes cover in caulk}. I’m trying my hardest to refrain from any caulk jokes at this point. Because I’m mature like that.
You can see in this photo the top half is only halfway caulked. It is amazing how much caulk can help finish the project.
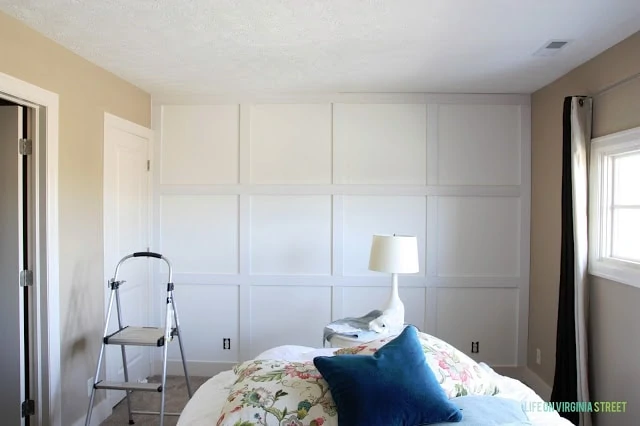
Once all the caulking was completed, I then used putty to fill all the nail holes. Once everything was dried {I actually waited a day or two}, I put another coat of paint on everything. I worked in square pieces, complete a square at a time {wall and then boards}. The more I painted, the more I was in love!
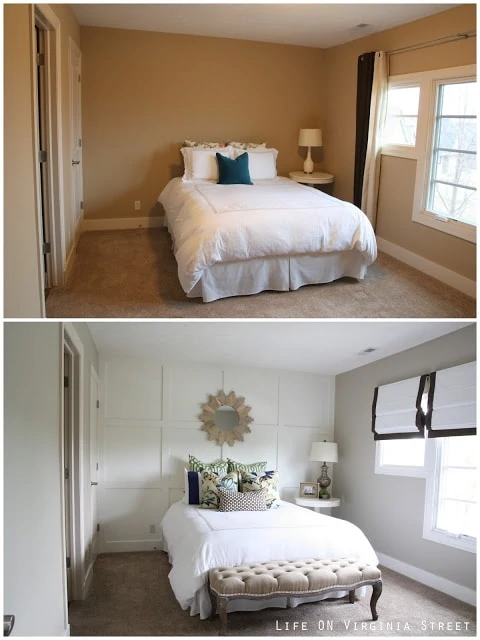
And that about wraps it up! In terms of time, this is a fairly quick project {especially with the nail gun}. I think it only took us a few hours, with the bulk of our time trying to cut around the door frame. The majority of the project are the finishing parts, which I actually don’t mind. Bottom line – I love how this turned out and I am so glad we moved forward with it.

So, what do you think? Easy enough to try a board and batten grid on your own? If there is anything I left out, feel free to ask me questions in comments and I’ll get back to you as quickly as I can! For a full list of sources in this room, click here.

If you would like to follow along on more of my home decor, DIY, lifestyle, travel and other posts, I’d love to have you follow me on any of the following:
Pinterest / Instagram / Facebook / Twitter
disclosure: some affiliate links used
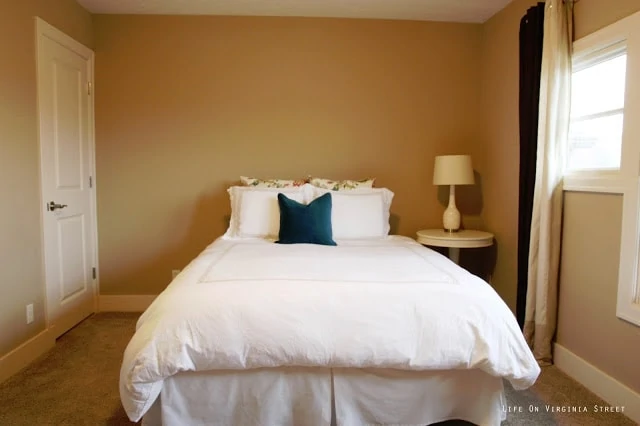
Looks so fresh! Such a great change and really accents the bed. xo Kristin http://www.bliss-athome.com
I absolutely love this idea!!! By the way, what color did you paint your walls?
Thanks Selene! The main wall color is Behr Castle Path and the Board + Batten wall is Behr Swiss Coffee. Both are in the eggshell finish.
Love this! I am happy someone else asked the question about the paint color! I was curious too. I really like your roman shades, loving that black border. Where did you get them?
Thanks Deana Marie! The roman shades were from Restoration Hardware Baby&Child. You can get the link to the product on this post, along with a full list of sources for this room:
http://www.lifeonvirginiastreet.com/2013/06/queen-guest-bedroom-reveal.html
As a side note, the trim is actually a dark brown. I hope this helps!
Hi just discovered your blog – glad I did. I love your style. This is a great tutorial!
Could you offer more information on the model number of the Bostitch air compressor you purchased? Thanks!
How wide is the mdf or moulding you used?
The boards were 3″ MDF (they were pre-primed which made them much easier to finish).
How thick were the pre-primed 3″ MDF boards? I am trying to avoid the chunky look you see elsewhere. Were they less than 1″ thick? Thanks
Hi Sarah! Love the look of this room. Our bedroom has the curved baseboard so we’ll need to remove those. Did you have to buy special baseboard to match the boards? Or can we use the 3″ MDF?
Hi Annabel – Our baseboards were already the 5″ MDF so we left those one. I’m sure you could use the 3″ MDF as well but we left the 5″ for a bit chunkier base.
Lovely project! Did you use caulking to fill the line between the horizontal and vertical boards Or putty?
Yes – I used white caulk on the boards, along the ceiling and on the sides of the wall.
I’m new to your site and I’m loving all the changes you’ve made in your rooms. We have very similar styles in decorating, but I’m just not experienced in DIY projects. My husband is very handy though. I would love to do a board & batten on one of our bedrooms or our home office.
YES! This is exactly want I want to do in my master. Love it! Turned out great!
Thank you so much for this tutorial. I am very eager to take on a project such as this in my new home, which is still under construction. Theoretically, I felt I knew how to do this. Your tutorial addresses questions I had and some I didn’t know I had!
Thanks so very much…D!
How did you figure the math of your squares? My walls are measuring not exact inches like 96 1/4 inch one way and an additional quarter inch the other way too.
Looks great! What size is the MDF? You mentioned 3″ boards but are they 1″ or 1/2″ deep.
Thank you! It’s actually about 5/8″ deep.
Sara, on one of the pictures (#8) you’re showing a piece of wood being added to the top and bottom of the square. You mentioned that you kept doing this, but somehow I don’t see that the final result have the added wood. It seems like the additional piece of wood on top and bottom would make the squares smaller but looks awesome too.
I hope my question makes sense and I can understand better how to do this so I can feel confident doing it for one of our guest bedrooms.
Those added pieces were just spacers. So, we would place them there to make sure every box was the same size, but they were not nailed in and we just popped them out as we moved around the grid. I hope that helps!!
Oh got it! Yes this helps a lot! Thank you!
Awesome room! How do you have the art work hung on the wall?
Thank you! I actually used monkey hooks since they stick out a bit further, and allowed enough space to hang 🙂
Are the walls smooth? We have textured walls….will that work for the Board and Batten look?
Yes, our walls are smooth. And technically it will work (you may just have to do a little more caulking). You will just need to realize each of the squares will be textured. Another method I’ve seen if you prefer it all smooth is to first hang smooth wood sheets on your walls and then apply the board and batten over it. An alternative would be to hang the board and batten and then cut individual sheets of smooth wood and insert them afterwards. It’s just a matter of personal preference. I hope that helps!
Excellent tutorial, thank you! Just curious, what kind of tool did you use to cut the boards? Thanks for sharing your talent 🙂
Thank you! We just used a miter saw to cut the boards 🙂
See-you did this 4 years ago and I’m just seeing it today and it’s exactly what I want to do in my master bedroom. Excellent tutorial! Heading to Lowes.
Thanks so much! Good luck on your project!
Looks great! I have all the boards nailed up and ready to paint. I understand that you caulked the edges where they hit the wall and ceiling but did you caulk where the boards that cut in met the other two boards? Also, did you caulk the inside of each square where the board meets the wall, or did you only caulk the outer edges where the frame met the walls and ceiling?
Yes! I basically caulked every seam on the entire wall. Basically every edge around every board. It was time consuming, but made a huge difference in the overall look!
Love this idea and want to try it in our master bedroom. You mentioned you painted the wall with two coats of paint. Did you paint with one coat, then hang the board and then add the second coat of paint all over? Or did the wall have two coats of paint, hang the boards, and then add a third coat of paint? Thanks for the help!
I’ve actually done it both times. Once the wall was painted first (and then I still did another coat once the boards were on) and another I did everything all at once. I do feel like it’s easier if the walls have at least one coat first!
Hi! I LOVE this and am in the process of getting ready to install it in our nursery. Following your tutorial above! Quick question where did you get the 3” MDF boards from? I am seeing them at Home Depot but they are saying the “actual size” is 2.5” – are those the ones you used? Thanks!
Thank you! We got all of our boards at Lowe’s 🙂
Another blogger forwarded me your like with this tutorial. Sounds like you cut your boards on site and you mentioned using a mitre saw. I am assuming you used it for the corners. Did you cut the vertical boards on site or did you have Lowe’s cut them at the store? Would you recommend a project like this for someone like me who only owns a hacksaw? Didn’t know if Lowe’s would cut boards to your measurements at the store?
Hi!
I’d like to do this in my similarly sized guest bedroom. I also see that you have the same issue I have, which is a slightly off center bed, to accommodate the door opening. Did you get lucky with the bed centering on the wall, or did you plan the size of the verticals (etc) to balance out and allow you to center the bed on that vertical?. I’m very acutely aware of balance in spaces and I feel like the combination of a slightly off center bed with a headboard that doesn’t center on the vertical board would give me anxiety lol. How did you arrive at your measurements?.
Thanks!
Michael
Couple of questions please. What type of nail gun dod you use and size nails? Also, were the boards you used square edged or slightly rounded over? If rounded over, how did you address where the boards intersected as the rounding over would seem to leave a very small groove.
Thanks!
Mike C